Excellent software and practical tutorials
Cross-border e-commerce sellers build their own Shopify independent website
Shopify Equivalent to oneE-commerce Platform, similar to AmazonShop, but you can bind your own top-level domain name and have your own independent template. Shopify, those who do traditional foreign trade may not know it, but those who do cross-border e-commerce should have heard of this name. This can be said to be the world's most famous SaaS online e-commerce website building platform! Shopify independent station is a personal store that can be bound to a top-level domain name.
What is Shopify?
Shopify Inc. is a Canadian multinational e-commerce company headquartered in Ottawa, Ontario. Shopify is also the name of the company's e-commerce platform. Shopify provides a full range of services for online retailers, includingPayment, marketing, shipping, and customer engagement tools to make it easier for small merchants to open an online store."
Shopify is a popular e-commerce platform designed to help businesses and individuals quickly build, operate and manage their online stores. It provides a full range of tools and services that enable users to easily create and design their websites, add and manageproduct, processing payments andtransport, and use a variety of marketing and sales tools toPromotiontheir business.
Main functions and features
User-friendly interface: Shopify provides a simple and intuitive interface, no programming knowledge is required, and users can easily create and design their online stores.
Variousthemeand templates: The platform provides a variety of themes and templates, and users can customize them according to their brand image and needs.Custom.
Product Management: Users can easily add, edit and manage products, including setting prices, inventory, product descriptions and images, etc.
Payment Processing: Shopify supports multiple payment methods, including credit cards, PayPal, etc., ensuring that users can conduct transactions safely and conveniently.
Delivery Management: The platform provides flexible shipping options, and users can set different shipping methods and fees to meet various customer needs.
Marketing and SEO Tools:Shopify provides a variety of marketing tools, such as discount codes, email marketing,SEO Optimizationetc., to help users increase sales and increase website traffic.
Multi-channel sales: Users can sync products to other sales channels through Shopify, such as Facebook, Instagram, Amazon, etc., to expand their sales scope.
Analytics and Reporting:The platform provides detailedData analysisand reports, users can monitor sales, traffic sources and customer behavior in real time,optimizationOperational strategy.
Application Market:Shopify has a huge application market, and users can install various application extensions as needed to further enhance the functions and performance of the store.
What are the requirements for building a Shopify independent station?
To build a Shopify website, I recommend you firstregisterA company will be very convenient in many aspects. Now the threshold for registering a company is not high. So what are the specific things needed to build a Shopify website:
- A top-level domain, preferably with a .com suffix
- There are payment methods such as PayPal, but they require a corporate account, so you must have a company. Other methods also require company qualifications to receive payments. It is not recommended to use Hong Kong Paypal. In addition to PayPal's fixed transaction fee, it also requires a 2.5% currency exchange rate conversion fee. However, if you have a Hong Kong company, you can open Stripe credit card payment, which is very good.
- A credit card that supports foreign currency
- A theme. Although Shopify officially provides free themes, their functions are limited. It is recommended that you purchase a paid theme. Please go to Themeforest to buy one, which is more cost-effective. The paid themes on Shopify's official website start at a minimum of US$160.
- Products, sources of supply.
For the start-up, you can build a website with these general preparations. Shopify will provide users with a 14-day trial, which is very user-friendly, because within 14 days, except for not being able to trade and launch the website, you can experience almost all functions, and you can terminate it at any time if you feel it is not suitable. Next, let's take a look at how to use Shopify to build a website.
How to Get Started with Shopify
registeraccount: Visit Shopify official website (Shopify) and register an account to enjoy a 14-day free trial.
Choose a Theme and Template: Choose a suitable theme according to your needs and brand image and customize it.
Add products: Enter the backend and add productsinformation, including name, description, price, inventory and pictures.
Set up payment and shipping: Configure payment methods and shipping options to ensure your customers can complete their purchases smoothly.
Custom domain name: Bind a custom domain name to make your store more professional and brand-recognizable.
releaseand promotion: Once everything is set up, publish your online store and promote it using the marketing tools provided by Shopify.
Continuous Optimization:Based on data analysis andCustomer feedback, constantly optimize stores, improve user experience and sales performance.
With Shopify, anyone can easily build and operate their own online store, start an e-commerce business, quickly enter the market and achieve sales goals.
E-commerce platform Shopify independent station, Shopify beginner tutorial
The following introduces how novice users can build their own Shopify independent station and build their own foreign trade website!
1. Register an account
Go Shopify Official website, normally, Shopify will automatically jump to the sub-site of the corresponding language according to your IP, but I think English is not a problem for most foreign trade people, so I still mainly use English to build the website. If you really have difficulty with the language, you can switch to Chinese. You should know that Chinese has only been available in the last one or two years, and there are still some imperfections, but of course it does not affect the trial.
On the official website homepage, add your email address or click on the upper right cornerStart Free Trail

There are roughly two steps next. Because Shopify often adjusts this step, sometimes you may see the content of this article is different, but it does not affect the subsequent website building steps. This process is actually a process of registering an account:
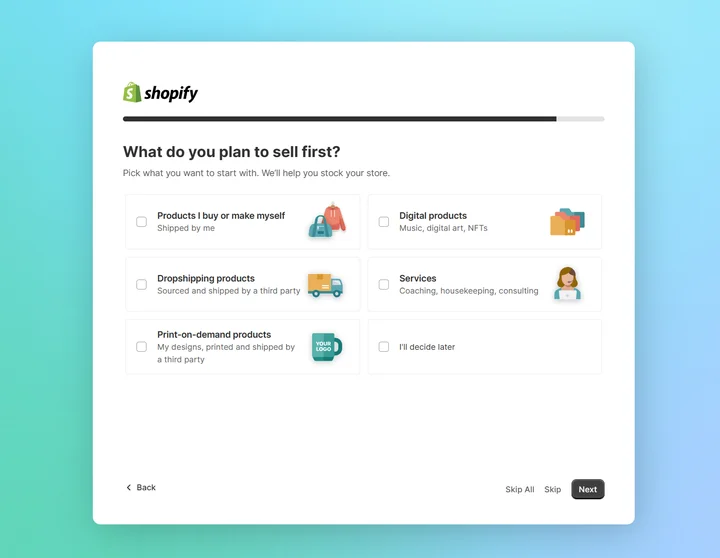
- Ask about your current online e-commerce business. You can skip this step or fill it out according to the actual situation.
- Then you are asked to determine the store region. Different regions may have different functions. If conditions permit, the United States is the best, because it has complete functions, such as connecting with certain social platforms, which is very convenient. If not, it is better to choose China. Next, you need to create an account, enter the account password, record the password, and then click the Create your Store button. Next, you will enter your contact information and store address in the store settings. This step is essential. Please fill in according to the actual situation. After filling in, clickEnter my Store.
2. Start trial
Because this article was written before Shopify changed its subscription method, you may still see words like 14-day trial period in it, but other content will not be affected.
After entering the store, the backend operation page is as shown below. It is still fresh and clean, giving people a very comfortable feeling. However, I didn't set it up for two days when I registered, so there is only a 12-day trial period, but it is enough.
*The latest policy is that no matter how many days of free trial the official gives, you can usually buy at least one month of trial for $1. Sometimes this paid trial period can last for 3 months, but the official policy changes frequently, so please check their official website for details.
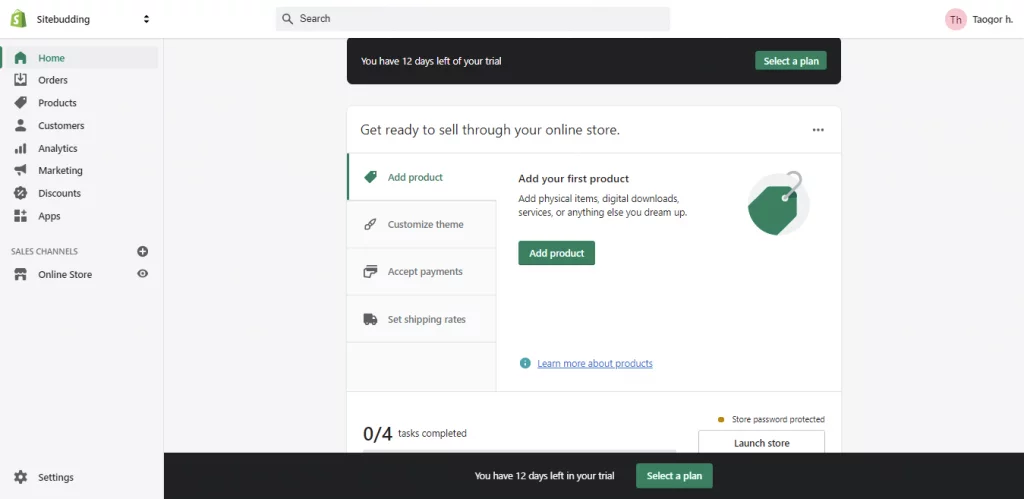
The homepage of the background gives you a lot of guidance, telling you what steps you need to complete before you can publish the website. However, the first step is not to set up the website, but to set up your own account, mainly to authenticate the email address. This is very necessary, and a lot of subsequent work will require the use of email addresses. You can enter the account settings in the upper left and right corners of the picture above.
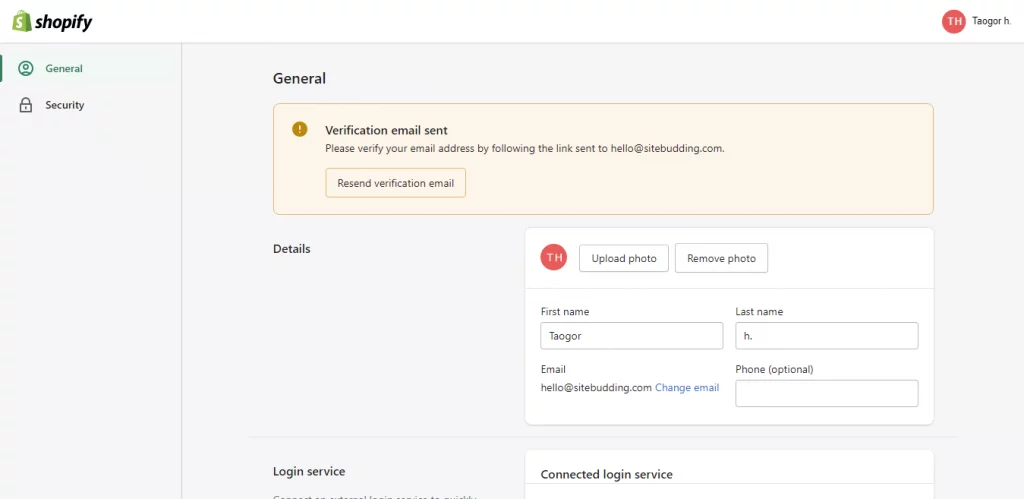
There are two items in total:
- General – General settings, mainly to send a verification email to your mailbox, and then you can modify other settings
- Security – Change your password, double security login, and add a secondary email address, depending on your needs.
After verifying your email address, you can actually start trying Shopify. Go back to the homepage of the store. To make the website online, there are at least four basic steps: adding products, customizing the theme, setting payment methods and logistics shipping costs. The actual settings are slightly modified. First set the theme Customize Theme.
3. Theme settings
A Shopify store requires a theme template before the website can be used. You can enter the theme settings from the homepage novice page>customize theme, or you can enter the theme settings from online Store>Themes in the left menu.
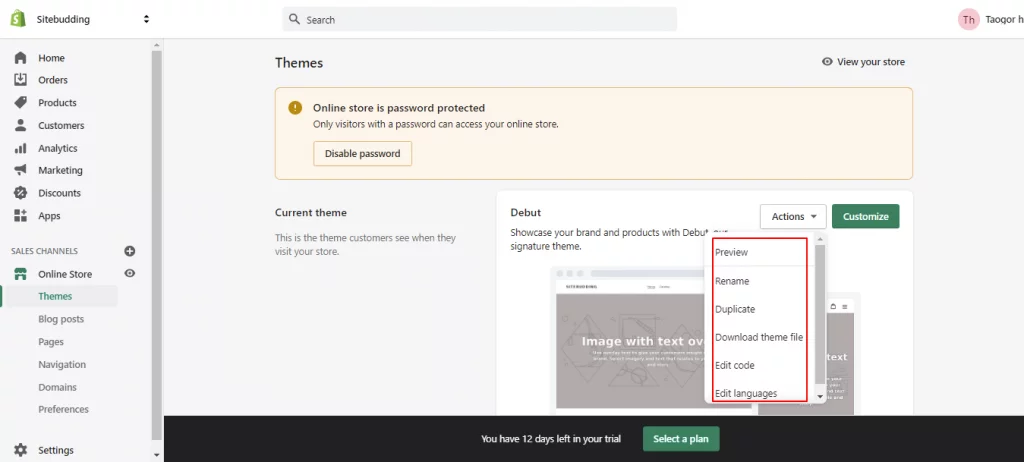
The above is the theme page. Since I haven’t selected any package yet, the trial phase is password protected, but you can set it up for use.
1. Select a theme. The default theme is called Debut. You can rename the theme, copy the theme, download the theme file, edit the code, edit the language, and preview the theme through Actions. Of course, the most important thing is that you can customize the theme through Customize.
2. Is there only one theme? Of course not. Scroll down and you can see the online store score (it actually has this, just like Android phones, I'll run a score if you don't agree). You need to purchase a package to see this. Then there is the theme library, which has free and paid ones. The paid ones start at US$160, which is really expensive. You can try the free one at the beginning, but the functions are simple, but it is enough for basic sales. However, I suggest you buy a feature-rich theme from a third-party platform.
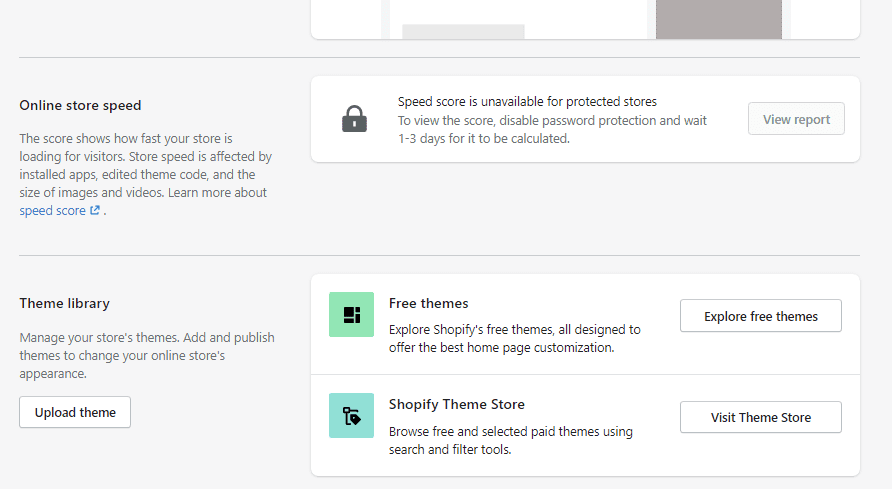
3. Where can you buy third-party themes? I provide two places for you to choose from.

Themeforest
The world's largest theme template mall, providing templates and plug-ins for almost all types of website building methods

Template Monster
Another well-known theme template mall, which also provides templates and plug-ins for all types of website building. The themes are only allowed to be sold after manual review.
But with so many themes, you may not know which one is good. One of my previous stores used a theme calledEllaThis theme is quite famous among domestic users. It should be said that this theme comes with more than 10 homepage styles and more than 10 sub-themes for different product industries. You can find their templates for almost any industry.

4. After purchasing the theme, you need to download it, which is quite large. Select All files & Documentation to download it. Some themes may require an activation code when used, and you also need to download the purchase code here. However, Ella does not require it, so you only need to download the files and documents. The actual theme is not very large, but because it contains many sub-themes and usage documents, it is relatively large.

After downloading, you need to unzip it and enter the unzipped folder ella-package-UnZip-Me. Then there will be more than ten folders. Each folder is equivalent to an independent theme. You can refer to their theme preview and select the .zip file you need.
5. Upload the theme. In the picture above, there is a button Upload theme under Theme library. For example, I chose the template TEA. The actual name is Tea-1.0.0-sections-ready.zip, which is only 1.3MB. However, if you don’t download the entire folder, you can’t extract this theme. After uploading:
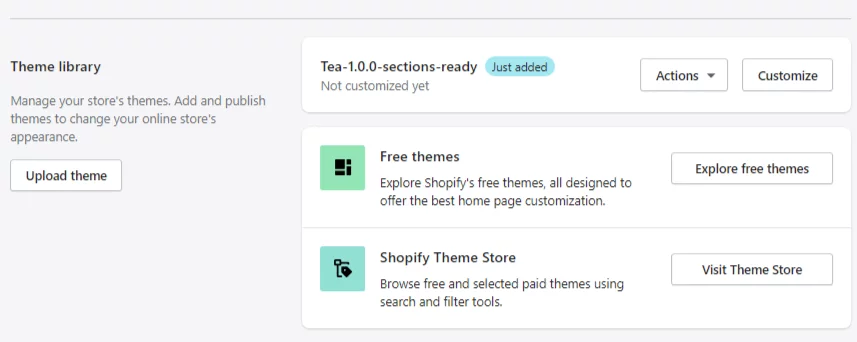
6. Because you haven't subscribed to a package, you can't change this theme to the current theme for now, but you can still customize and preview it:
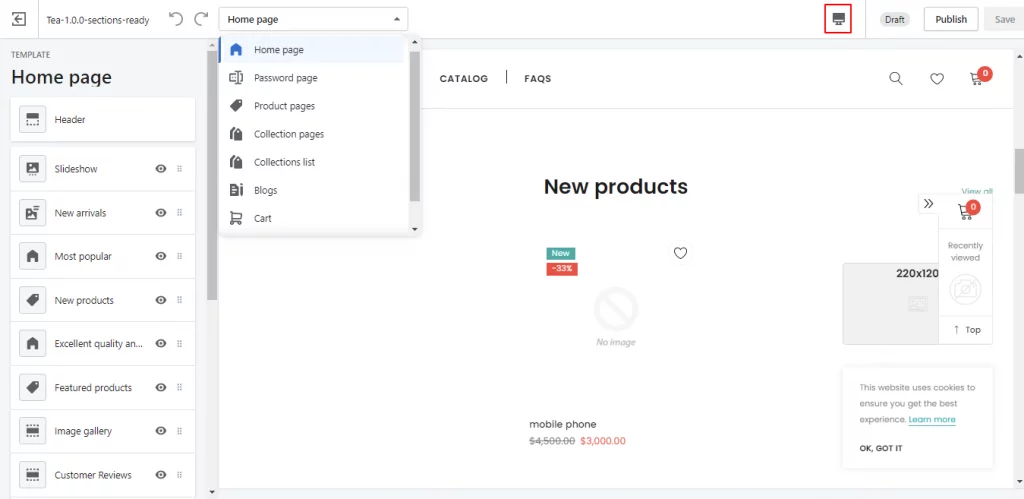
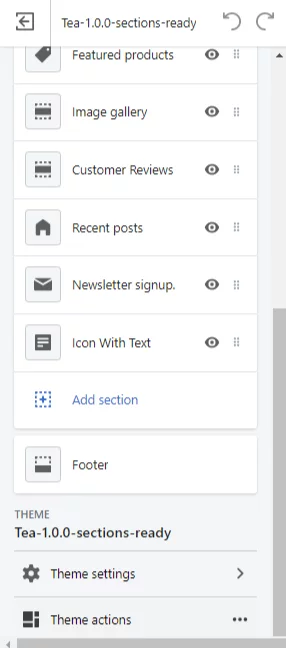
Because the screen height is limited, the menu on the left cannot be displayed on one page. Please see the right picture above. In the custom theme
- You can set different pages, not just the home page.
- You can also change the screen preview size as shown in the red box on the small computer button
- Set the header, each part of the page (the homepage can have up to 10 parts), and the footer
- Theme Settings – including colors, fonts, currency, language, etc.
- Theme Action – Just like the Action on the theme selection page in the previous picture, you can change the name of the theme, edit the code, change the language, preview, etc.
7. Please modify the specific settings according to your needs. Each theme has a slightly different settings page. Save everything after setting it up, and then view the website in the preview in Theme Action.
After setting up the theme, it is not a one-time setup. You will definitely need to make some updates after uploading the product. Next, you can add some pages. Go to the online store>Pages on the left menu to enter the add page. For what pages you need to add, please see: A complete foreign tradeIndependent websiteA required page. There are many sub-menus in the online store, let’s take a look:
- Blog Posts – You can add blog posts
- Navgation – This is the menu setting. This step will also have this setting in the header setting of the theme settings
- Domain
- Preferences – Basic store settings including store name, secondary name, brief introduction, Google analytics, password protection, etc.
4. Add products
Now you can add a product and try it out with the theme.
* Go to Add Products on the homepage, or Products>All Products>Add Product on the left as shown below. You can see that I have added a product.
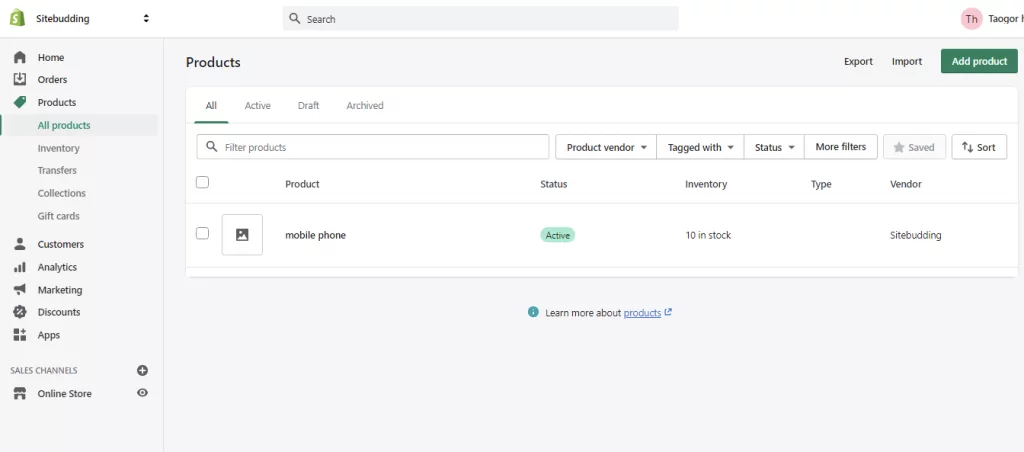
First, take a look at the submenus under the Products menu on the left:
- All Products – All products. You can add, delete and manage products from here.
- Inventory
- Transfer – This is the area where you manage the goods you receive from suppliers.
- Collections – This is a product classification, but it is different from a normal product catalog.
- Gift Cards
* Enter the product adding page. There are still many places that need to be set for new products.
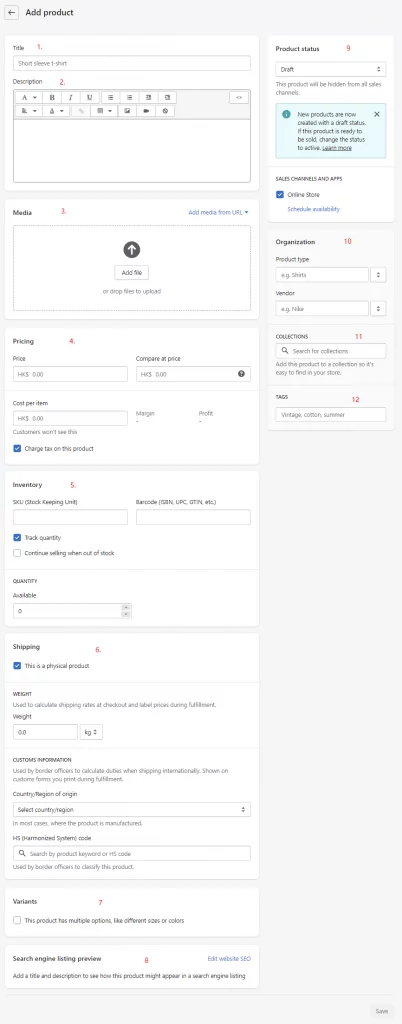
In the order marked in the figure:
- title
- describe
- picture
- Price – includes the sales price and the comparison price (this is equivalent to the original price being marked up and the sales price being marked down, which acts like a discount)
- Inventory – You can set sku, barcode, etc., the quantity of each sku
- Shipping – weight, origin, customs code
- Variants – There are different sizes and colors that can be added. This variant adding mode is the most comfortable for me in all e-commerce systems except AliExpress. New friends of Amazon may be troubled. After adding a variant, the price column will become each set price, add variant pictures, this operation can be batch
- SEO optimization – mainly gives you a preview of the search engine display effect
- Product status – Draft or online activation. You can add sales channels such as Amazon, Facebook, etc. To add channels, please go to SALES CHANNELS in the left menu of the homepage. The channels allowed in each region are different. Although you can change the store address to open the channel, it is not recommended.
- Product organization includes type and whether the product is a brand and which brand
- Product categories. As mentioned above, you can set categories in Product > Collections. Adding products can add products to the corresponding categories.
- Product tags are similar to categories, but can be added at any time.
* After adding all the information, click Save in the lower right corner to save the product, and click Preview in the upper right corner to preview the product. For products of the same type, you can click Duplicate to directly copy and change the corresponding content.
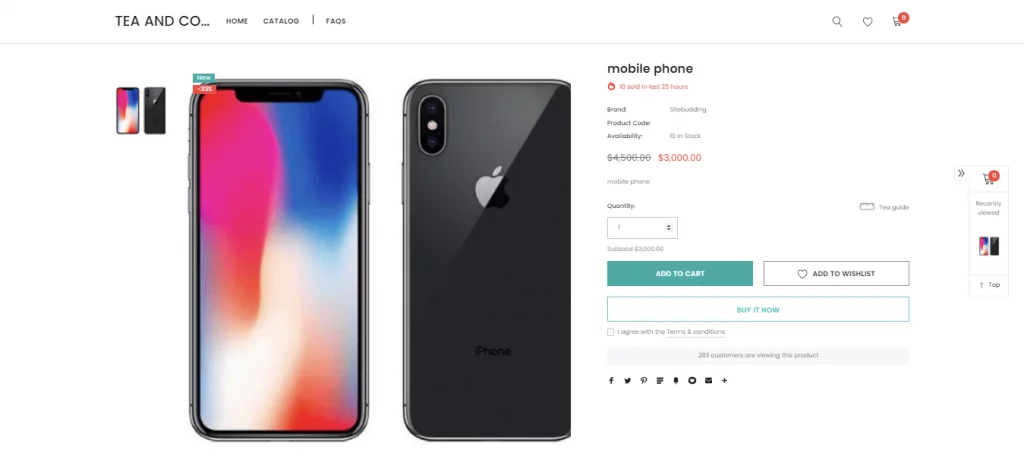
Above is the product detail page.
5. Payment settings
After adding the product, we can add the payment method.
Directly from the home pageGet ready to sell through your online store>Accept Payments>Set up Payments Enter the payment settings, or you can enter the settings through the settings in the lower left corner. Shopify provides a wide range of payment methods.
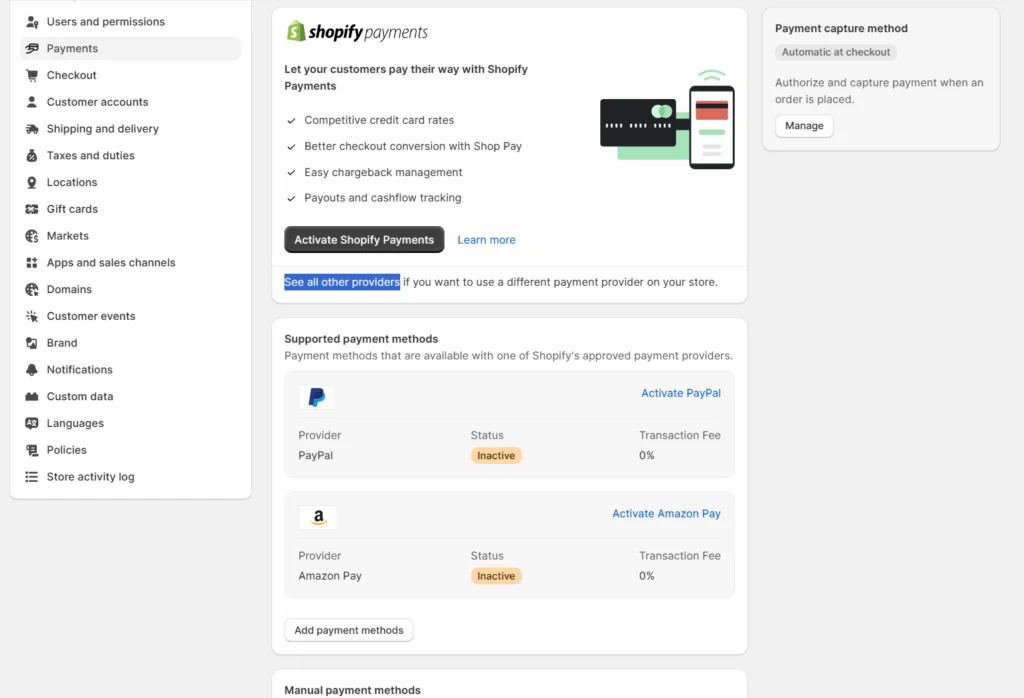
Let’s look at each one in detail:
- Shopify Payments – The address I set here is in Hong Kong, so there is a ShopifyPayments. There is no such thing when choosing mainland China, because this payment method does not support mainland China, but there is no Stripe payment method in Hong Kong. In fact, ShopifyPayments actually uses Stripe’s payment gateway, but if you use ShopifyPayments, you don’t need to pay the order transaction fee. If I have to say one thing, don’t force the payment method. You must choose a method that is easy for you to deposit into your account. Most of them require you to pay the order transaction fee (2% or less).
- If you have a Hong Kong identity, you can be a company and click complete account setup to complete the setup of Shopify Payments.
- Payout means the money has been paid back.
- PayPal - Needless to say, the most popular payment method requires the enterprise version in mainland China. The enterprise version in Hong Kong does not require uploading documents for certification for the time being, but I think it is a matter of time, and the exchange rate of Hong Kong's PayPal is 2.5%, which is clear that you should not use Hong Kong PayPal, otherwise you will have to pay.
- Third-party payment methods – Third-party payment providers/See all other providers. Here, all the third-party payment methods available locally are listed according to the location of your store. The main ones suitable for users in mainland China are PingPong, 2Checkout, and some others. You can also use them as long as you have the conditions.
- Alternative payment methods - Alternative payment methods, which mainly include payment methods for some regions and local users, such as Alipay and WeChat in China, EBANX in Latin America, EXIMBAY in South Korea, etc.
- Manual payment method – Manual payment methods
- Custom payment methods, such as Western Union
- Bank Payment
- Cash Transactions
- Cash on delivery
As for payment methods, there are really limited good payment methods for domestic users, and the fees for various payment methods are very high. One or two main ones are enough. In the end, it depends on your conditions. At the beginning, you can set up Sandbox mode for testing.
Finally, there is a payment method, automatic or manual. I think everyone will choose automatic, of course, special circumstances are another matter. After setting it up, click the save button at the bottom to save it.
6. Set Shipping Rates
Also through the home pageGet ready to sell through your online store>Set Shipping Rats, enter the logistics and freight settings as shown below. The transportation settings are divided into four major items:
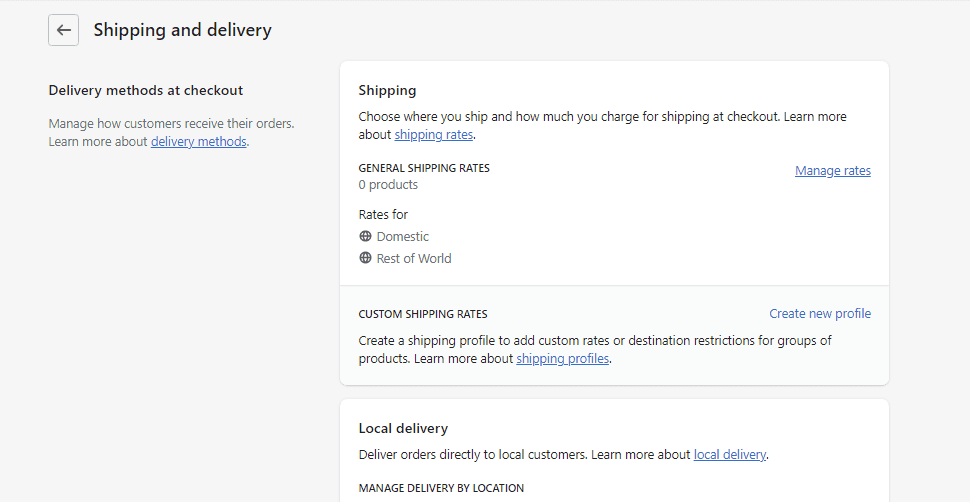
Delivery methods at checkout
This is also the most important setting. Go to Shipping > GENERAL SHIPPING RATES to enter the general logistics fee, which is also the main logistics setting
1. ClickMange ratesThe top of the page shows the products that have been added. You can leave it unchanged. All the products you add in the future will be automatically displayed here. Then you can add the product shipping location from shipping from. If you do warehousing, you can have more than one shipping location, a warehousing address and a domestic shipping location.
2. Then set the shipping zone. You can add multiple shipping zones according to your needs. As shown in the figure below, click the Create Shipping zone button on the right side of Shipping to add a new North America zone:
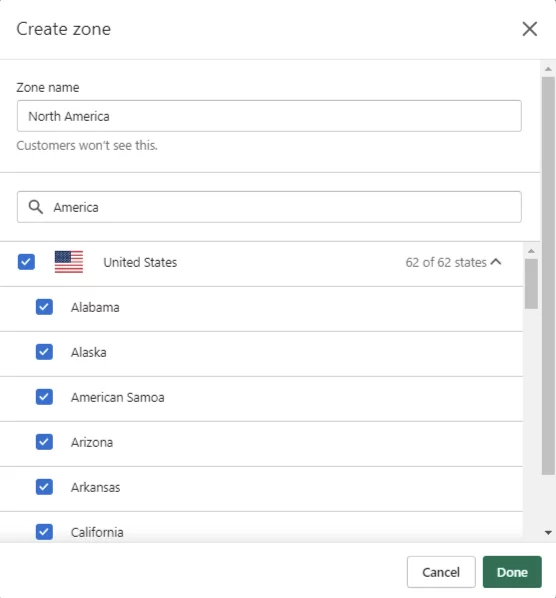
As shown in the figure, you can directly enter the region name or related words to search for the region, and then select the required region, which can be accurate to the state. After selecting, click done to successfully create it. The region has been created:
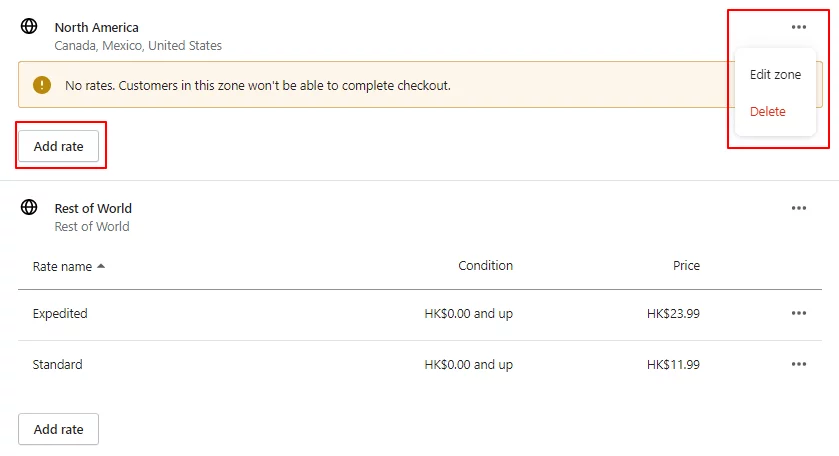
There is a More button on the right that allows you to edit or delete the area.
3. Next is to set the shipping rate. Click Add Rate.
- Set up your own rates
- Calculate the shipping rate according to the third-party shipper. Use carrier or app to calculate rates
If you use a third party, you need to add the third-party shipping company in Shipping and delivery>Accounts and integrations>Manage Integration. Here we take setting custom shipping rates as an example.
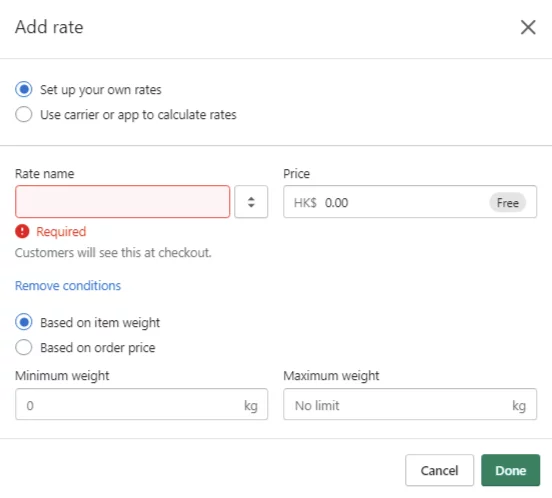
You need to set a fee name, which is actually the shipping method. You can enter one yourself or select one from the options. There are three preset options: Standard, Expedited, and Heavy Goods Shipping. Fill in the Price column according to the actual cost. Then add the basis for calculating the shipping fee, which can be calculated based on weight or order amount. Fill it out according to your needs and save it.
Use the same method to add other areas and save them.
4. Click save at the bottom of the shipping area page to save the entire GENERAL SHIPPING RATES, and the basic shipping fee settings are completed.
If you need to add specific shipping rates to similar products in bulk, such as large and small products in the same category, you can set higher shipping rates for large products in bulk. You can create a new shipping profile through CUSTOM SHIPPING RATES, which is similar to WooCommerce shipping classes.
Local delivery and Local pickup
Local delivery and local pickup, these two need to be set up by friends who do warehousing, but you need at least two addresses. Go to Settings>Locations>Add Location in the lower left corner of the backend homepage. After setting the address, select the default shipping address, and then come back here to set the local delivery fee.
Please set the specific shipping fee according to the actual shipping fee.
Packages & Packing slips
Cargo packaging and packing lists are actually helpful for freight calculation and delivery, but if you have many types of products, you may need to set up multiple packaging types.
1. Click Packages>Add Package to add a package type:
- Boxes
- envelope
- Flexible packaging, such as plastic bags
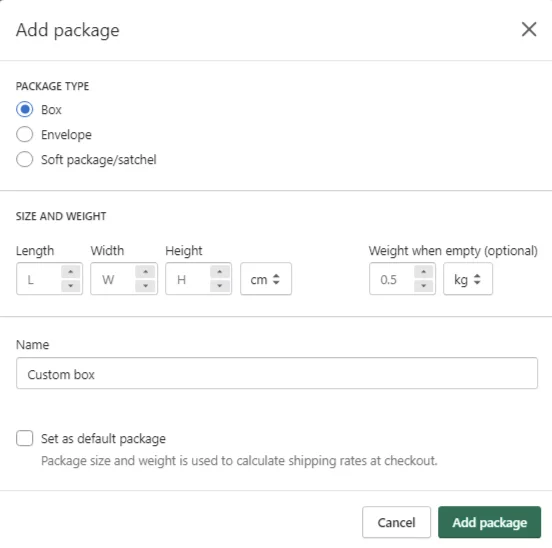
Fill in other actual sizes and click Add Package to add it. You can continue to add more packages.
2. Packages>Add Package, set the packing list. You don't need to modify it because you need to know some relevant codes. But you can click Edit and preview the packing list. Most logistics companies now make packing lists for you. If you think you can do it yourself, print it out and send it with the goods.
Accounts and integrations
This is to add third-party transport companies and fulfill order services, such as Fedex, DHL, etc., and then provide freight calculations according to their rates and complete the order through them. If you have relevant cooperation, you can add their cooperative accounts here. Then select the third-party shipper to calculate the freight in the transportation method step.
7. Choose a plan and more store settings
The picture below shows all the settings for the store. Not every item needs to be set because some have been filled in when you opened the account and some are the defaults. If you haven’t planned to launch the store yet, don’t consider purchasing a package yet. However, if you add a credit card and select the package you need to purchase, you have opened up all the links, and the store restrictions will basically be lifted, so you can sell products at any time.
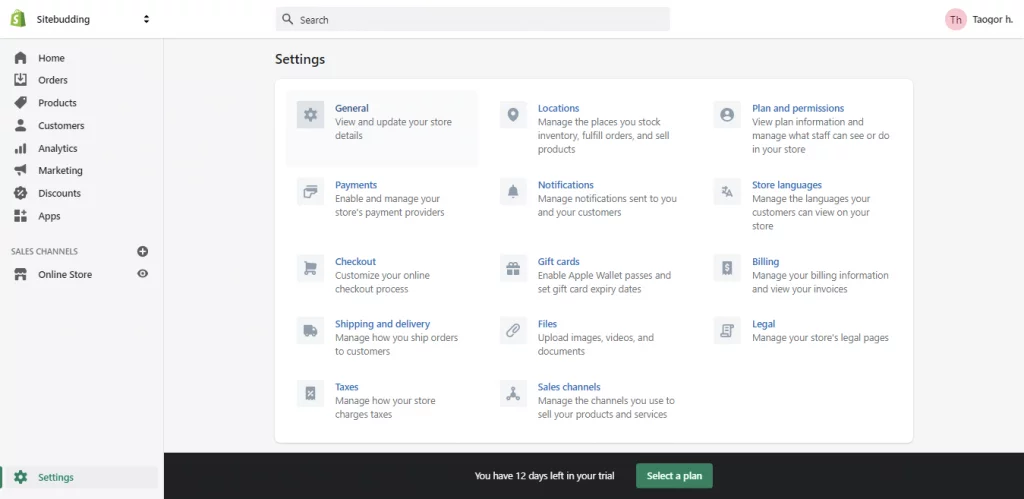
- General – General settings, which are your store name, email, address, product industry, time zone, scale, currency, etc., are basically filled in when you open the account
- Lcations – store location, warehouse location, multiple locations can be determined based on the package
- Plan and permissions – This is where you choose a package and buy it to start selling. There are three packages: $20, $49, and $299. You can also add employees, close accounts, etc.
- payments - detailed above
- Notification – Set how you want to receive store messages.
- Store Languages – Store language, Chinese is available, but most of them are machine translated
- Checkout – Checkout payment. There is one item that you should pay attention to: Customer accounts. Please select Accounts are optional. This means that customers can pay without registering an account. Please set the other items according to actual needs.
- Gift cards – This is set according to actual needs and can be skipped most of the time
- Blling – This is where you manage your credit cards and how much you need to pay to Shopify every month
- Shipping and delivery – detailed above
- Files – Upload media files, pictures, and videos for your store. You can upload them here and use them elsewhere.
- Legal – Make some policy descriptions of your store, such as privacy policy, refund policy, user terms. I think it is necessary to add each of these pages.
- Taxes – Set tax rates for different regions
- Sales Channels – You can add POS (Point of Sale), Facebook, Google, eBay, Amazon, etc. according to the region. POS is equivalent to the mode where we order food and pay after going to a restaurant.
After the setup is completed, your store is almost ready. Then add more products. Once you are sure to start selling, purchase a package. The basic package only costs $1/month for the first three months, a total of 3 US dollars.
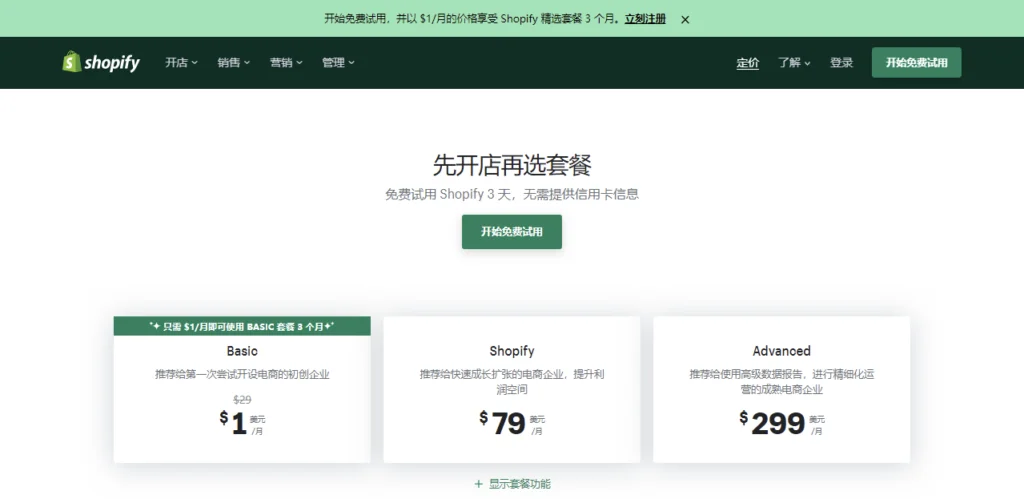
After that it’s $29, which is a very good price, and it’s like you can use it for 3 months for free.
8. Bind domain name
An independent website of course needs an independent domain name. After purchasing a package, you can add an independent domain name and bind the domain name from Online Store> Domain:
1. Buy a domain name. You can buy it from Shopify (it’s more expensive), or you can transfer an existing domain name, or you can directly connect to the existing domain name without transferring it.

2. Bind the domain name (resolve the domain name), click Connect existing domain. The following is one of my domain names. You can click Automatic Connection first, but please make sure that your domain name has not been resolved elsewhere. The best way is to enter your domain name provider's backend and delete all records.
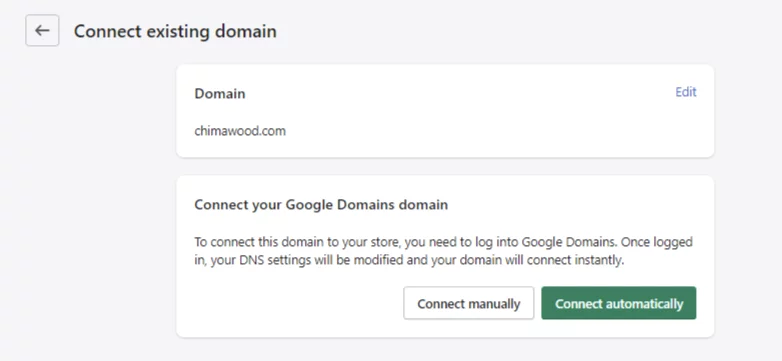
3. If you cannot connect automatically, manually bind the domain name, connect manually>Verify connection, if you still cannot connect, Shopify will give you the IP address, as shown in the pictureRequired IP addressThat's it.
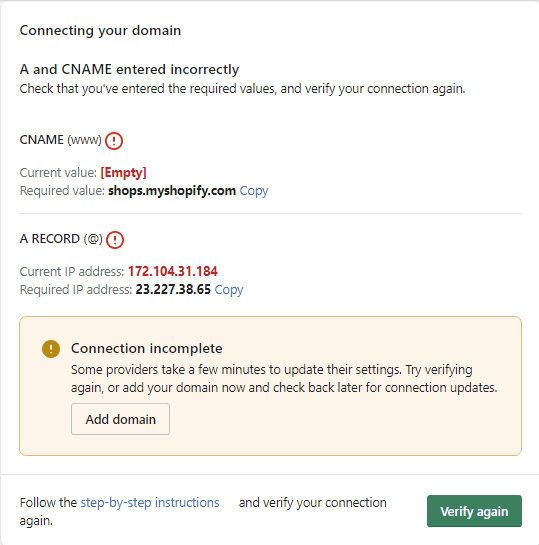
However, you need to add a CNAME record to resolve the domain name to Shopify, which is also explained in the article. After adding the domain name, the store is called an independent website.


