Excellent software and practical tutorials
A detailed guide to adding native CloudFlare DDNS functionality to your Synology NAS
Synology(Synology DSM) The system's native DDNS function does not support CloudFlare, but an open source script can be used to easily add CloudFlare as a DDNS provider, thus achievingDynamic DNS(DDNS), let your NAS automatically update the domain name record when the public IP changes. This is applicable to DSM 7.x and above, the operation is simple, but requiresSSH accessThe entire process does not require any third-party plugins and can be configured directly in the DSM DDNS interface. The following are the complete steps based on a reliable tutorial.
Prerequisites
- CloudFlare Account and Domain: Make sure you have a domain that has been added to CloudFlare and is using CloudFlare's NS servers.
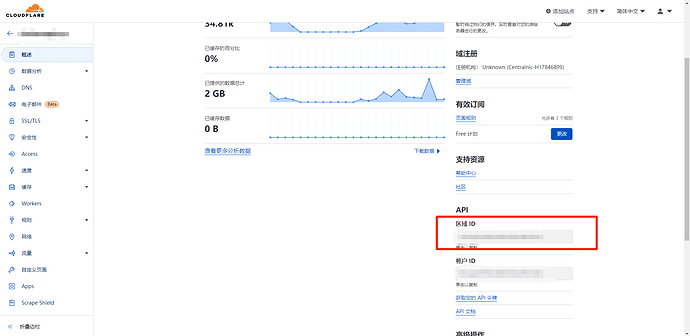
- GetZone ID: Log in to the CloudFlare dashboard, go to the domain overview page, and copy the "Zone ID" (also called the Zoom ID, usually a 32-digit hexadecimal string such as 023e105f4ecef8ad9ca31a8372d0c353).
- createAPI Token:
- access CloudFlare API Tokens page.
- Click Create Token and select the Edit zone DNS template.
- Set the permissions to default (Zone: DNS > Edit), and select "Include > Specific zone" (specify your domain name).
- After generating, copy the token (Note: the token can be retrieved in the "Deployments" section, but not in "API Keys").
- Enable Synology SSH:
- Go to DSM Control Panel > Terminal & SNMP > check "Enable SSH service" (default port is 22).
- Prepare an SSH tool, such as PuTTY, Xshell, or OpenSSH for Windows.
- Precautions: Back up NAS configuration; API Token must be kept confidential; it is recommended to create a subdomain for DDNS and add an A record in CloudFlare DNS (Proxy shutdown, that is, the orange cloud icon is gray). The initial IP address can be filled in arbitrarily.
Step 1: Install the script via SSH
- Use SSH to connect to the NAS:
- Host: NAS IP address, Port: 22.
- Username: your DSM administrator account, Password: your DSM login password.
- After logging in, the prompt is such as admin@NASName:~$.
- Switch to the root user:
- Enter sudo -i (or su root), and then enter the administrator password (no characters are displayed during input).
- After success, the prompt changes to root@NASName:~#.
- Download and install the script:
- Run the following command to download the script (this is an open sourceCloudFlare DDNSInstallation script):
curl -L https://raw.githubusercontent.com/timothymiller/synology-cloudflare-ddns/master/cloudflare.sh -o /sbin/cloudflare
- If the download fails or you get an HTTP error, try modifying the script (use vi /sbin/cloudflare to edit line 6 and change proxy="true" to proxy="false").
- Grant execute permissions:
chmod +x /sbin/cloudflare
- Run the script to add CloudFlare to the DDNS list:
/sbin/cloudflare
The script will automatically detect and add CloudFlare as a provider and restart the DDNS service (this may take several minutes to take effect).
- Run the following command to download the script (this is an open sourceCloudFlare DDNSInstallation script):
- Exit root and SSH:
- Enter exit to exit root, and then exit to exit SSH.
warnThe script will modify system files (such as /etc.defaults/ddns_provider.conf) during execution. This may be overwritten by a DSM upgrade. It is recommended to back up /etc/ddns_provider.conf before upgrading. If the script reports an error, check your network connection or manually download and paste the script.
Step 2: Configure DDNS in DSM
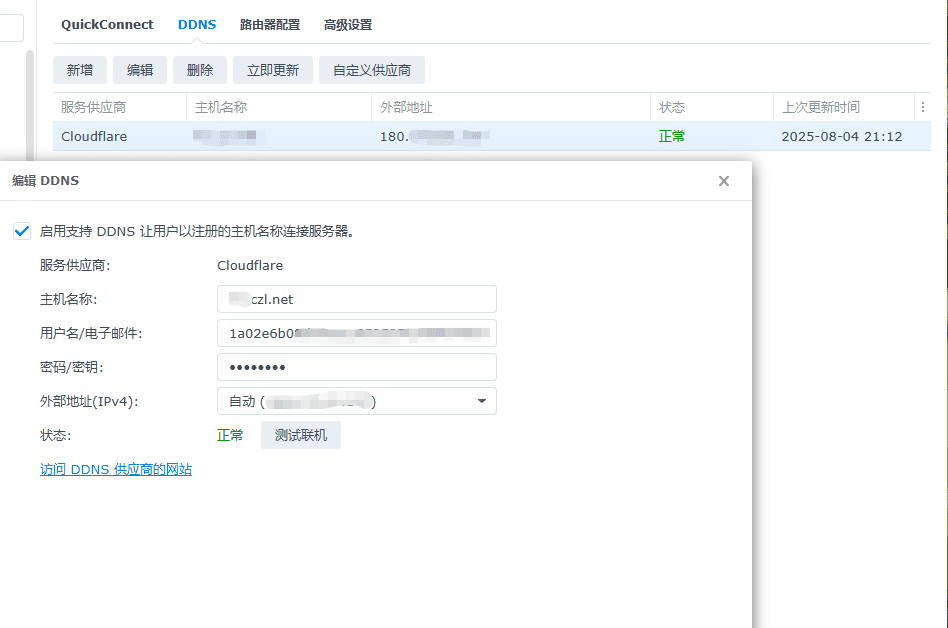
- Open DSM Control Panel > External Access > DDNS.
- Click the Add button.
- Fill in the configuration:
- Service Providers: Select "CloudFlare" (will appear after the script is added).
- Hostname: Enter your subdomain (e.g. nas.example.com) and make sure the corresponding A record has been added in CloudFlare DNS (with proxy turned off).
- Username/Email: Paste the Zone ID.
- Password/Key: Paste the API Token.
- External Address: Select "Use current IP address" or "Automatically".
- Click "Test Connection" to verify (it should say "Connection Successful").
- Click Apply to save and activate.
Step 3: Verify and test
- Check on the CloudFlare DNS page whether the A record IP of the subdomain is updated to your public IP (use curl ifconfig.me to check the current IP).
- External access test: Use a browser to access http://nas.example.com:5000 (DSM default port). You should see the DSM login page.
- IP change test: Simulate an IP change (or wait for the operator to restart), and check after a few minutes whether the record is updated.
Frequently Asked Questions and Notes
- Script failure: If the DSM version update causes the script to become invalid, re-run the installation command or refer to the GitHub repository timothymiller/synology-cloudflare-ddns renew.
- Proxy Problem: CloudFlare proxy (Orange Cloud) will hide the real IP and is not suitable for DDNS; it must be turned off.
- Security: The API Token is limited to DNS editing permissions. If you have multiple domain names, create a dedicated Token.
- Alternative methodIf you don't want to use scripts, you can use Docker to run the CloudFlare DDNS container, or a third-party provider like DNS-O-Matic, but native scripts are the simplest.
By following the above steps, you can implement native CloudFlare DDNS on Synology and enjoy free, reliable dynamic resolution. If you encounter specific errors, it is recommended to check the DSM log (Control Panel > Log Center).
Usage scenarios
I have an external network and a domain name, which is hosted on CloudFlare. I need DDNS resolution, but I don't want to use ddns-go.
How to use
Configure Synology
- SSH to Synology, switch to root user, and execute
wget https://mirror.czl.net/https://raw.githubusercontent.com/joshuaavalon/SynologyCloudflareDDNS/master/cloudflareddns.sh -O /sbin/cloudflareddns.sh
- Give the script permissions
chmod +x /sbin/cloudflareddns.sh
- Add cloudflare's ddns script to the Synology system and paste it first
cat >> /etc.defaults/ddns_provider.conf << EOFThen paste
[Cloudflare] modulepath=/sbin/cloudflareddns.sh queryurl=https://www.cloudflare.com website=https://www.cloudflare.comLast paste
EOFJust save it
Get Cloudflare parameters
- Get the region ID.

- Get editableDNS recordsAPI KEY

Setting up DDNS
- The host name is the secondary domain name to be set
- Username/email sectionRegion ID
- Password/Key FillAPI KEY
Save and enable.
