Excellent software and practical tutorials
What is Amazon Cloud AWS?
Amazon Cloud AWS Sign up now and get 12 months of free tier! Amazon Web Services (Amazon Amazon Web Services is a cloud computing platform created by Amazon Web Services, Inc., a subsidiary of Amazon. It provides a range of information technology infrastructure and application services such as storage, database, computing, machine learning, etc. to individuals, businesses and governments.
- AWS Amazon China is a professional big data, cloud computing service and cloud solution provider. AWS overseas cloud services help you achieve business expansion and growth.
- Register now and get 12 months of free package! Enterprise email and marketing services. Cloud database. GlobalCloud Server. Cloud storage S3.
- Global cloud servers, cloud databases, cloud storage, corporate email and marketing services.
Amazon Cloud Free Trial Zone
100+ cloud products free trial registration account,Enjoy 12 months free!
Global Amazon Cloud Free Cloud Servers
Cloud Server EC2 12 Months Free VPS 1 Core 2G 60GB 3 Months Free!
Amazon Web Services
0 yuan trial, supports 25 users, 50G storage each, 62,000 group emails per month, free forever!
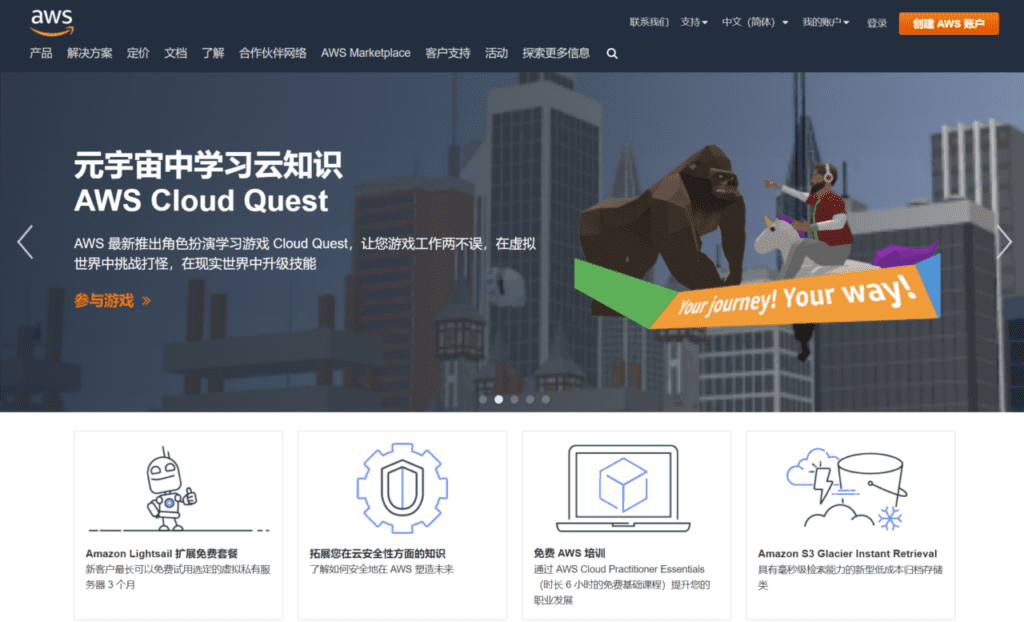
Free Amazon cloud hosting
AWS provides customers with free tiers for a variety of products and services. After registering an account, customers can try it for free for 12 months to help customers gain practical experience with AWS, explore more than 100 products, and start building on AWS using the free tier. There are three different types of free offers to choose from, depending on the product used.
AWS China official website: https://aws.amazon.com/cn/
Amazon Web Services official website: https://www.amazonaws.cn/
How to apply for freeAmazon Cloud Hosting,EnterAmazon official websiteAfter that, you can see that there is a free 12-monthAWS FreeCloud hosting services require a credit card to verify your account, which takes approximately1 USDAmazon charges based on traffic. If you don't exceed the limit, there will be no additional charge. If you exceed the limit, you will need to pay extra. If you choose an EC2 host that meets the free service, there will be no charge.
Preparation before applying for Amazon cloud hosting
- Prepare a visa or mastercard credit card, which will be used to complete the registration and authentication.
- An email address, it is recommended to use Gmail or a domestic email address.
- A mobile phone number that can receive text messages.
Amazon cloud hosting free application steps
first step,accessAmazon Cloud RegistrationApplication page,Amazon AWS overseas account free package,https://aws.amazon.com/cn/free/
Click the orange button on the page.Create an account for free!

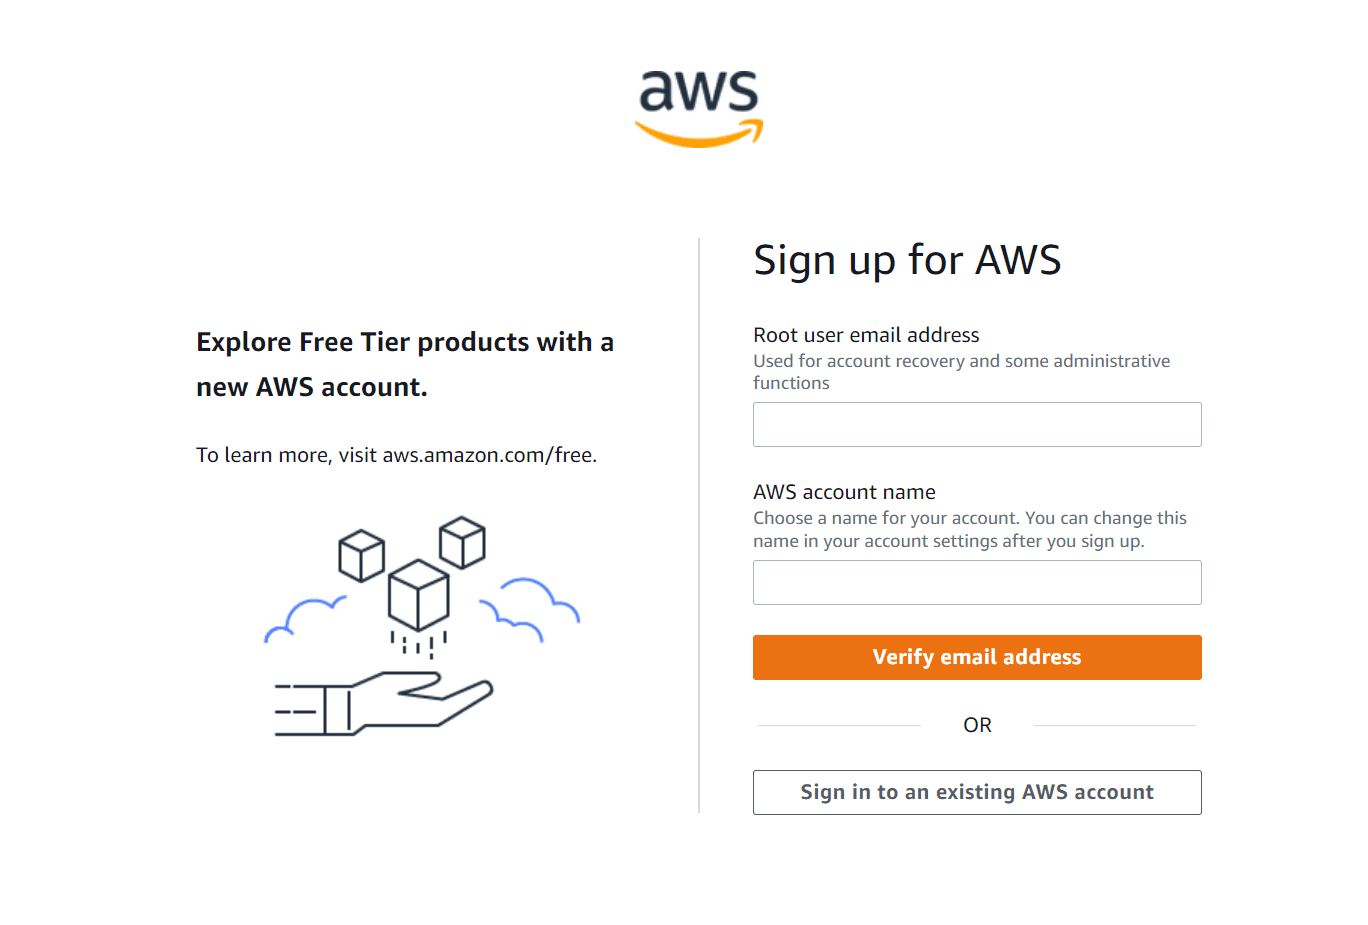
Step 2, fill in the registration information, fill in your email address in the upper email column, you need a real email address, it is recommended to use Gmail, and fill in a custom AWS account name in the lower column. Then click the orange button below,Verify Email.
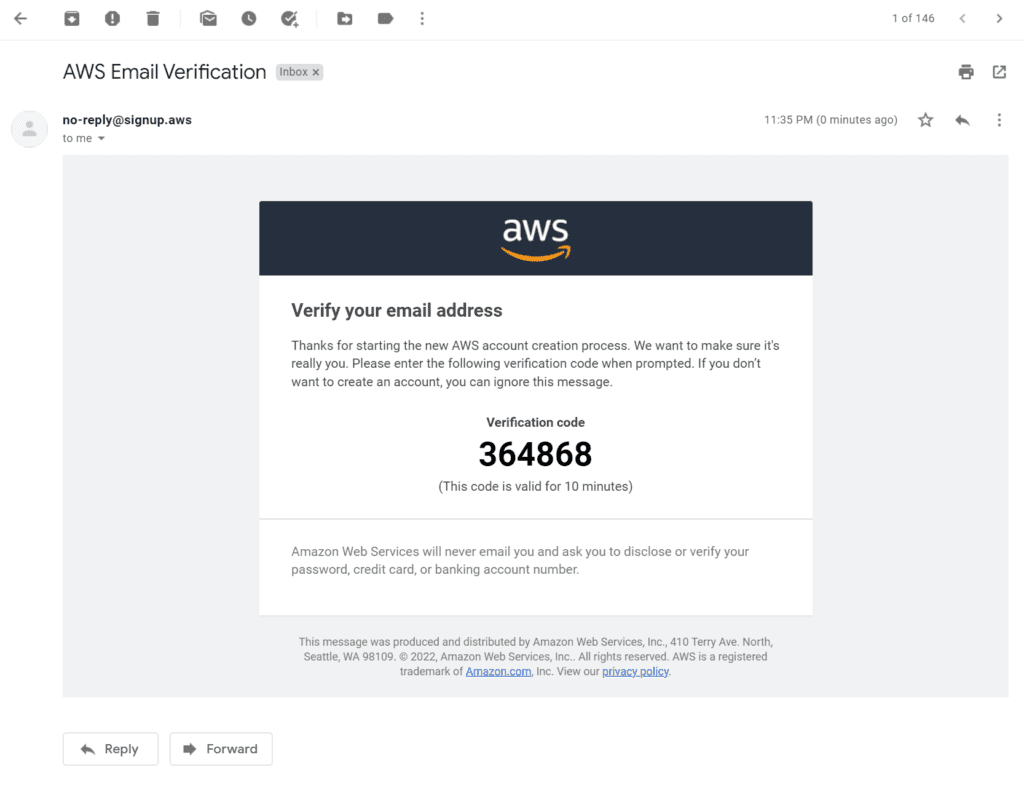
Step 3, access your email to get the verification code, then fill in the verification code on the registration page, clickverify! You need to turn off the translation function of your browser when submitting the verification code, otherwise it will prompt that the verification failed.

Step 4,Set password, the password requires uppercase and lowercase letters + numbers + special characters. After entering the password, click Continue.
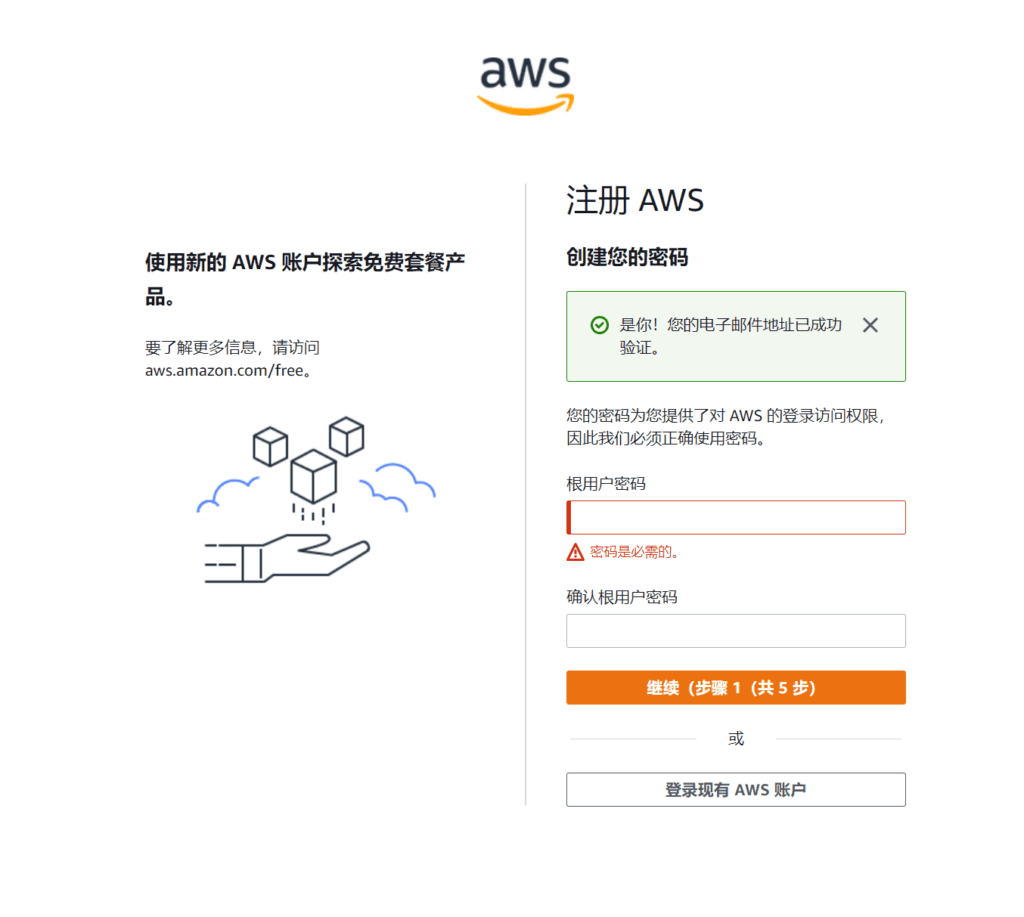
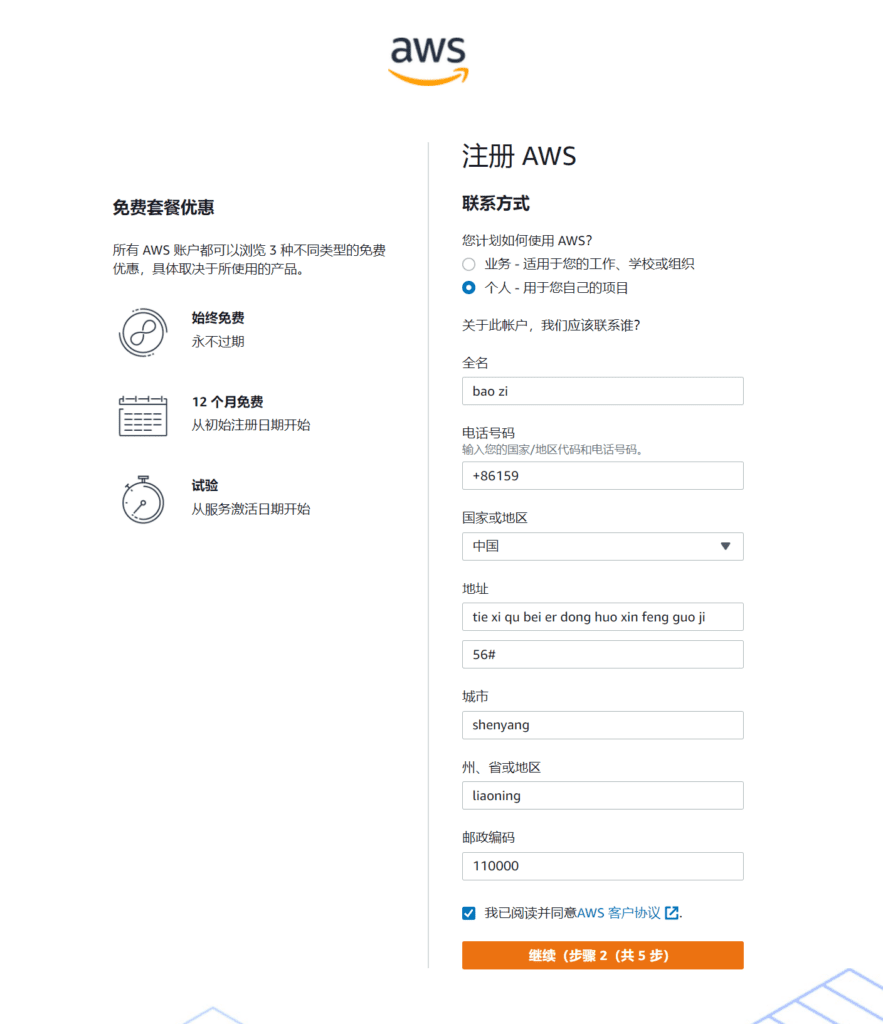
Step 5,Fill in contact information, try to fill in your real identity in the contact information, use pinyin or English, and do not use text.
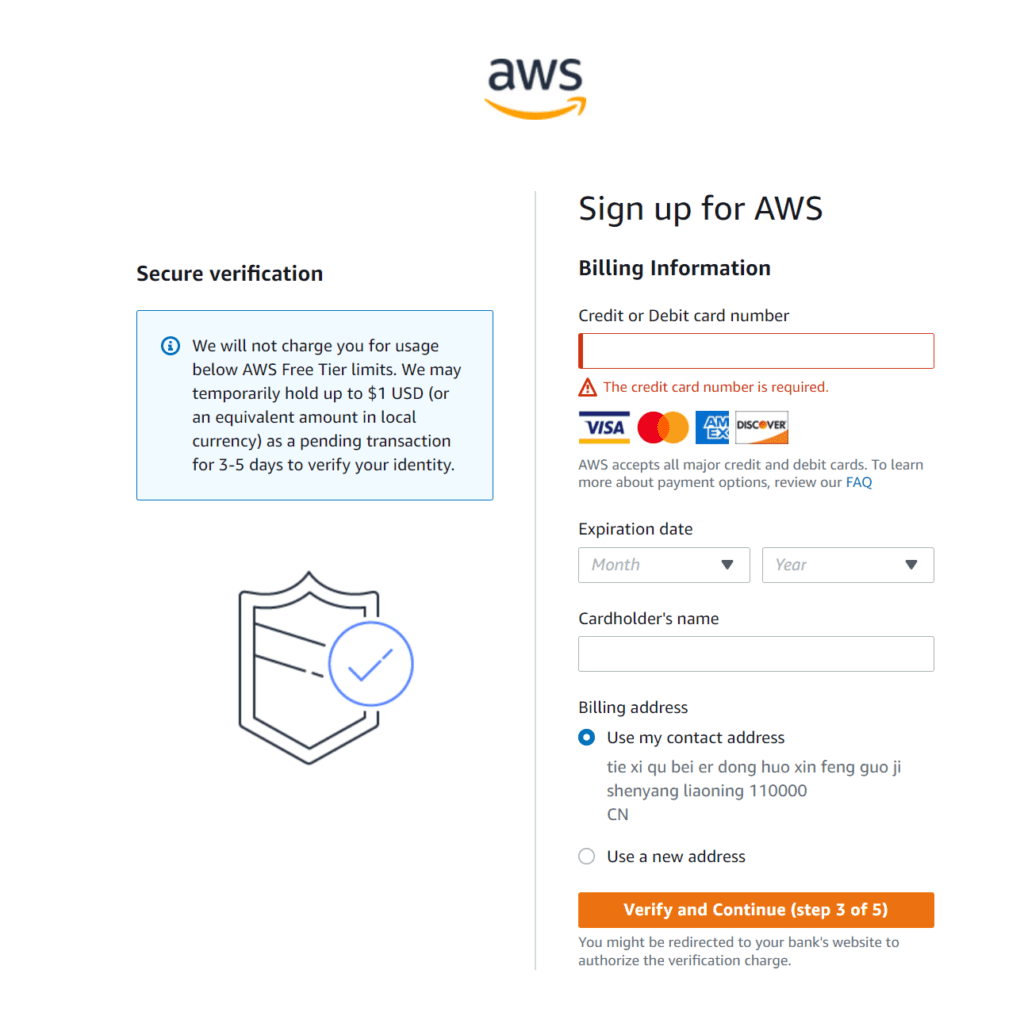
Step 6,Verify credit card, fill in the foreign currency credit card you prepared earlier. You must have a US dollar account, and the verification deduction must be settled in US dollars.
Step 7, verify your mobile phone number, select the country or region code, select China for domestic mobile phone numbers, and enter your mobile phone number below
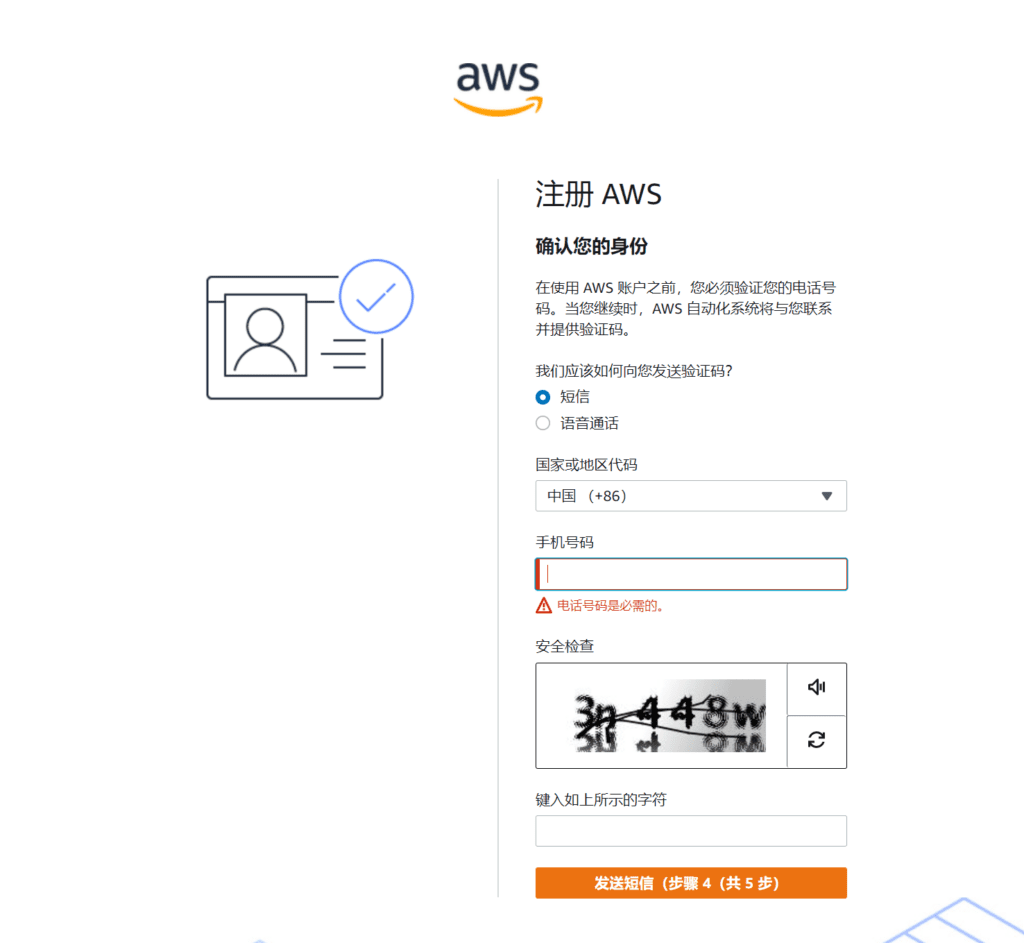
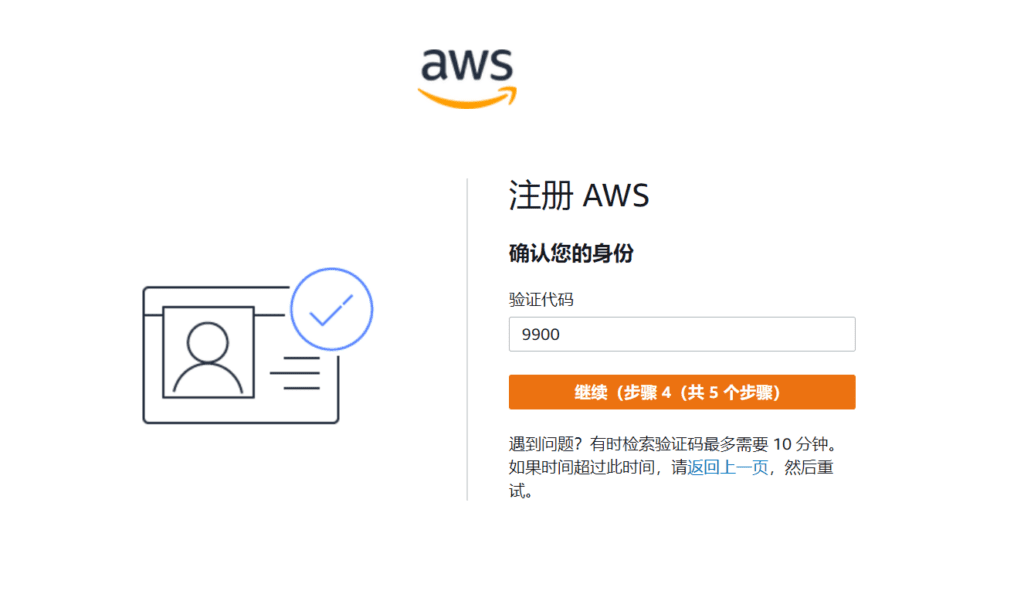
Step 8, fill in the mobile phone verification code,Identity confirmed!
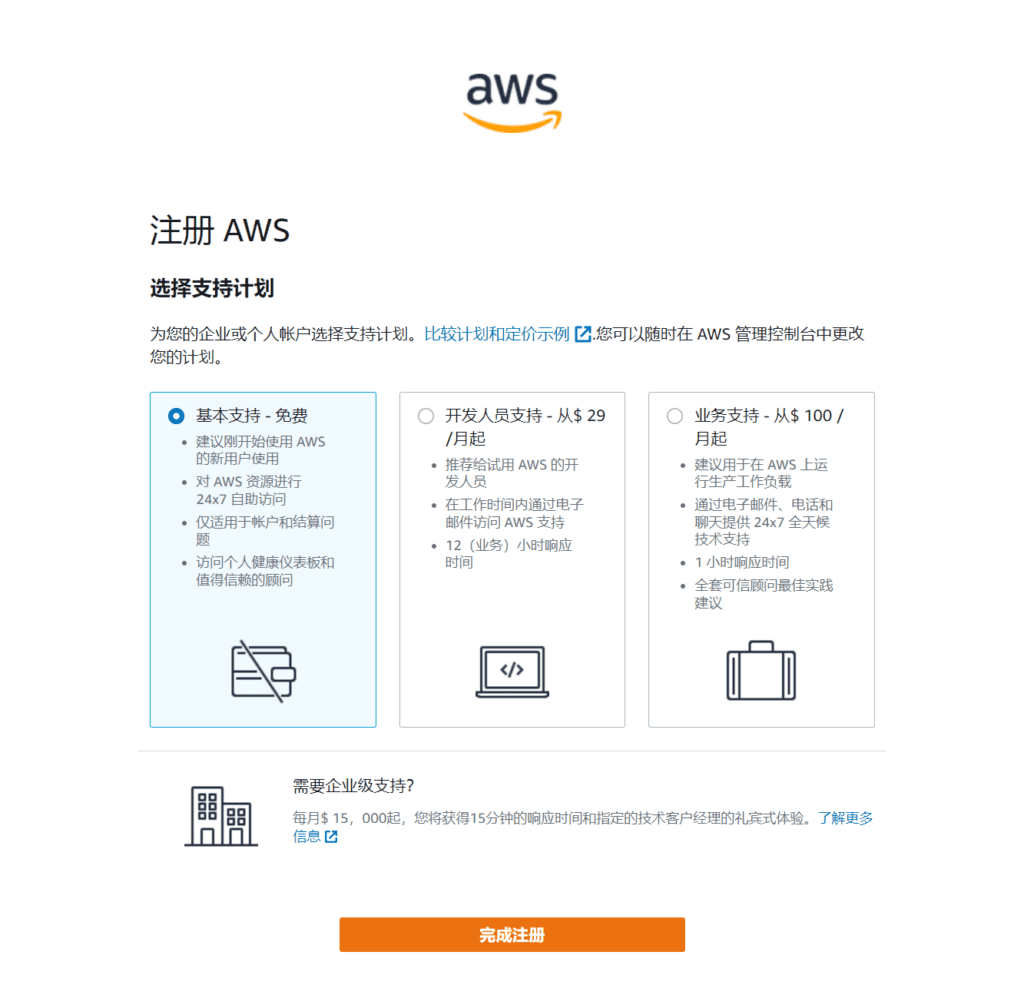
Step 9After all the above content is filled in successfully, proceed to the last step and select the service you need. The default selection is Basic Support-Free.
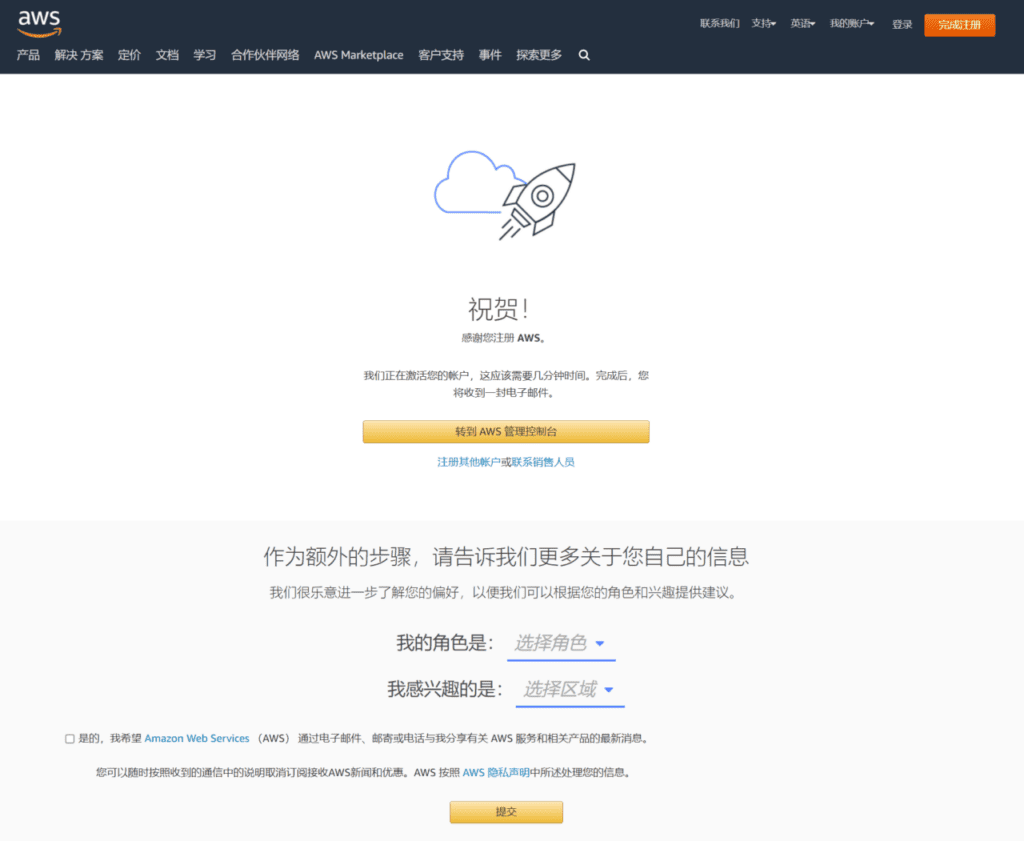
After clicking the orange button to complete the registration, click Go to AWS Management Console to enter the Amazon cloud operating platform.
Log in to the Amazon AWS Management Console
Click Go to AWS Management Console to enter the AWS Management Console login interface.
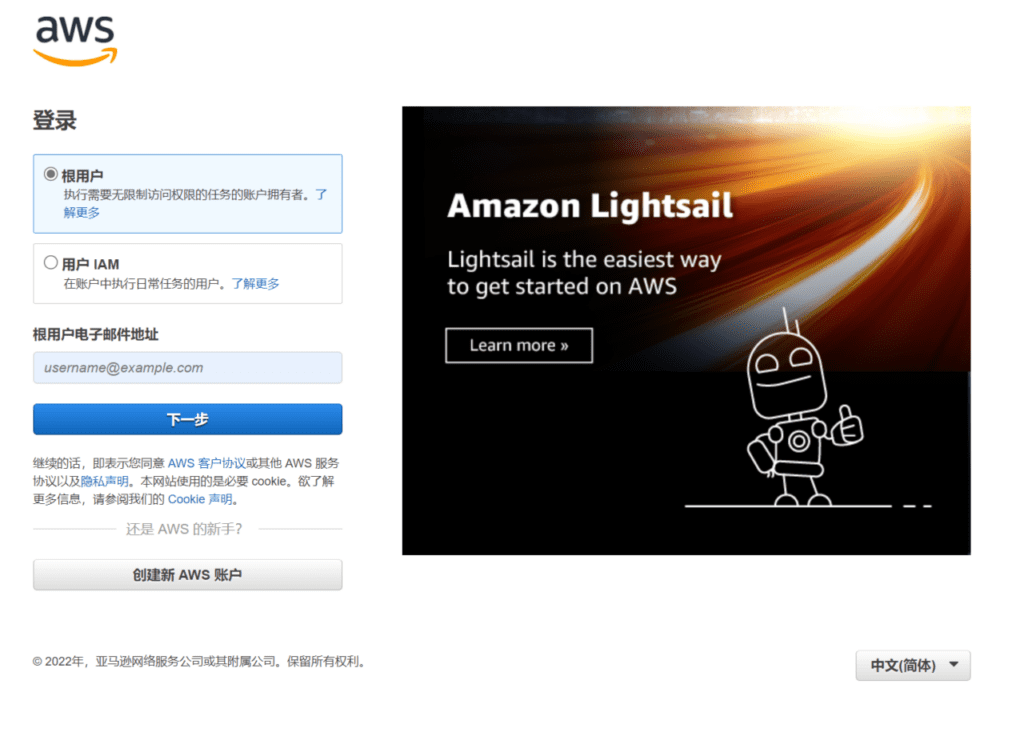
In the lower right corner of the login interface, select the language of the AWS Management Console as Simplified Chinese. The root user is selected by default, and the root user has unlimited access rights. Fill in the email address you used to register before, then click Next, enter the verification code, enter the account password, and log in to the AWS Management Console homepage.
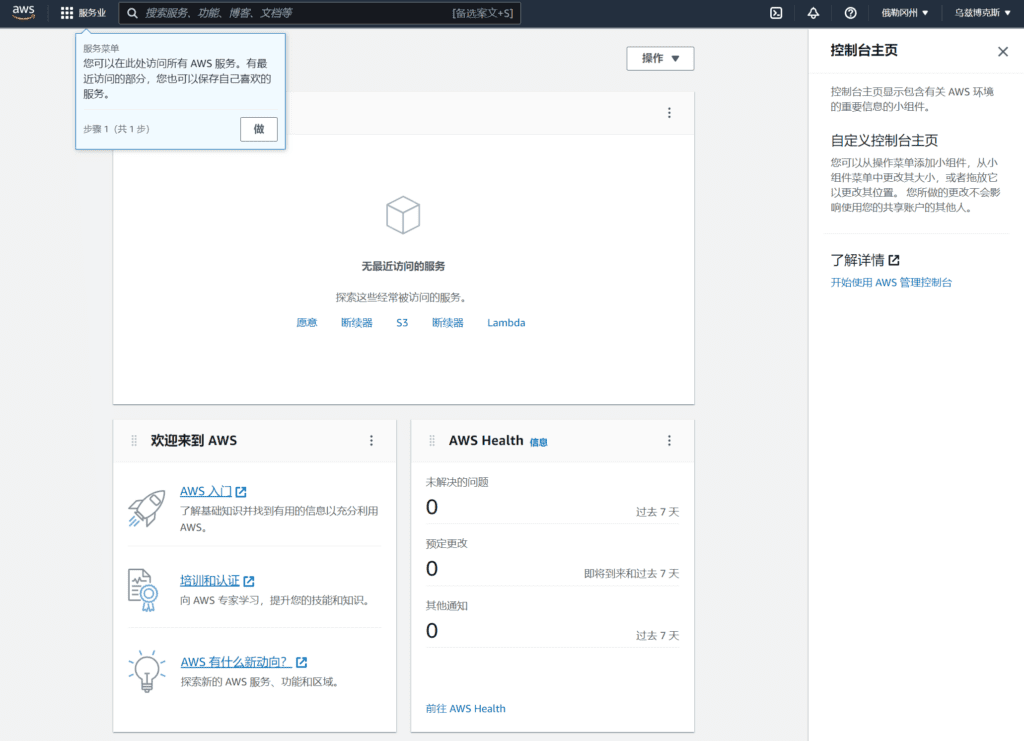
- Getting Started with AWS
Learn the basics and find helpful information to get the most out of AWS. - Training and Certification
Learn from AWS experts and advance your skills and knowledge. - What’s new with AWS?
Explore new AWS services, features, and regions.
AWS creates a virtual machine instance
The first thing to do after logging into the AWS management console is to create an AWS virtual machine, also known as an Amazon cloud host VPS. First, select the region where the Amazon cloud host is located, click the second down arrow option in the upper right corner of the AWS management console, the platform's default region is Oregon, domestic users can choose the Asia-Pacific region, the line quality in Europe and the United States is not very ideal!

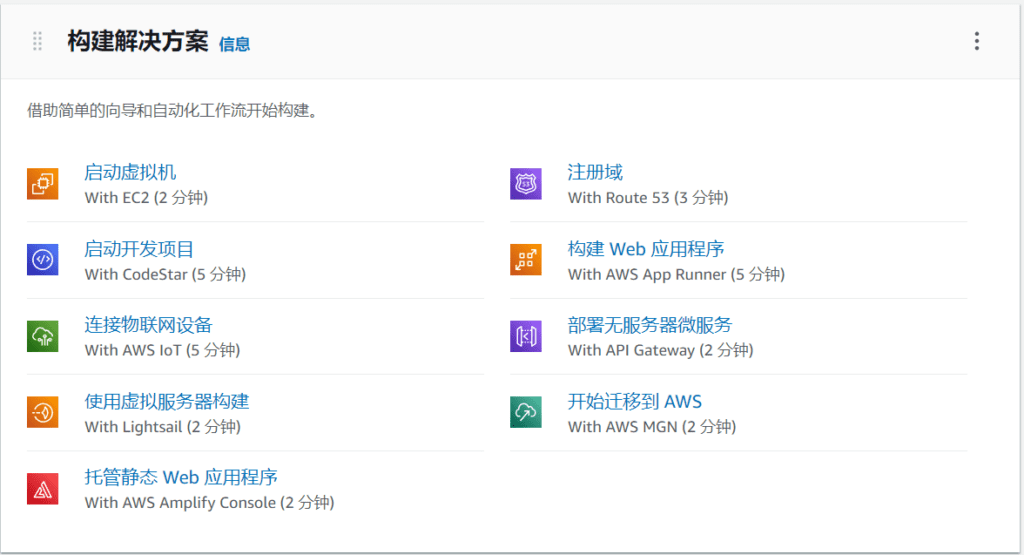
The Asia-Pacific region currently includes Hong Kong, Jakarta, Mumbai, Osaka, Seoul, Singapore, Sydney, and Tokyo! Japan and South Korea are relatively close, so you can consider giving them priority. After selecting the server storage area, pull down on the console homepage, find the build solution, and select the first option.Start the virtual machine.
Step 1: Select an Amazon Machine Image (AMI) Cancel and Exit
An AMI is a template that contains the software configuration (operating system, application server, and applications) needed to launch an instance. You can choose an AMI provided by AWS, our user community, or AWS Marketplace; or you can choose one of your own AMIs.
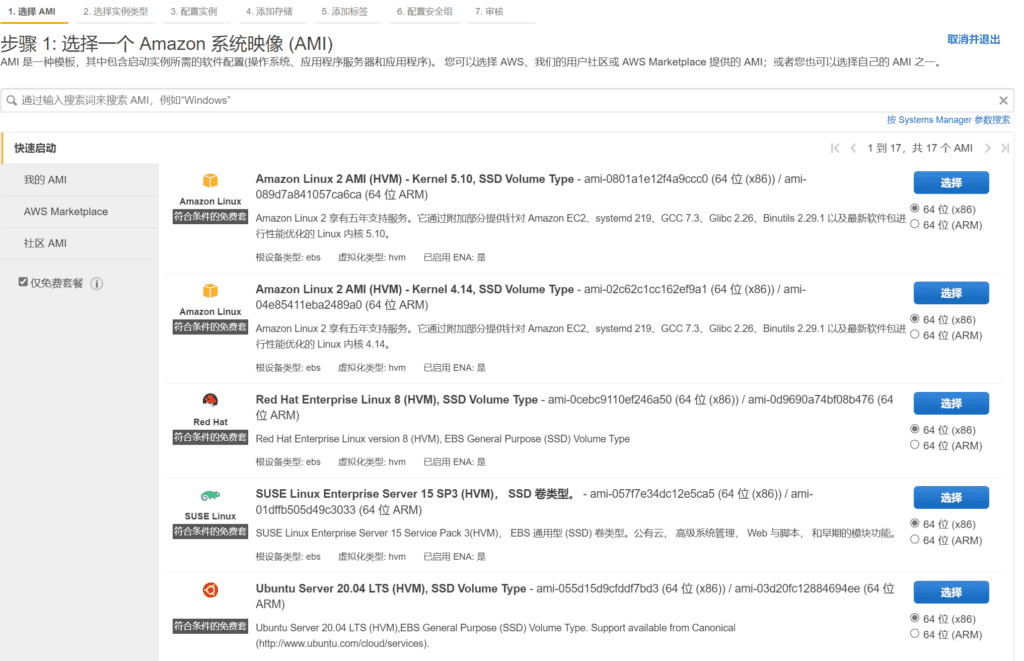
Select AMI, System Image, and on the left side of the page, check Free Tier Only. After selecting, a list of operating system images that you can choose for free will be displayed. Amazon's system images support Windows and Linux. Select an operating system that you are familiar with.
Step 2: Select an instance type
Amazon EC2 offers a variety of instance types that are optimized for different use cases. Instances are virtual servers that can run your applications. They come in different combinations of CPU, memory, storage, and network capacity, giving you the flexibility to choose the right mix of resources for your application. For information about instance types and how they can meet your computing needs, see learn more.

Select EC2 instance type, eligible free tier, currently only supports virtual machine instances with 1vCPU and 1G memory. Then click Next to configure instance details.
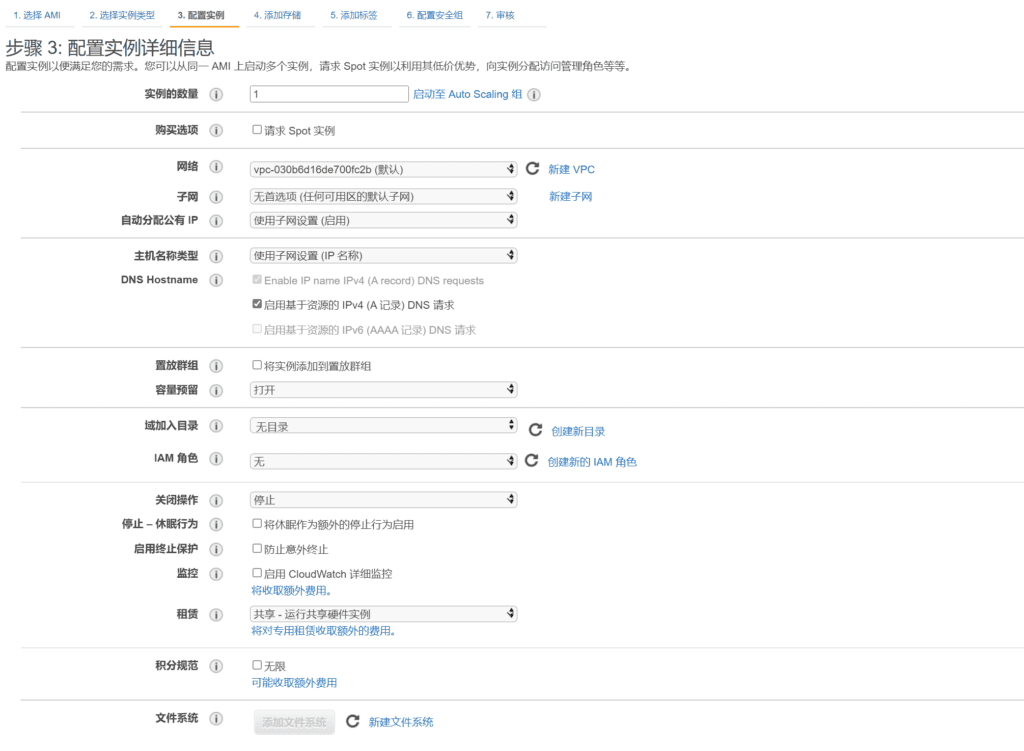
Step 3: Configure instance details
Configure instances to suit your needs. You can launch multiple instances from the same AMI, request Spot Instances to take advantage of their low prices, assign access management roles to instances, and more.
Step 4: Add storage
Your instance is launched with the following storage device settings. You can attach additional EBS volumes and instance store volumes to your instance, or edit the settings of the root volume. You can also attach additional EBS volumes instead of instance store volumes after you launch your instance. Learn more about storage options in Amazon EC2.
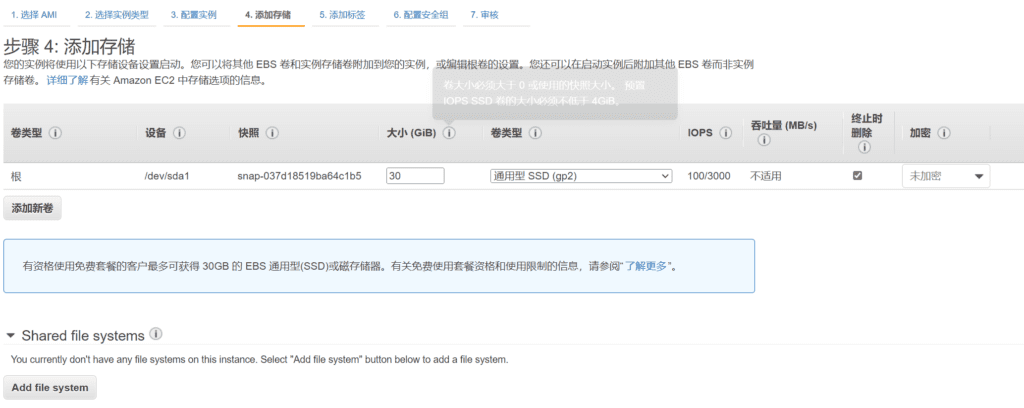
Customers who qualify for the free tier receive up to 30GB of EBS General Purpose (SSD) or magnetic storage. You can modify the storage disk size to 30GB here.
Step 5: Add Tags
Tags consist of a case-sensitive key-value pair. For example, you can define a tag with a key of "Name" and a value of "Webserver".
You can apply tag copies to volumes, instances, or both.
The tags are applied to all instances and volumes. For information about tagging Amazon EC2 resources, see learn more.

Step 6: Configure security groups
A security group is a set of firewall rules that control traffic to your instance. On this page, you can add rules to allow specific traffic to reach your instance. For example, if you want to set up a web server and allow Internet traffic to reach your instance, add rules to allow unrestricted access to the HTTP and HTTPS ports. You can create a new security group or select an existing one below. For information about Amazon EC2 security groups, see learn more.
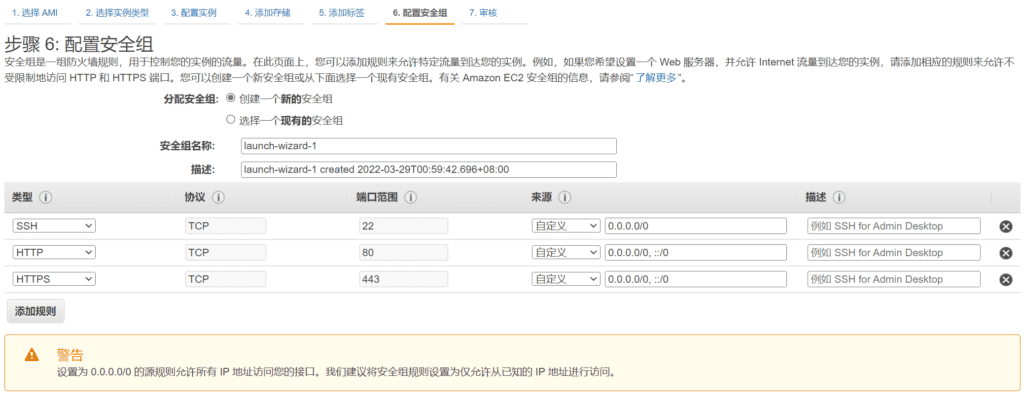
If you do not want to use a security group, you can open all ports, select the type all traffic, the protocol all, the port 0-65536, and the source 0.0.0.0/0. Then when you create a virtual machine instance, a security warning will appear.
Improve instance security. Your security group launch-wizard-1 is open to the world.
Your instance can be accessed from any IP address. We recommend that you update your security group rules to allow access only from known IP addresses.
You can also open additional ports in the security group to facilitate access to applications or services that you are running, such as HTTP (80) for a web server.
Step 7: Verify instance startup
Review the details of your instance launch. You can return to edit each section and make changes. Click Launch to assign a key pair to your instance and complete the launch process.
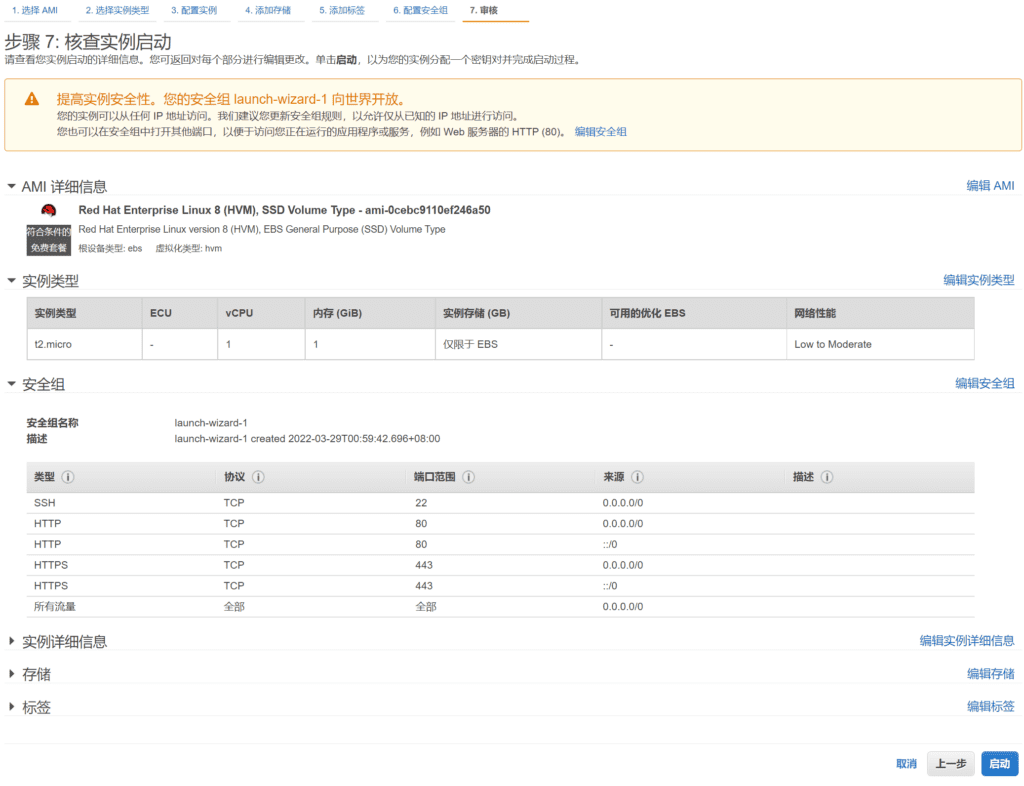
After the above information is configured, click the Start button to start the virtual machine instance. Since there is no CentOS operating system, I chose the Red Hat system. The operations of Red Hat and CentOS are basically the same. Red Hat Enterprise Linux version 8 (HVM), EBS General Purpose (SSD) Volume Type
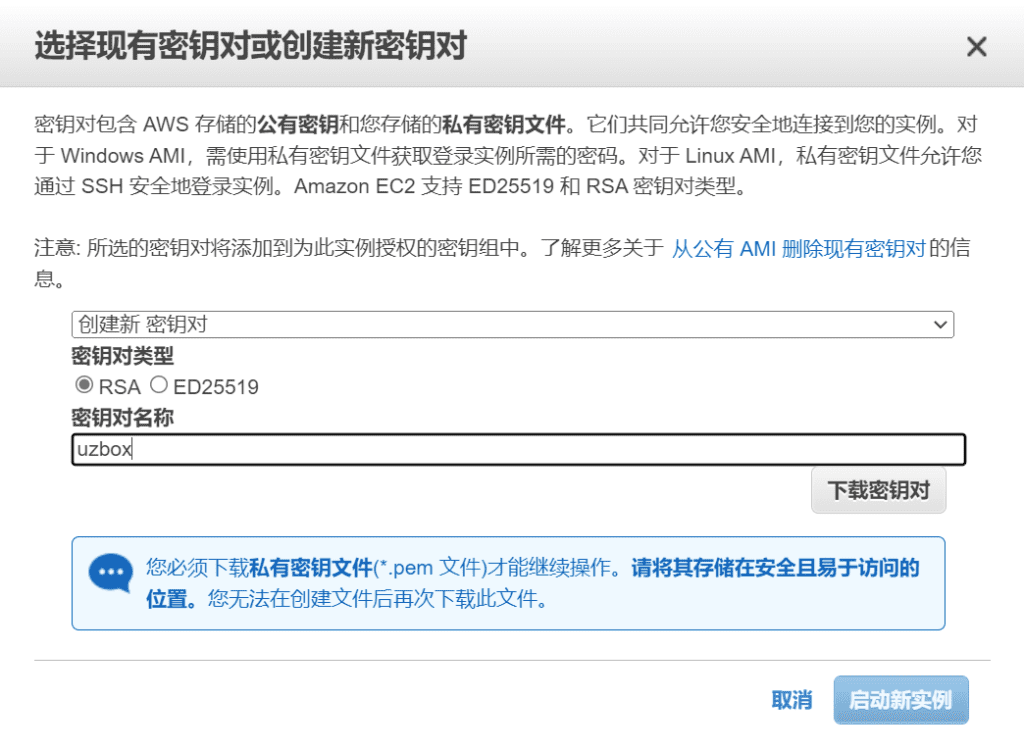
Before launching an EC2 virtual machine instance, you need to set up a new key pair. Select Create a new key pair, enter a key pair name, and click Download key pair. After the download is complete, click Launch new instance.

- How to connect to your Linux instance
- Learn about AWS Free Tier
- Amazon EC2: User Guide
- Amazon EC2: Discussion Forum
Configure AWS EC2 Amazon cloud host instance
AWS EC2 The Amazon cloud host instance has been successfully applied for. Next, perform a simple configuration. The firewall has been set up before. If you need to change it, you can change the security group policy in the menu on the left. The public IPv4 address of the Amazon cloud host is randomly generated. If your virtual machine instance is stopped and then started again, the public IP address will change.
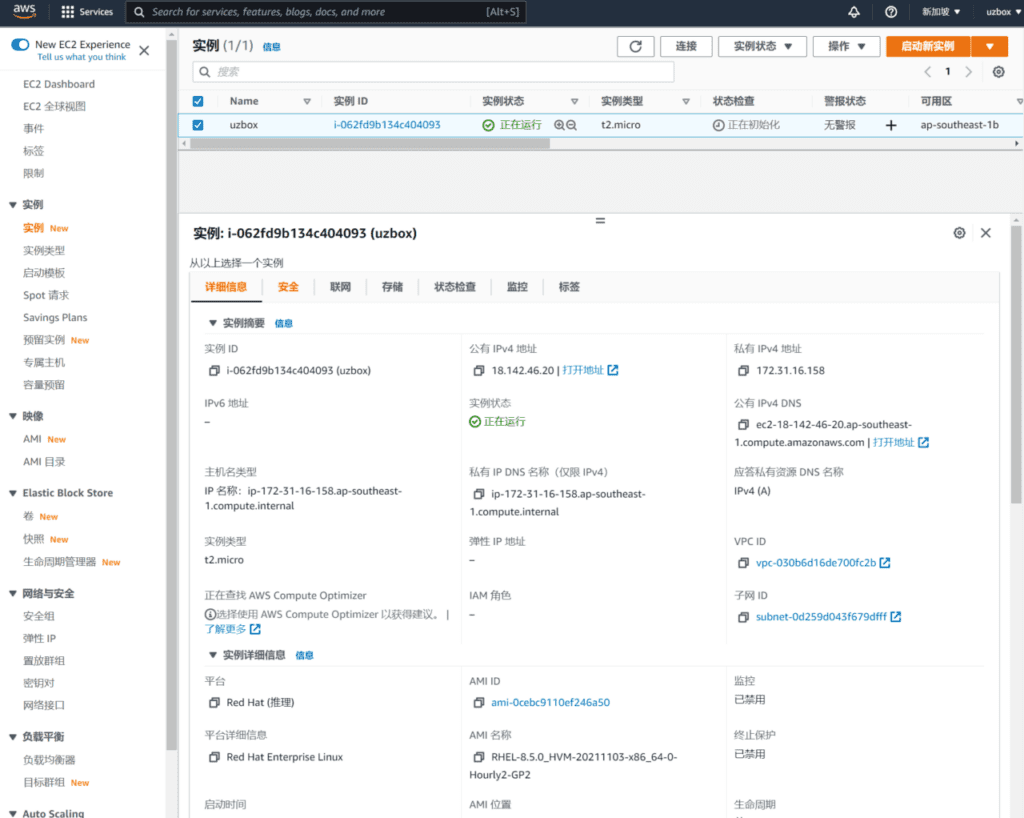
Configure Elastic IP
If you want to have a fixed IP address, you need to apply for an Elastic IP. In the Network & Security category on the left menu, click Elastic IP.
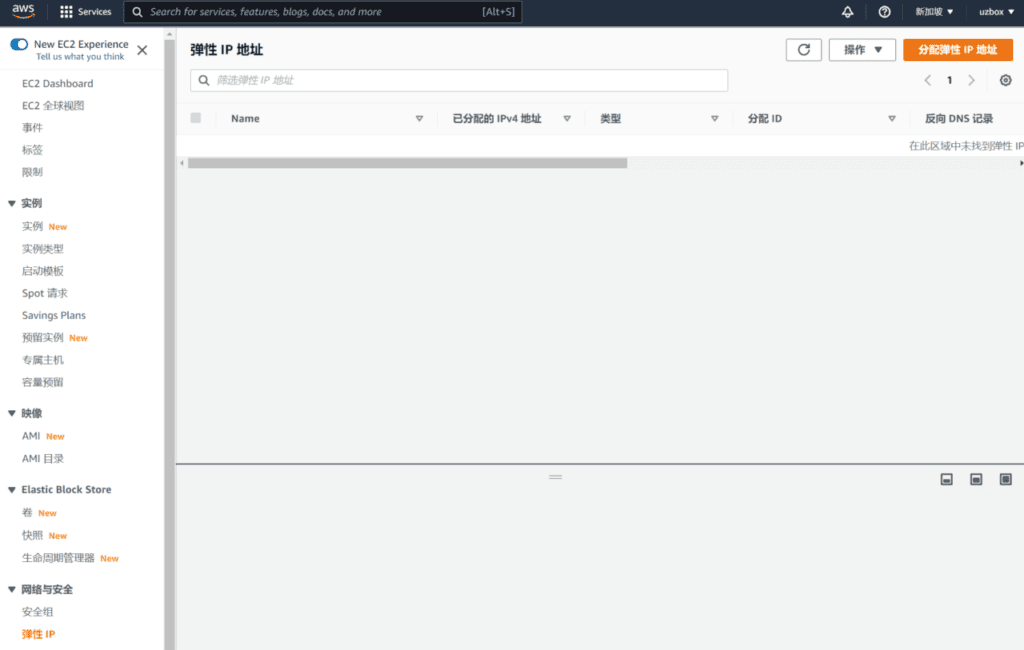
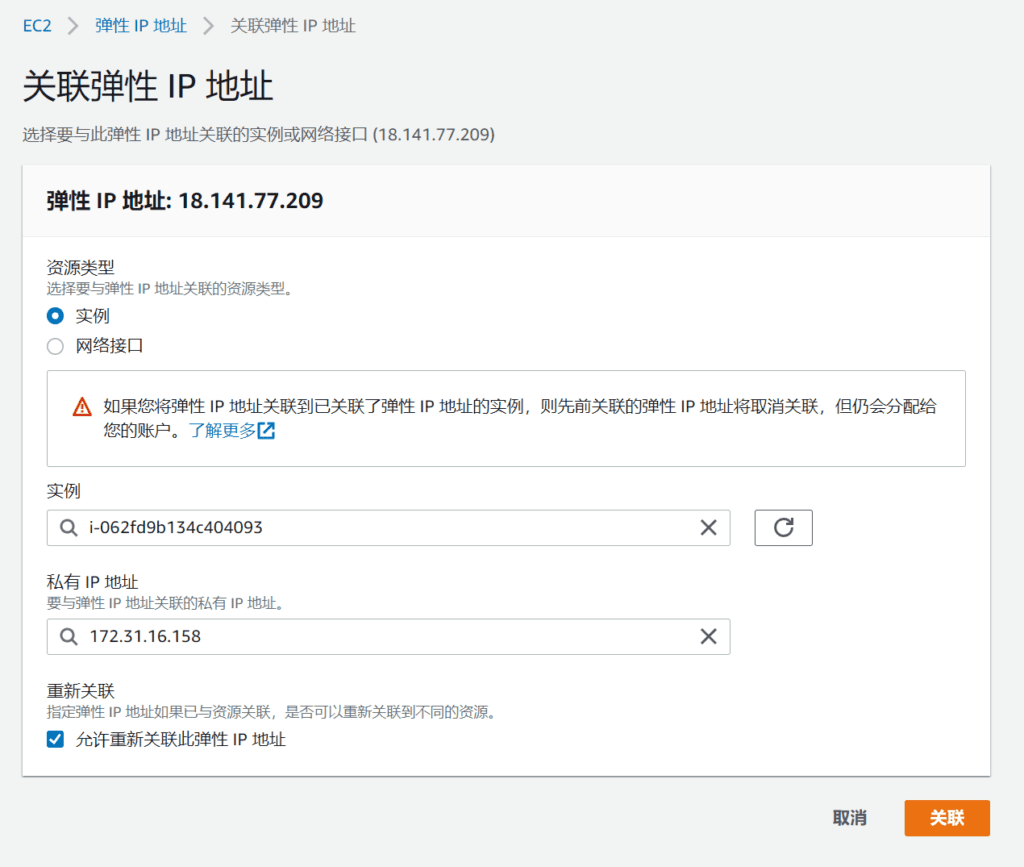
Click Allocate Elastic IP Address, select your instance name and private IP address, and click Associate.

Is there a charge for elastic IP addresses in Amazon Cloud?
You can associate one Elastic IP (EIP) address with a running instance for free. If you associate additional EIPs with the instance, you will be charged a prorated fee for each hour that additional EIPs are associated with the instance. Additional EIPs can only be used within Amazon VPC.
To ensure efficient use of Elastic IP addresses, we charge a small hourly fee when they are not associated with a running instance or when they are associated with a stopped instance or an unconnected network interface. If you create Elastic IP addresses using an IP address prefix that you bring to AWS using BYO IP, you will not be charged for those Elastic IP addresses.
$0.005 (pro-rated per additional IP address per hour associated with a running instance)
$0.005 (pro-rated per hour for Elastic IP addresses not associated with a running instance)
There is no charge for applying for an elastic IP. You can apply for an elastic IP address for free and associate it with an EC2 virtual machine instance.
Connect to Amazon Cloud VM instance using SSH
After the Amazon cloud host instance is started, the system will automatically assign a public IP address. If the server is not shut down, the public IP will not change. If the virtual machine is shut down and then reopened, the public IP will change randomly. If you want to have a fixed IP address, you need to apply for an elastic IP address. In the Amazon cloud, you can apply for an elastic IP for free.
How to connect to Amazon Cloud Server using SSH
You can choose PuTTY or Xshell as the SSH tool.
Note: If you install the system RHEL-9.1.0_HVM-20221101-x86_64-2-Hourly2-GP2, you need to use PuTTY for key connection. When starting a new instance, create a key pair in the .PPK private key file format, and then perform SSH remote connection in PuTTY. The .PEM format private key file will not be able to connect to the server, and Xshell will prompt "The selected user key is not registered on the remote host", and then it will prompt to enter the password of the PubLic Key.
 Xshell connects to the Amazon cloud host.
Open the Xshell software and create a new session. Enter the server IP address, click the category option on the left, and click User Authentication.
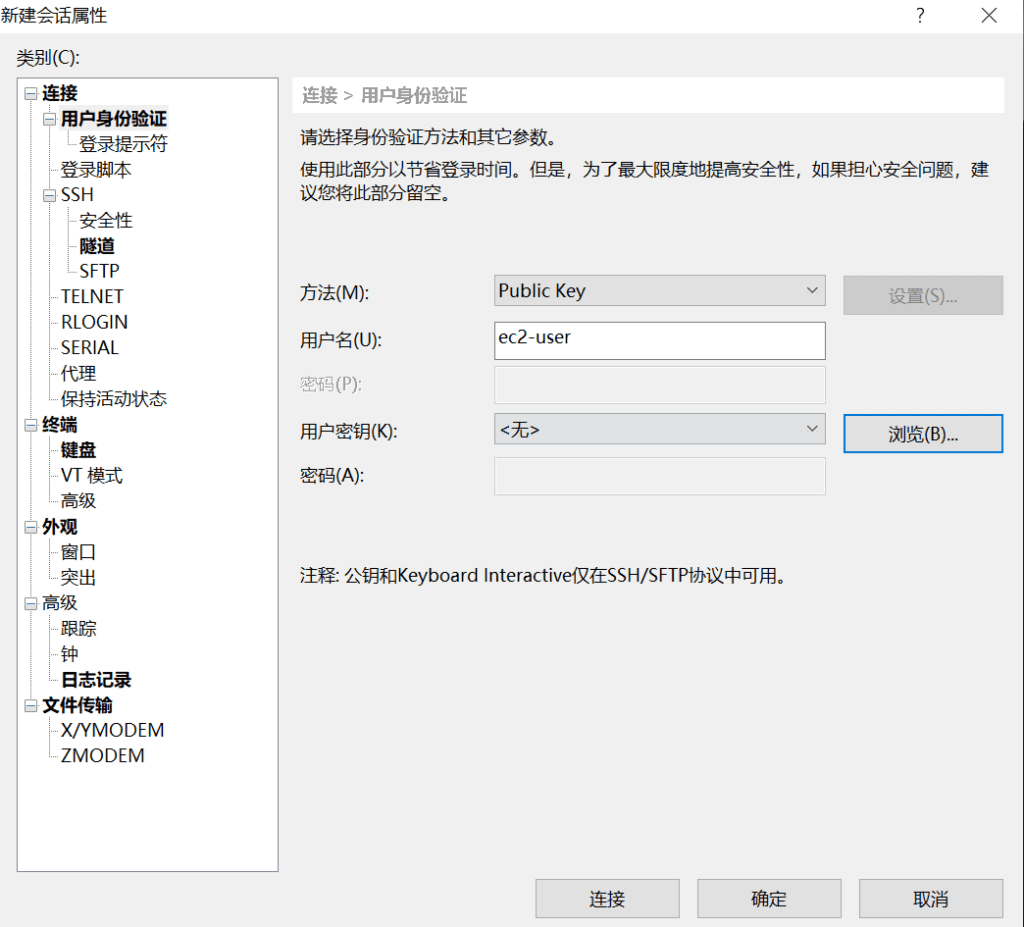
Select Public Key as the method and fill in ec2-user as the username. Click Browse in the User Key field. You do not need to fill in the password below.
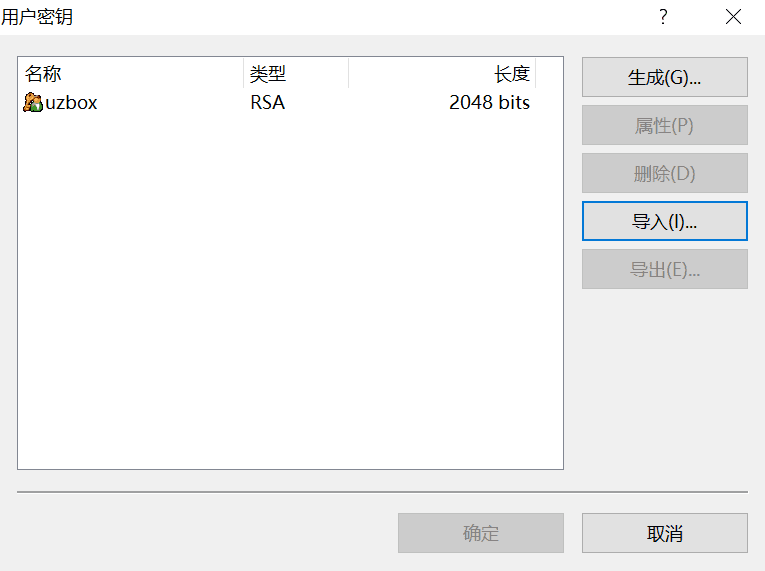
Click Import in the User Key window to import the key you have previouslyApply for Amazon CloudWhen you are on the host, download the key to the local machine. After the key is imported, select the key and click Confirm.

Now that you have successfully connected to the server, let’s set the password for the root super administrator user.
sudo passwd root
Set the root password, enter the new password, enter the new password again, and then the prompt password: all authentication tokens updated successfully. indicates that the password change is complete.
Switch to root user
su root
Now the root user has been switched successfully! It is troublesome to switch users every time you log in, so you need to enable root login.
After logging in as root, enter the command to modify the sshd configuration file
vi /etc/ssh/sshd_config
After opening the sshd configuration file, press i to enter the editing mode.
Change PermitRootLogin no to PermitRootLogin yes. If PermitRootLogin is in yes state, continue to modify the next item.
PasswordAuthentication no changed to PasswordAuthentication yes
Change UsePAM yes to UsePAM no
After modification, :wq save and exit! reboot restart aws EC2 orsystemctl restart sshdRestart the SSH service and you can log in directly as the root user.
RedHat9 root user logs in via ssh
Edit SSH Configuration File
vi /etc/ssh/sshd_config
Find the following
#PermitRootLogin prohibit-password
Modify it to
PermitRootLogin yes
Save and exit and restart the SSH service
systemctl restart sshd
At this point the root user can log in remotely via ssh
OK, now your application for Amazon Cloud’s free server has been successful. After logging into the system, start configuring the services you need!
Teach you how to configure Amazon Cloud:AWS Amazon cloud configuration, Red Hat8 server configuration LNMP environment
Related articles recommended:
Microsoft Cloud Azure application guide: 12 months free and $200!
Free registration for Google Cloud Google Cloud $300 USD most complete guide
The latest Oracle Cloud registration tutorial: lifetime free VPS cloud hosting



 Xshell connects to the Amazon cloud host.

