Excellent software and practical tutorials


How to use Grounded-SAM in Amazon SageMaker
How to quickly build a hosted AI painting visualization environment based on SageMaker Notebook.
1. New features of the solution: ControlNet and Image browser plug-in support;
2. In the e-commerce/advertising industry, the new version of this solution is equipped with the latest visual tools Grounded-SAM, generate controllable text and images to accelerate the output of marketing materials;
3. Common questions and answers about this program.
We recommend that you deploy the solution in the us-east-1 region in the US East region and choose the ml.g4 or ml.g5 series instance type based on your needs.
Sign up for a free trial of Amazon Web ServicesAWS)Cloud Service Link: https://aws.amazon.com/cn/free/
Part I: New Features
1 Extensions and plugins
1.1 ControlNet
ControlNet is based on Stable Diffusion WebUI A plug-in launched by ControlNet, which introduces a new control method for the Wenshengtu function, which can additionally control the character's posture, depth of field, line drawing coloring, etc., and can more stably control the output screen. ControlNet trains models for each different type of input. Currently, the following 8 models are publicly available. They are: canny, depth, hed, mlsd, normal, openpose, scribble, segmentation, and the model description is shown in the table below.
| Preprocessing name | Corresponding model | Model Description |
| canny | control_canny | Edge detection. Extract line drawings from the original image to generate a picture with the same composition. |
| depth | control_depth | Depth detection: Capture the depth of the image and obtain the relationship between the foreground and background of the image. |
| hed | control_hed | Edge detection but retains more details, suitable for recoloring and stylization. |
| mlsd | control_mlsd | Line segment recognition is extremely poor at recognizing people, but is very suitable for architecture. |
| normal_map | control_normal | Generate normal maps based on images, very suitable for CG modelers. |
| openpose | control_openpose | Extract character skeleton poses. |
| openpose_hand | control_openpose | Extract character + hand skeleton pose. |
| scribble | control_openpose | Extract black and white draft. |
| fake_scribble | control_scribble | Graffiti style extraction (very powerful model). |
| Segmentation | control_seg | Semantic segmentation. |
The latest version of this solution, WebUIVersion 0405, supports the ControlNet plug-in by default (see FAQ 1 in Part 3 of this article). Simply follow the steps below to download the model and you can start using the ControlNet plug-in immediately.
- In CloudFormation-Stack-Output (referencePrevious blog 4.3 Step 12), find the NotebookURL link and open the SageMaker Notebook Instance
 |
- Open a terminal and click File->New->Terminal
- Enter the following command to start downloading. The downloading time will be determined based on the server network status.
- Wait for the download to complete, return to the Stable Diffusion Web UI interface, and click the "Refresh" button in ControlNet to complete the model download and installation.
 |
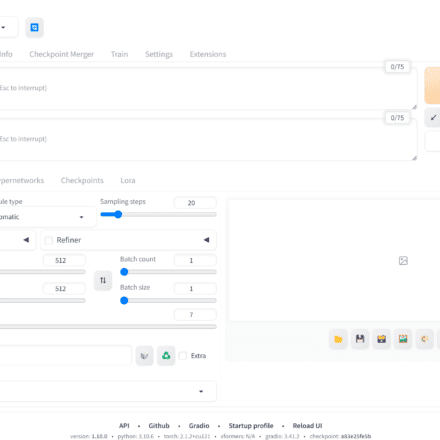
1.2 Image Browser
New support for the Image Browser plug-in, you can easily view the generated historical images, as shown in the following figure.
 |
2 Regional Support
Added US West (Oregon) region
Part 2: E-commerce Advertising Creative Generation
1 Background
In the generation of e-commerce image materials, a very common task is to modify a certain part of the image. In the past, it required designers to use professional image editing software and spend a long time to achieve this. However, with the current AI capabilities, we can complete this task more easily and efficiently.
In this article, we will show you how to use Stable Diffusion WebUI and Grounded-SAM on the new version of Shenghuamiaobi to achieve the end-to-end image editing effect shown in the figure below, including 1. No codeImplementing image editing (Manual Mask), suitable for designers and creators who are not familiar with code development, and 2. Exploit CodeAutomatic image editing (Auto Mask), suitable for developers and enthusiasts interested in AIGC.
 |
The original picture comes from the Internet
2. Use of solution model
In this article, we will use the following models.
2.1 Realistic Vision
Realistic Vision Refers to a model that generates realistic images. It can create highly realistic portraits of people of different ages, races, and clothing styles that look just like photos.
2.2 ControlNet
ControlNet It is a pre-trained model based on Stable Diffusion 1.5. In the paper by the author Lvmin Zhang, it is explained that ControlNet is a large-scale diffusion model that is pre-trained and controlled by input conditions. It can use the edge features, depth features or skeleton features of human posture in the input image, and cooperate with text prompts to accurately guide the image generation results in SD 1.5. ControlNet has a total of 8 models, and this article uses the Control_canny model.
2.3 Grounded-SAM
Grounded-Segment-Anything(Grounded-SAM) is based on Grounding DINO(detector) and Segment Anything The multimodal image generation workflow built by Model (segmenter) is a popular open source project. Grounded-SAM can be directly used with Stable Diffusion for controllable text and image generation.
2.3.1 Grounding DINO
Grounding DINO: A zero-shot image detection model that can detect objects in an image through text descriptions and generate rectangular boxes.
2.3.2 Segment Anything Model (SAM)
Segment Anything Model (SAM): A high-quality image segmentation model that can perform image segmentation using auxiliary points and auxiliary boxes as prompts. Its training set includes more than 1 billion masks and 11 million images, making it the largest open source dataset for image segmentation to date. Officials claim that SAM has learned the general concept of "what an object is", so it can perform image segmentation without additional training.
3. Code-free image editing (manual masking)
The experimental steps are as follows:
3.1 Readers can clickhereDownload images used in this experiment.
3.2 In CloudFormation-Stack-Output, find the NotebookURL link and open the SageMaker Notebook Instance.
 |
3.3 Click Terminal and enter the following commands in sequence to download the Realistic Vision V1.3 model.
In the above script, we use HuggingFace Realistic Vision V1.3 Model. You can also download it directly from the CIVITAI official website Realistic Vision V2.0, the final effects of the two are very close.
 |
3.4 In the WebUI, select the pre-trained model Realistic Vision V1.3 that we just downloaded as the basic model, and select the Inpaint function in img2img as our task type. The so-called Inpaint is actually a subcategory of the image generation task, that is, image completion through mask (Mask), or partial image generation.
 |
3.5 Upload the original image and use the brush to manually draw a mask of the area you want to edit.
 |
3.6 Configure the Inpaint related parameters according to the figure below. Here we choose to complete and generate only the mask part.
 |
3.7 Upload the original image to ControlNet and configure the relevant parameters as shown below. The ControlNet function can help strengthen the control over the final image generation. Here we select the Canny preprocessor and the corresponding Canny model to generate the stroke image. Lowering the "Canny lower threshold" can help us retain more edge details in the original image, as shown in the figure. Please refer to the FAQ for the installation of the ControlNet model, and refer to the model interpretation table in the ControlNet section for the explanation of the Canny and other models.
 |
3.8 Refer to the following template to enter the prompt words and click Generate.
Prompt = an extremely beautiful dreamy white lace cotton dress with delicate see-through sleeves, extra details, (high detailed skin:1.2), 8k uhd, dslr, soft lighting, high quality, film grain, Fujifilm XT3, photorealistic
Negative Prompt = (deformed iris, deformed pupils, semi-realistic, cgi, 3d, render, sketch, cartoon, drawing, anime:1.4), text, close up, cropped, out of frame, worst quality, low quality, jpeg artifacts, ugly, duplicate, morbid, mutilated, extra fingers, mutated hands, poorly drawn hands, poorly drawn face, mutation, deformed, blurry, dehydrated, bad anatomy, bad proportions, extra limbs, cloned face, disfigured, gross proportions, malformed limbs, missing arms, missing legs, extra arms, extra legs, fused fingers, too many fingers, long neck
 |
3.9 After waiting for generation, we can get the following results.
 |
summary:Although the above process is simple and easy to operate, it would be very time-consuming if the mask needs to be generated manually every time. Next, we will introduce how to edit images through code.
4 Encoded fully automatic image editing (automatic masking)
After combining the two key components, Grounding DINO (detector) and Segment Anything Model (segmenter), Grounded-SAM becomes an extremely powerful visual application combination, which can complete CV semantic segmentation through text prompts. Combined with Stable Diffusion, it undoubtedly provides more possibilities for multi-modal engineered image generation. The experimental steps are as follows:
 |
Image from https://github.com/IDEA-Research/Grounded-Segment-Anything
4.1 In CloudFormation-Stack-Output, find the NotebookURL link and open the SageMaker Notebook Instance.
 |
4.2 Click Terminal and enter the following two commands in sequence to clone the code locally.
 |
 |
4.3 Select "miaobishenghua2" in the path on the left and double-click the "g-seg-local.ipynb" file. At the same time, select "conda_pytorch_p39" as our environment.
 |
4.4 Run all the code snippets sequentially. The whole process consists of three main parts.
4.4.1 will show you how to use Grounding DINO, generate a predicted rectangular box through text description. For example, here we want to select a green dress, so we can enter "green dress" as the prompt word and get the following picture. We can also adjust the "box_threshold" to control the confidence of recognition and adjust the "text_threshold" to control the relevance of the prompt word to filter the final results (see the code for details). The rectangular box result will be used as an auxiliary prompt for the following segmentation task.
 |
We can also try to change the prompt word to "white dress with blue patterns", and we will get the following rectangular box. Although the dress on the far left is also white, it is not selected because it does not have a blue pattern.
 |
4.4.2 will show you how to use Segment Anything Generate a segmentation mask based on the predicted rectangle in the previous step. Here we input the predicted rectangle as an auxiliary prompt, and limit the output of only one segmentation mask by "multimask_output=False" (see the code for details), and finally get the result in the figure below. Segment Anything itself also supports single point and multiple points as auxiliary prompts, so that we can quickly and automatically generate masks in batches when only the original image is available.
 |
 |
4.4.3 We will show how to use the Inpainting model of Stable Diffusion to replace the content in the mask above. We used ml.g5. 2xlarge instances in the experiment. Please adjust according to your instance type. os.environ["CUDA_VISIBLE_DEVICES"] = "0"Here, we use the stable-diffusion-2-inpainting model to generate the following image (see the code for details).
 |
Summary: Based on the above methods, we can achieve fully automatic image editing and material generation more easily and efficiently. In actual production environments, we often need a more complex engineering architecture to further optimize the entire workflow. It should be noted that the Stable Diffusion used in this part of the code comes from HuggingFace diffusersConsidering that teams collaborate more closely within a general enterprise (designers and technical developers), it is recommended to use the Stable Diffusion WebUI API to implement the workflow of coded image generation and output to ensure the uniformity of parameters and other information. This solution example can be used as a reference for quick verification of fully automatic workflows.
Part 3 Frequently Asked Questions
1 How to update to the latest version of the scheme (0405)?
For installation instructions, please refer to"Bright and Brilliant Writing - Quickly Build a Managed Stable Diffusion-AI Painting Visualization Environment Based on SageMaker Notebook"The default WebUIVersion is 0405. Currently, it is not supported to update in an existing environment and needs to be reinstalled.
 |
2. How to deal with service limit issues when deploying the solution?
Before deploying this solution, please confirm that the corresponding resource quota of SageMaker Notebook (for example, ml.g4dn.2xlarge for notebook instance usage) has been increased in the Service Quota of the corresponding region. For specific steps, refer toLink.
3 How to use models downloaded from the Internet?
- exist Cloud formation's Outputs page, open NotebookURL Corresponding link
- In the left navigation bar, locate the sd-webui/data directory, as shown below
 |
- For the basic model of Stable Diffusion, place StableDiffusion Table of contents
- For the Lora model, place Lora Table of contents
- For ControlNet models, place ContrloNet Table of contents
- User-fine-tuned models are also placed in StableDiffusion Table of contents
4 How to switch between Automatic and InvokeAI?
- On the Cloud formation Outputs page, open NotebookURL Corresponding link
- Open a terminal and click File->New->Terminal
- Enter the following directory
- Start Automatic WebUI
- Start Invoke WebUI
5 About version management
We will keep the latest two versions of the plan: 0405 and 0316.
Summarize
This article introduces the new features of the previous series of blog solutions, such as: new support for ControlNet and Image Browser plug-ins, and new support for US West 2 (Oregon). It also details the methods and steps for using Grounded-SAM to generate marketing materials in the e-commerce advertising industry based on this solution and related SageMaker services, including: 1. Code-free image editing through the Canny model in ControlNet and the Inpaint function, and 2. Using Grounded-SAM (Grounding DINO and Segment Anything) Use code to edit images. In addition, we will continue to add more solutions that are close to customer scenarios in the "Flowering and Wonderful Writing" series. If you have any related questions or needs, please feel free to contact us for further communication.


