This article mainly introduces how to use Amazon SageMaker Notebook machine learning service easy hosting Stable Diffusion WebUI, deploy the AIGC image-oriented lightweight application out of the box with one click. Through Amazon CloudFormation infrastructure-as-code services, the underlying environment, AI model, and front-end Stable Diffusion WebUI can be quickly deployed, helping users deploy a set of text-to-image and image-to-image AI applications in 15 to 20 minutes. This solution is suitable for enterprise-level customers to conduct preliminary research and rapid verification of AIGC image direction, and small teams to quickly build lightweight AI applications.If you want to quickly experience the hands-on experiment, you can scan the QR code at the end of the article, register an Amazon Web Services account, receive $200 in cloud resources for free, and explore the infinite charm of AI painting.Amazon Web Services official website:https://www.amazonaws.cn
Amazon Cloud Overseas Official Website:https://aws.amazon.com/cn/
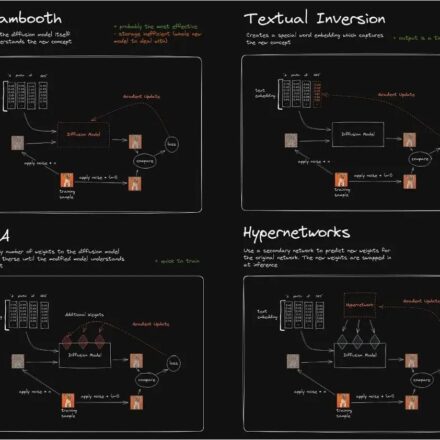
This solution currently provides image generation based on Stable Diffusion 1.5, based on DreamBooth Image training and reasoning; technical support for scripts and extensions is not provided yet. Readers can continue to pay attention to the functional iteration of subsequent solutions.
● This solution uses CloudFormation for one-click deployment. With just a few clicks, you can quickly deploy a set of AIGC image-oriented web application environment in your Amazon account. The interactive interface is simple and friendly, helping users quickly experience AI services such as text-to-image and image-to-image. ● The underlying layer uses the Jupyter notebook instance hosted by Amazon SageMaker Notebook Instance. You do not need to worry about the construction of the basic environment (such as storage, network, etc.) and the operation and maintenance of the underlying infrastructure.● The solution uses the fully managed Stable Diffusion AI model service (1.5 lightweight version, including two interfaces: Stable Diffusion WebUI and InvokeAI), has a good open source project experience, and supports the installation of plug-ins according to your needs to expand usage scenarios (such as ControlNet).
● Users can use their own image data to fine-tune the model, and the output model can be quickly deployed online to the inference node based on automated pipeline tools, facilitating large-scale image inference calls.
● This solution is completely open source, and users can customize and develop models and extensions in SageMaker Notebook to meet their own business needs.
3.1 Amazon SageMaker NotebookAmazon SageMaker Notebook instances are machine learning (ML) compute instances that run Jupyter Notebook applications. SageMaker manages the creation of instances and related resources. Use Jupyter notebooks in your notebook instances to prepare and process data, write code to train models, deploy models to SageMaker hosting, and test or validate your models.3.2 Stable Diffusion ModelStable Diffusion is a text-to-image model developed by CompVis, Stability AI and LAION. It is trained with a large number of 512×512 image-text models from the LAION-5B subset. Users can simply input a piece of text and Stable Diffusion can quickly convert it into an image. Similarly, users can also insert pictures or videos and process them with text.3.3.1 Stable Diffusion WebUI+ Usage ExampleGinsengTestStable Diffusion WebUI It is a browser interface for Stable Diffusion. It provides a variety of functions, such as txt2img, img2img, etc. It also includes many additional upgrades such as model fusion improvements and image quality repairs. Different effects can be generated by adjusting different parameters, and users can create according to their needs and preferences. It not only supports generating images, using a variety of models to achieve the effects you want, but also trains your own exclusive models. Stable Diffusion WebUI:https://github.com/AUTOMATIC1111/stable-diffusion-webui
Taking text-to-image generation as an example, users can use the prompt words to generate the desired image in the "txt2img" interface. The steps are as follows:
● Click "txt2img" to enter the text image interface
● Enter the prompt word in the prompt word input box
● Click the “Generate” button to generate the image
1. Generate a pair of young Chinese lovers in the 1990s, size 512×512, generate 4 pictures at a time: Prompt: A pair of young Chinese lovers, wearing jackets and jeans, sitting on the roof, the background is Beijing in the 1990s, and the opposite building can be seen2. Generate a bust figure of a Roman soldier with daisies in the background, size 512×512, generate 4 images at a time: Prompt: A roman soldier with daisies in the background, bust figure3.3.2 InvokeAI+ usage example referenceInvokeAI InvokeAI is an implementation of Stable Diffusion, an open source text-to-image and image-to-image generator. It provides a streamlined pipeline with various new features and options to aid in the image generation process.https://github.com/invoke-ai/InvokeAI
Prompt: temple in ruins, forest, stairs, columns
Prompt: A pair of young Chinese lovers, wearing jackets and jeans, sitting on the roof, the background is Beijing in the 1990s, and the opposite building can be seen3.4.1 Solution deployment steps1. Log in to the console and switch the region to us-east-1 in the upper right corner of the console page.
2. Enter Cloudformation in the Service search box and click Enter.3. Create a stack - Use new resources (standard) - Upload the template file, which can be downloaded from the following link: https://xiekl.s3.cn-northwest-1.amazonaws.com.cn/sd-webui.yml4. Enter the stack name. It is recommended to select g5.2xlarge for Instance Type. The default disk volume size is 100G. Select WebUI Type. The default is auto, which represents Stable Diffusion WebUI. Select 0316 for WebUI Version and click "Next".5. Keep the default settings and click "Next".6. Confirm the configuration (maintain the default), check "I confirm...", click "Submit", and wait 15-20 minutes for the deployment to complete.3.4.2 Using Stable Diffusion WebUI for text generationpicture 1. After creating the stack, wait for the resources to start one after another (about 20 minutes). When the stack status is displayed as "CREATE_COMPLETE", click "Output". Click the URL in the "Value" position corresponding to "Key" of "WebUI URL".2. Enter the WebUI interface, enter Prompt, and click generate to generate the image.3.4.3 Using Stable Diffusion WebUIconducttrain(microTune Here's how to train your own images using the Stable Diffusion WebUI.
1. First, create a model and navigate to the DreamBooth page.2. After successful creation, as shown in the figure below.3. Set the training parameters and navigate to the Select page, as shown in the figure.4. On the input page, set Setting, keep the Basic parameters as default, and click the arrow on the right.5. Click the arrow on the right side of Advance to expand the tab. Select fp16 in Mixed Precision and xformers in Memory Attention. Keep other options as default, as shown in the figure below.6. Click the Concepts tab and enter the directory where the sample images are located in Dataset Directory. We have prepared sample images in /data/images in advance, and readers can also put their own image files in this directory.7. Scroll down and enter "a photo of a zxw dog" in the Instance Prompt and "a photo of dog" in the Class Prompt. Keep the rest as default.8. Click the "Train" button at the top of the page.9. Observe the training progress on the Output tab on the right and wait for the training to complete.10. After the training is completed, click the refresh button, the newly trained model will appear in the model list, select the newly trained model.11. Click txt2img to jump to the Vincent image page. Enter Prompt, note that you must include the zwx prefix, and view the result.12. Here is how to train with your own images. In the Cloudfomation output, click the NotebookURL link.13. As shown in the figure below, click sd-webui to enter the data/images/ folder. Right-click on the files one by one and delete them.14. Click Upload files button to upload your own images as training set. After uploading, repeat the above steps to complete the training process.
This article briefly introduces how to use the hosted notebook service SageMaker Notebook to deploy the Stable Diffusion WebUI with one click, and easily build an interface-based, fast verification environment for AI-generated images. The solution can be automatically deployed with just a few clicks. The characteristics of the hosted service allow you to not worry about the construction and operation of the underlying infrastructure, while having a good open source project experience. You can also use your own images to fine-tune the model and prepare for customized AIGC applications.- https://docs.aws.amazon.com/sagemaker/latest/dg/nbi.html
- https://jupyter-contrib-nbextensions.readthedocs.io/en/latest/
- https://github.com/AbdBarho/stable-diffusion-webui-docker
- https://github.com/AUTOMATIC1111/stable-diffusion-webui
- https://github.com/invoke-ai/InvokeAI
If you want to quickly experience the hands-on experiment, scan the QR code below, register an Amazon Web Services account, receive $200 in cloud resources for free, and explore the infinite charm of AI painting: