Excellent software and practical tutorials


How to apply for freeGoogle CloudAfter applying for Google Cloud, you need to configure Google Cloud step by step, apply for IP address, configure and enable firewallVirtual MachinesofVM instances.
Next, let's configure Google Cloud Server. First, log in to the Google Cloud management interface and click onGoogle Cloud There is an icon with three horizontal bars on the left side of Pleaform. Click on the icon

After clicking the icon, a navigation menu will appear. Pull down the menu and find the network. There is a VPC network in it, which is used to configure the static IP address and firewall of the server.

First, select the IP address. Under VPC network, select the External IP address menu and click Reserve static address.

Keep the static address settings, give the static address a name, such as UZBOX, and do not need to fill in the description. The default network service level is Premium, the default IP version is IPV4, and you need to select the region in the type. The default is Iowa. Currently, the region with the best support for domestic network speed is Taiwan. Pull down to select the region and select asia-east1 (Taiwan) in the Asia-Pacific region. Click Save.

OK, now that the IP address has been applied for, the next step is to set up the firewall rules.
Click the Firewall Rules menu, delete all the rules in it, and then re-establish a firewall without a firewall. Click Create Firewall Rules and create a new firewall rule named alllow. The log is disabled by default. If it is enabled, it will generate a lot of traffic and consume account balance.
Traffic direction, the default inbound does not need to be changed. Select Allow for the action to be performed on the matching item below, select All instances in the network as the target, and the default IP range for the source filter. Enter 0.0.0.0/0 for the source IP address range to allow access from all IP addresses. Select Allow All for the protocol and port. Click Create, and the firewall has been created here.
![]()
After the IP address and firewall are created, we need to create a cloud server. Click the navigation menu in the upper left corner and go to the VM instance page under Compute Engine under the computing category.

Click Create VM Instance. Of course, if you have a VM instance backup, you can also import the VM instance. Google only allows importing VM instances, not exporting them. You need to understand this. Go to the Create Instance page. The default is to create a new VM instance. Here we create a new VM instance.
Give the virtual machine a name and fill in the name. Select Taiwan in the Asia Pacific region for the region. If you do not select Taiwan here, you will not be able to find the IP address when configuring the virtual machine below. The region defaults to -b. Let's talk about the region and area in detail below.
Regions and areas
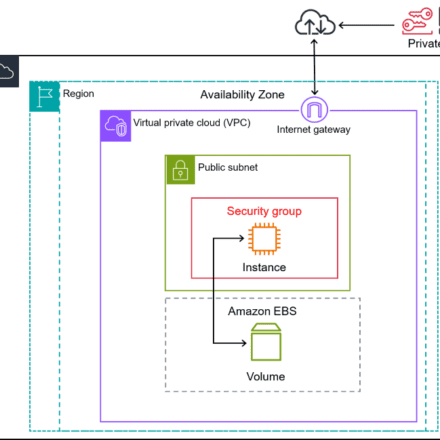
Compute Engine resources are hosted in multiple locations around the world. These locations are made up of regions and zones. A region is a specific geographic location where you can host resources. Each region has one or more zones; most regions have three or more zones. For example, the us-west1 region represents a region on the west coast of the United States, and it has three zones: us-west1-a, us-west1-b, and us-west1-c.Resources within a zone, such as VM instances or zonal persistent disks, are called zonal resources. Other resources, such as static external IP addresses, are regional resources. Regional resources can be used by any resource in that zone, regardless of zone, while zonal resources can only be used by other resources in the same zone.
For example, if you want to attach a zonal persistent disk to an instance, both resources must be in the same zone. Similarly, if you want to assign a static IP address to an instance, the instance must be in the same region as the static IP address.
Placing resources in different zones within a region isolates most types of physical infrastructure failures and infrastructure software service failures. Placing resources in different zones allows for a higher degree of failure independence. In this way, you can design robust, reliable systems by distributing resources across different failure domains.
Only some resources are region or zone specific. Other resources, such as images, are global resources that can be used by any other resource anywhere. For information about global, regional, and zone Compute Engine resources, see Global, Regional, and Zone Resources.
Regions and clusters
Compute Engine implements an abstraction layer between zones and the physical clusters that host zones. A cluster represents a unique piece of physical infrastructure within a data center. Each cluster has independent software infrastructure, power, cooling, networking, and security infrastructure, and has a large pool of compute and storage resources.Each zone is hosted in one or more clusters, and Compute Engine maps zones to clusters independently for each organization. For example, your organization's us-central1-a zone might not map to the same cluster as another organization's us-central1-a zone.
Separating regions from clusters has several benefits for both you and Compute Engine:
This enables Compute Engine to ensure that resources are evenly distributed across clusters within a region.
As Compute Engine continues to expand its regions by adding more clusters, the list of zones you can choose from remains limited.
For most organizations, Compute Engine ensures that all projects in the organization have consistent zone-to-cluster mappings. For organizations that use VPC Network Peering or Private Services Access to share networks or services with other organizations, Compute Engine tries to ensure that peered organizations have consistent zone-to-cluster mappings. For example, for a large SaaS provider, Compute Engine might not be able to provide consistent mappings for all peered organizations. In such cases, Compute Engine ensures that peered projects have consistent zone-to-cluster mappings.
Let me briefly talk about the options in the Asia-Pacific region:
| area | area | Location |
| asia-east1 | a, b, c | Changhua, Taiwan |
| asia-east2 | a, b, c | Hongkong |
| asia-northeast1 | a, b, c | Tokyo, Japan |
| asia-northeast2 | a, b, c | Osaka, Japan |
| asia-south1 | a, b, c | Mumbai, India |
| asia-southeast1 | a, b, c | Jurong West, Singapore |
At present, Taiwan has the best speed support for the mainland, followed by Hong Kong, and the worst is Japan.
After selecting the region, start machine configuration:
For machine configuration, just select general. The prices of memory optimization and computing optimization are higher than each other.
The virtual machine platform series are divided into the first generation and the second generation. The first generation is the N1 series and the second generation is the E2 series. You can choose according to your needs. Here we take the N1 series as an example.

The cheapest N1 series is $5 for a shared core with 1 vCPU and 614MB memory, and the other is $15 per month for 1 vCPU and 1.7GB memory. I don't consider these two. After installing the CENTOS system and configuring the PHP environment, the $15 1.7GB memory one can't even run! The memory is too low.
It is recommended to use the standard configuration of 1 vCPU and 3.75GB memory. The estimated monthly cost is $28.50. Of course, if you need higher, you can choose a more advanced machine configuration.
The container is not selected by default. Start the disk and click Change Configuration Disk:
The virtual machine installs the operating system here. The public image is the operating system disc image provided by Google. Select the operating system you want to install and then select the hard disk size.

Startup disk type setting: Standard persistent disks are cheaper than SSD persistent disks. Standard disks have worse IO read performance than SSDs. Users with high requirements can choose SSD persistent disks.

The startup disk is selected here, the identity and API access rights are the default, both firewalls are checked, HTTP traffic is allowed, and HTTPS traffic is allowed. The next and last step is to configure the IP address.

Click Management, then click Network. The network mark is default, the host name is default, and click the small pencil icon behind the network interface to enter the configuration.
Enter the network interface configuration interface. Select external IP, enable IP forwarding, and click Finish.

After all configurations are completed, click Create and a new VM instance is created.
At this point you can use the web version of SSH on the Google Cloud VM instance interface to manage your virtual machine.

If you need to change the configuration of the virtual machine, such as upgrading the CPU, increasing the memory, expanding the hard disk, etc., you can first select the VM instance name and click Stop. After stopping the VM instance, click the name of the VM instance to enter and modify the configuration.
Finally, let's ping the IP of Google's virtual machine to see how fast it is in China.

The speed is pretty good, more than 200 MS, and the key is that there is no packet loss, it is quite stable!
Next, I will introduce the environment configuration for installing PHP on Google virtual machine.Manually install PHP7.4.3 under CentOS7