Excellent software and practical tutorials


Free CDN provides 1000G free CDN traffic per month Gcore CDN
What are the free CDNs that are fast and free? Let’s take a look below Gcore CDN , Gcore launched a free CDN service, similar to AWS Free CDN Cloudfront CDN, Gcore CDN provides 1000G, or 1T, of free CDN traffic per month. Although the effect is not as good as Cloudfront CDN, it is still good for small factories, after all, it is a free CDN.
What is Gcore
Gcore is an international leader in public cloud and edge computing, content delivery, hosting and security solutions. We manage a global infrastructure designed to deliver best-in-class edge and cloud-based services to enterprise-class businesses.
Gcore is headquartered in Luxembourg with offices in Germany, Lithuania and Georgia.
Gcore official website:https://gcore.com/
Gcore CND Register Account
Signing up for a free CDN is relatively simple. You can log in directly using your Google account or GitHub account, or register using your email address.

Gcore CND Registered Address:https://cdn.gcore.com/
Because Gcore's CDN requires changing the nameservers, you need to have a domain name and then a dedicated CDN.
Freenom Free Domain Names Find a new free domain name
Free CDN for WordPress
Gcore offers free CDN plans for all WordPress enthusiasts who need a powerful and cheap solution to reach a global audience. How to Speed Up Your WordPress Website Using Gcore CDN, let's take a look at how the free CDN Gcore CDN works.
Content Delivery Network (CDN) brings your website visitors closer to the origin servers hosting your content by using geographically distributed caching servers. With more than 140 points of presence around the world, Gcore CDN is ready to reduce your page load times to significantly improve user satisfaction.

How to use Gcore CDN Free CDN
Activate CDN module
After successful registration, log in directly to the CDN control panel.


For free CDN service, you should choose FREE, which is the default choice. 0/mo Then click Next Activate the CDN module.
Service Activation. This will take several minutes. The CDN service is being activated for your account. The service menu will appear in 2-3 minutes and you can start using it.
Create a free CDN resource
After the CDN module is activated, you need to create a new CDN resource. In the lower left corner, we can see that there are 1000G of free resources remaining, which means 1T of free resource traffic.

After clicking Create CDN Resource, you will be taken to the installation wizard page and can complete the installation step by step through the installation wizard.
Step 1: Acceleration and protection types
Select the type of acceleration and protection for your project:By default, the entire site is accelerated and protected, using CDN and DNS services for code-free acceleration and network layer protection of the entire site. The free plan automatically activates the DNS service.
You can also choose to accelerate and protect only static assets and use CDN services to accelerate and protect the static assets of your website at the network layer. Code changes are required.
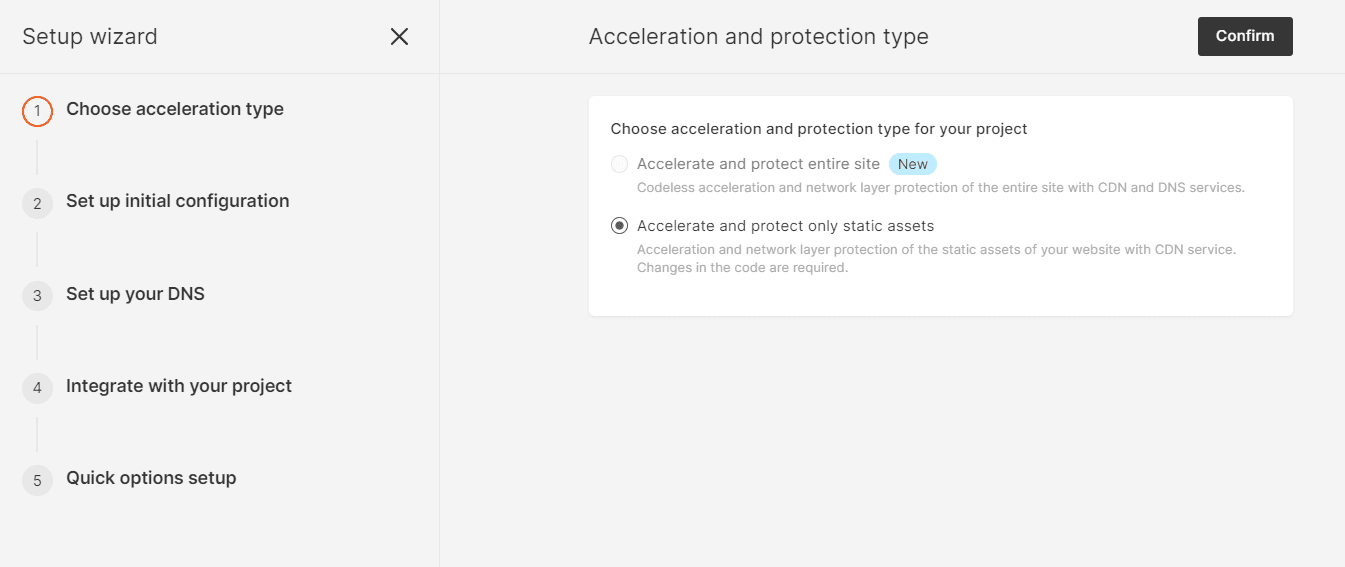
After making your selection, click Confirm in the upper right corner to proceed to the second step.
Step 2: Enter the site name
Enter the site you want to accelerate and protect:Enter your website domain name, no need to fill in the website description.

Step 3: Check your DNS records
Add DNS records:Confirm that the following DNS records are configured correctly. Add more DNS records or edit existing records. These DNS records will only take effect after you change your nameservers with our nameservers.
Resolve the domain name to the IPV4 address of the cloud server where your website is located.

Step 4: Change the Name Servers
DNS zone xxx.com has been created successfully. CDN resources will use it to proxy traffic through the CDN. Please change your name servers to ours. This is a critical step in the setup and must be completed to speed up and protect your project.
Steps:
1. Log in to your domain registrar's website.
Determine your registrant through the service WHOIS.
2. Replace the current name servers with our name servers.
Replace the original DNS server with
ns1.gcorelabs.net ns2.gcdn.services
3. Save your changes.
It may take up to 24 hours for the registrar to update the name servers.
Change the DNS server name to Gcore's DNS server name. It takes a long time for the DNS server name to take effect, which may take several hours at most, or a few minutes at the fastest.

Step 5: Quick option settings
Configure your CDN resource options to improve security, optimize performance, and get the most out of your site.
Enable the GZip compression option to speed up page loading for end users by compressing content.
Enabling the WebSockets option speeds up data exchange between end users and origins by reducing additional HTTP requests.

Enable all options and save. If the domain name has not applied for an SSL certificate, you can apply for one automatically. It is recommended to use automatic application for SSL certificates.

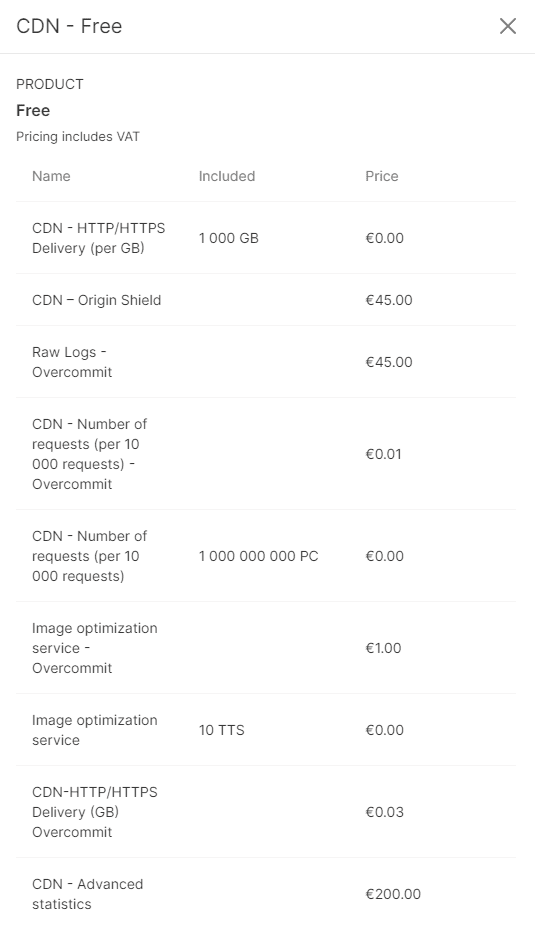
Free CDN 1T traffic per month
Note that Gcore CDN's monthly free CDN traffic is only 1TB. Free resources left: 1000 GB
The billing date of the free CDN is calculated from the date of your registration, not from the calendar month. However, the billing date is not important for the free CDN. As long as the traffic of the free CDN does not exceed 1000G, there will be no problem.