Excellent software and practical tutorials


How to configure the CyberPanel web server panel
If you are using WordPress to build a website and blog, thenOpenLiteSpeed The Web may be your best choice.LiteSpeedIt is an alternative to Apache. Using LiteSpeed as the web server, the access speed of its website is much higher than the parsing speed of Apache and Nginx. LiteSpeed provides better performance and can reduce resource usage. CyberPanel is the first to use free OpenLiteSpeed Web server open source panel!
The most important thing is that LiteSpeed provides a WordPress cache plugin LiteSpeed Cache LiteSpeed Cache is almost a fool-proof plug-in. With just a few simple settings, you can make WordPress access speed so fast that it takes off. It is no exaggeration!
CyberPanel is the first LiteSpeed web serverLinux PanelAfter using LiteSpeed Cache for simple optimization, the scores of Gtmetrix and Google PageSpeed Insights are almost A, which is a very satisfactory result. Because both Google and Bing,Search EnginesThe most important factor in ranking is the opening speed of the web page, which means that before doing any SEO optimization, it is very important to choose a correct web server. The following is a detailed introduction to the detailed configuration after installing CyberPanel.
CyberPanelOfficial website:https://cyberpanel.net/

CyberPanel Installation
Briefly explain CyberPanel Installation In September 2023, CyberPanel made some adjustments to the server version installation. CentOS and CentOS Stream systems are no longer supported, as well as Rocky Linux and Red Hat
- A server with a fresh installation of Ubuntu 20.04, Ubuntu 22.04, CloudLinux 7, CloudLinux 8, AlmaLinux 8.
- 1024MB RAM or higher
- 10GB disk space
Note: Ubuntu only supports Ubuntu 20.04 and Ubuntu 22.04. Do not use higher versions, such as Ubuntu 23. CyberPanel cannot be installed on Ubuntu 23. Many CyberPanel installation failures are mostly due to server system problems.
During the installation of CyberPanel, CyberPanel includes two versions.CyberPanel and CyberPanel Ent Let me briefly introduce these two versions.
Both versions of CyberPanel 100% are identical. The only difference is which web server is running on the backend.
- CyberPanel comes with OpenLiteSpeed and is completely free for an unlimited number of domains and workers.
- CyberPanel Ent comes with LiteSpeed Web Server Enterprise and is free for 1 domain. If you need more than 1 domain, you can check out our pricing page. CyberPanel license includes the price of LiteSpeed Enterprise license.
CyberPanel is free and uses the open source OpenLiteSpeed web server. CyberPanel Ent is paid and uses the commercial version of LiteSpeed Web Server Enterprise as the web server.
Let's take a look at the differences between the two versions:
CyberPanel OpenLiteSpeed
OpenLiteSpeed is our free, open source web server that is most often used for single sites that do not change often. This is because OpenLiteSpeed requires a restart in order to load any new .htaccess files.
- Powerful cache engine
- Apache-compatible rewrite rules
- CyberPanel and DirectAdmin compatibility
- Unlimited worker processes
- Industry standard mod_security library
- Open source, free
- Community Support
CyberPanel Ent LiteSpeed Web Server Enterprise
LiteSpeed Web Server Enterprise Edition is ideal for shared hosting environments where updates are frequent. LiteSpeed Web Server automatically detects changes to .htaccess and adjusts as needed without requiring a restart.
- More powerful cache engine
- Fully compatible with Apache
- Compatible with cPanel, Plesk, DirectAdmin, CyberPanel, etc.
- Number of worker processes based on license
- Proprietary high-performance mod_security engine
- SSL Handshake Offloading
- Commercial version, free
- Commercial Support
See a detailed feature comparison between CyberPanel and CyberPanel Ent.
After understanding the detailed functions of CyberPanel and CyberPanel Ent, the free and open source CyberPanel can meet the needs of building a WordPress website. It is very simple to install CyberPanel on the server.
Below in Google CloudInstall CyberPanel on the virtual machine instance.
Create a new Google Cloud VM instance
First, activate Google Cloud and create a Ubuntu 22.04 virtual machine instance in Google Cloud.
In Google Cloud, click the left menu, click the Compute Engine option, and select Virtual Machine Instance. If you have not created a virtual machine instance before, you need to enable the Compute Engine API first.

Click Create Instance in the virtual machine instance. Now we are ready to create a new Ubuntu virtual machine instance.

Start creating a new virtual machine instance on the Create Instance page, fill in the configuration information, and the monthly estimated cost is on the right. The free Google Cloud can get a $400 trial for free for three months.
Name: Enter a custom name or the default name, lowercase letters and numbers, without special symbols
Region: Select the region where you want to create the VM instance.Click here to search all areas If you are building an overseas website, you can choose different regions for different countries. For China, the Asian regionHongkongThe access speed is very fast.
Availability Zone: The default value is acceptable. Availability Zones are different machine types and different IP nodes in the same region.
Machine configuration: E2 is selected by default in the general category. E2 is sufficient for beginners, is economical, and has low daily computing costs.
The E2 machine family can have up to 32 vCPUs, up to 128 GB of memory, and up to 8 GB per vCPU, and offers the lowest cost of all machine families. The E2 machine family has predefined CPU platforms running either Intel processors or 2nd Generation AMD EPYC Rome processors. The processor is selected for you when you create a virtual machine. This machine family offers a wide range of compute resources at the lowest price on Compute Engine, especially when combined with committed use discounts.
The E2 and N1 families include shared-core machine types. These machine types time-share a single physical core, which is a cost-effective way to run small, non-resource-intensive applications.
E2: Provides 2 vCPUs and can be used for short bursts.
In the machine type below, choose the preset due to the website traffic requirements. You can choose CPU shared cores and independent cores! There are detailed options in the preset. If there is no option you want to use, you can customize the CPU and memory size in the custom one.

The next few options are left as default. At the Startup Disk option, click Change and select the operating system used by the server. Select the operating system from the public images below.

Here is an example configuration:
Operating system: Ubuntu
Version: Ubuntu 22.04 LTS (Note that you must select the x84/64 operating system version, and the operating system version must correspond to the CPU platform architecture of the virtual machine instance selected above)
Boot disk type: SSD persistent disk, which provides the best performance.
Size: Fill in the size as needed. Generally, 100GB is enough for a personal website or blog. If this is not enough, you canOnlineIncrease the disk size.

After making your selection, click Select to continue creating the VM instance.

In the firewall options, check three rules and install the Observability Ops Agent
Ops Agent is used to monitor the server status in real time. It is very necessary for later operation and maintenance of the server! It is recommended to install it.
Finally, click Create, and an Ubuntu virtual machine instance has been created. Next, after configuring a public external IP and firewall, you can use it normally.
In the Google Cloud platform, click the left menu and select IP addresses in the VPC network.
Click Reserve External Static IP Address, then give the static address a name. Lowercase letters, numbers, and hyphens are allowed.
In the Region and Attach Target section, select the region of the virtual machine instance you just created. After selecting the region, click Attach Target below to attach it to the virtual machine instance you just created.
Note: Static IP addresses that are not attached to an instance or load balancer are charged at a higher hourly rate. That is to say, after you apply for a fixed IP address, if you do not use it, you will be charged a high price, mainly to avoid waste and the shortage of IPV4 resources.
If you are not satisfied with the external IP address you applied for, you can apply for multiple external IP addresses, select the IP you are satisfied with, and then delete the others. To delete an external IP, just check the IP address and click Release Static Address.

After applying for the IP address, click Firewall on the left menu. Here you need to turn off the Google Cloud firewall. For convenience, you can use the firewall on the server. Set the firewall totransparentFirewall, open all ports.
Click Create Firewall Rules Create a new VPC firewall rule. Enter a firewall name, for example: all
Next, select Additional Firewall Rules:
Traffic direction: default inbound
Action to take on matching items: Default: Allow
Goal: Select all instances in the network
Source filter: Default IPV4 range
Source IPv4 Range: Enter 0.0.0.0/0 (meaning all ranges)
Protocols and Ports: Select Allow All

After making your selection, click Create to create a transparent firewall with all access ports open.
Next, you can install CyberPanel by doing a simple configuration. You can refer to the following link to configure the Ubuntu server.
Enable SSH and configure swap partition on Ubuntu
Install CyberPanel
First pass SSH Connect to your server:
CyberPanel is very easy to install. Use the SSH tool (Xshell 7) Log in to your server via SSH as the root user.
Update after successful SSH loginSystem SoftwareBag
sudo apt update && sudo apt upgrade -y
Next run the installation script
Run the following command. It will launch the automated installation script which will prompt you to make some decisions about the LiteSpeed version and which add-ons to install.
sh <(curl https://cyberpanel.net/install.sh || wget -O - https://cyberpanel.net/install.sh)
If for some reason you cannot log in as root, you can use this command:
sudo su - -c "sh <(curl https://cyberpanel.net/install.sh || wget -O - https://cyberpanel.net/install.sh)"
If you encounter any exceptions after installation, you can roll back the version installation.
sh <(curl https://raw.githubusercontent.com/usmannasir/cyberpanel/stable/preUpgrade.sh || wget -O - https://raw.githubusercontent.com/usmannasir/cyberpanel/stable/preUpgrade.sh)
Enter the version number directly to install, for example: 2.3.6 or 2.4.1
After the installation script is entered, it will automatically run the installer and select the LiteSpeed version you want to use.
Select the version of LiteSpeed you want to install. If you choose LiteSpeed Enterprise, make sure you have obtained a license key first. It is free for 1 domain, but you still need to obtain a key.
If the installation fails, please confirm your operating system version. Only servers running Ubuntu 20.04, Ubuntu 22.04, CloudLinux 7, CloudLinux 8, and AlmaLinux 8 are supported.

Enter the number 1 to install OpenLiteSpeed
Whether to install the three add-ons PowerDNS, Postfix and Pure-FTPd
- PowerDNS – Open Source DNS Server
- Postfix – Open Source Mail Transfer Agent
- Pure-FTPd – Open Source FTP Server
Google Cloud has disabled SMTP port 25, soPostfix Even if the mail server is installed, it cannot be used. Besides, there is no need for a mail server for the time being, and there is no need for a DNS server and FTP server for the time being. FTP can use Xftp7 for uploading and downloading. You can choose not to install these three additional components. Of course, if you have certain needs, you can install them on demand.
remoteMySQL(Default N): N
Allow your database to be installed on a remote server. Enter N to install the MySQL database on this server. If you want to install the database on another server, you can select Y in this step to configure the remote database connection.
CyberPanel version (default latest version): You can choose to install a previous version of CyberPanel, or press Enter to install the latest version
Set a password. If this step is left blank, a default password will be configured (default "1234567"). It is recommended that you use "s" to set your own strong password.
Next, configure the cache extension and add the following two cache toolsMemcachedand Redis are installed by default.
Distributed memory object caching system, Memcached (default Y): Y
In-memory data structure storage, used as a database, cache, and message interrupt, Redis (default Y): Y
The kernel watchdog is used to monitor whether the system is running. It should automatically restart the system if it is hung due to an unrecoverable software error! Press Enter to start the installation of CyberPanel
The installation process will be automatic. It will take about 10 minutes, depending on the speed of your server.
After the installation is complete, enter "y" to reboot. Or enter "reboot" after performing other required operations.
At this point, CyberPanel has been installed.
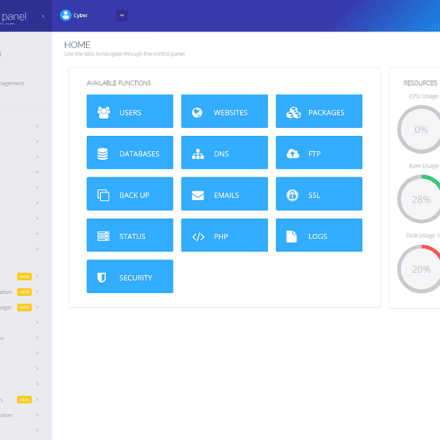
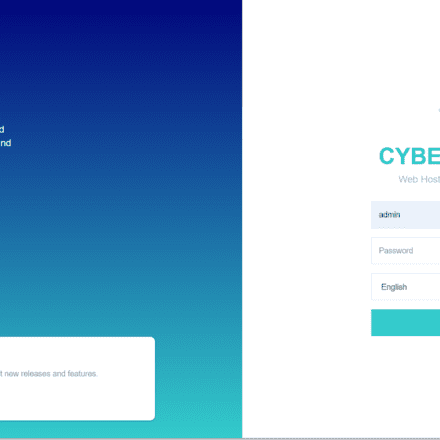
Enter https://ip:8090 in your browser
After entering the user password, you can access the Cyber Panel.


CyberPanel Configuration
I used to rack my brains to optimize the website's Gtmetrix score and Google PageSpeed Insights score, but with CyberPanel+OpenLiteSpeed, I can easily achieve full green or even full marks.
After CyberPanel is installed, we will start to configure CyberPanel step by step. Although CyberPanel is ready to use out of the box, there are still many things that need to be configured if you want to put it into a production environment.
SSH Configuration
After CyberPanel is installed, additional ports need to be reactivated. For example, if the port of SSH was previously modified, SSH will not be able to connect after CyberPanel is installed.
After logging in to the CyberPanel, click Security in the left menu, select SSH Hardening, click Save Changes, and then you can log in normally via SSH.
Otherwise, even if you changed the port when configuring SSH, after installing the CyberPanel panel, even if the SSH port is opened in the firewall, you will not be able to use the SSH connection. I don’t know if it is a BUG or a deliberate design.

Left menuSafetyClick belowFirewallThis firewall is the default firewall of CyberPanel panel, which can only open and close ports.

The transparent firewall we previously set up on Google Cloud is a first-tier firewall, a platform-level protection wall. This firewall belongs to the second-tier firewall, a server-level firewall.
Firewall Configuration
In addition to the basic port firewall, CyberPanel can also install CSF Firewall and ModSecurity.See how to configure ModSecurity
CSF is a free firewall for Linux system developed by a small foreign company. It works based on iptables and can effectively relieve server pressure. It has functions such as automatic shielding of brute force password cracking IP, management of open ports, immunity to lightweight DDos and CC, etc. At the same time, it is also extremely easy to install and use. It also has a graphical operation interface on the DA and CP panels we commonly use, and it also supports individual ordinary users to install and use it in the LNMP environment.
At the same time, CyberPanel also provides Imunify firewall integration services.
Imunify 360 protects Linux-based web servers and all hosted websites from malware infections, web attacks, vulnerability exploits, and all other threats.
How can I test Imunify360? You can explore all the features of Imunify360 for free on an unlimited number of servers for 14 days. No credit card information is required. After the trial period, you can purchase an Imunify360 license through CloudLinux Network (CLN) at cln.cloudlinux.com.
Imunify is a paid plugin and is not recommended. The free CSF firewall function is sufficient. Of course, after installing WordPress, there are many security plugins to choose from. I will not introduce more about firewalls here.
You can choose to install the CSF free firewall, or turn off the basic port firewall provided by the CyberPanel panel, and then you can install the firewall in WordPress.
The firewall in WordPress is a third-layer firewall, an application-type firewall. The firewall can be easily configured in WordPress.
Docker Manager Configuration
Docker uses containerization technology to make it simple and easy to deploy and run applications. Docker packages the application code together with all the libraries and dependencies required to run. Once the application is packaged, it will run in any environment where Docker is available.
CyberPanel provides you with an easy way to work with Docker containers and images. By default, Docker is not installed during the installation of CyberPanel.
If you need Docker Manager, you can install it: In the left menu, click Docker Manager to install it.
Click Install Docker to start the installation process, which may take several minutes. Once the installation is complete, the page will automatically refresh. Now you are ready to manage Docker images and containers.
Modify package configuration
Before building a website, you need to modify the package configuration first. Because CyberPanel is a multi-user mode, the website building is more similar to the logic of virtual machine sales. When creating a website, you need to select the user ownership of the website and the website restrictions.
This package is used to limit the size of the website.

In the initialized package Default, the default disk space and traffic are both 1000, the subdomain limit is 20, and you don't need to worry about the mail account, database, and FTPS for now, as they are basically not used.
Click Edit. Change the domain name, hard disk space, and traffic to "0", where 0 means no limit. Click Save after modification.
Create a website
Under the Website menu on the left menu, click Create a website.
Select a package: Default is selected by default
Owner: admin is selected by default
Domain name: Just fill in the primary domain name. There is no need to fill in www. The domain name bound to www will be automatically determined. If it is a secondary domain name, fill in the secondary domain name directly.
Email: Fill in as you like
choosePHPVersion: PHP 8.0 is selected. There are multiple PHP versions to choose from.PHP7.4 is relatively stable, PHP8.0 and PHP8.1 sometimes encounter inexplicable failures. If you encounter problems, you can switch the PHP version to PHP7.4
Additional function: Check SSL, it will be automatically generated after checking SSLSSL Certificate.

After clicking Create Website, the website has been created!
open_basedir protection prohibits your PHP scripts from accessing the file system outside of the specified path, ie open_basedir "/home/domain.com/"
If you specify this path for open_basdir, your PHP code cannot access file system paths outside the scope of /home/domain.com/
This essentially helps prevent a single site on your server from being hacked.

If you want to enable open_basdir to prevent cross-site attacks, you can find the anti-cross-site icon under the file options of the website and click to activate it.

LiteSpeed Settings
Under the Server Settings menu, clickLiteSpeed Settings
This is a global setting for the LiteSpeed server.
Maximum number of connections: 10,000
Specifies the maximum number of concurrent connections the server can accept. This includes both plain TCP connections and SSL connections. Once this limit is reached, the server will close the "Keep-Alive" connection when it completes the active request.
When the server is started by the "root" user, the server attempts to automatically adjust the file descriptor limit for each process; however, you might need to increase this limit manually if automatic adjustment fails.
10,000 users are online at the same time, which is enough, and of course this is an ideal value.
Maximum number of SSL connections: 10000
Specifies the maximum number of concurrent SSL connections that the server will accept. Since the total number of concurrent SSL and non-SSL connections cannot exceed the "max connections" limit, the maximum number of SSL connections allowed must be lower than this limit.
Connection timeout: 300
Specifies the maximum idle time allowed for a connection in a request. If the connection remains idle (i.e. no I/O activity) for this period of time, it will be closed.
Setting the value as low as possible can help free up connections that would otherwise be tied up by invalid connections during a possible denial of service attack.
Kepp Alive Timeout: 5
Specifies the maximum idle time for persistent connection requests. If no new requests are received during this time, the connection will be closed. This setting only applies to HTTP/1.1 connections. HTTP/2 connections have a longer idle time and are not affected by this setting.filmring.
It is recommended that you set the value just enough to handle all requests for a single page view. There is no need to extend the persistent connection time. Smaller values can reduce idle connections, increase the ability to serve more users, and prevent denial of service attacks. 2-5 seconds is a reasonable range for most applications. Litespeed is very efficient in non-persistent connection environments.
Memory cache size: 2048M
Specifies the total memory allocated for caching/serving small static files.
OpenGZIP Compression:Enable

PHP Settings
In the server settings menu, there are specific PHP settings for each website. Select the website domain name and you can set the corresponding PHP parameters.
Initialization request timeout (seconds): 600
Specifies the maximum time the server waits for an external application to respond to the first request of a newly established connection. If the server does not receive any data from the external application within this limit, it will mark the connection as bad. This helps identify communication problems with external applications as soon as possible. If some requests take a long time to process, increase this limit to avoid 503 error messages.
Maximum number of connections: 2000
Specifies the maximum number of concurrent connections that can be established between the server and the external application. This setting controls how many requests the external application can handle at the same time. However, the real limit depends on the external application itself. If the external application is not fast enough or cannot handle a large number of concurrent requests, setting this value higher will not help.
Setting a high value does not directly translate to high performance. Setting it to a value that does not overload external applications will provide the best performance/throughput.
Memory soft limit: 2047M
The purpose of this limit is primarily to protect against excessive memory usage caused by software bugs or deliberate attacks, not to restrict normal usage. Make sure to leave enough memory, otherwise your application may fail and return a 503 error. Limits can be set at the server level or at the level of individual external applications. If limits are not set at the level of individual external applications, the server-level limit will be used.
If the limit is not set at either level, or if the limit value is set to 0, the operating system default setting will be used.
Memory hard limit: 2047M
Very similar to "Memory soft limit (bytes)", but within a user process the soft limit can be relaxed up to the hard limit value. The hard limit can be set at the server level or at the individual external application level. If no limit is set at the individual external application level, the server level limit will be used.
If the limit is not set at either level, or if the limit value is set to 0, the operating system default setting will be used.
Process soft limit: 1400
Limit the total number of processes a user can create. All existing processes will be counted towards this limit, not just new processes that are started.
This limit can be set at the server level or at the level of individual external applications. If it is not set at the application level, the server-level limit will be used. If the value is 0 or if neither the server-level nor the application-level limit is set, the operating system default setting will be used.
Process hard limit: 1500
Very similar to the "Process Soft Limit", however, the soft limit can be relaxed up to the hard limit value in a user process. The hard limit can be set at the server level or at the individual external application level. If the limit is not set at the individual external application level, the server level limit will be used. If the limit is not set at either level, or the limit value is set to 0, the operating system default setting will be used.
Database persistent connection: Enable
Specifies whether to keep the connection alive after processing a request. Persistent connections can improve performance, but some FastCGI external applications do not fully support persistent connections. Defaults to "On".
Note: In the PHP settings, there is a BUG in the database persistent connection. After the website is created, the database persistent connection is turned on by default. After setting up the PHP of the site, even if the database persistent connection is turned on, it will be turned off after saving. It needs to be manually set to turn on in the background of OpenLiteSpeed.

Manually set up the database persistent connection, log in to the OpenLiteSpeed backend, select the corresponding domain name in the virtual host, change the persistent connection to yes in the external application, then save in the upper right corner, click Smooth Restart to make the settings effective. If you modify the PHP configuration again, you also need to manually set up the database persistent connection. Otherwise, it will always be closed.

Edit PHP Configuration
In the PHP menu on the left side of the menu, click Edit PHP Configuration. Then select the PHP version in Basic
display_errors: Off
Closed by default, PHP error output
file_uploads: On
Upload option, enabled by default.
allow_url_fopen: On
Open by default
allow_url_include: Off
Default off
If allow_url_include is ON, the file inclusion function can load remote files. This vulnerability is called a remote file inclusion vulnerability. Exploiting a remote file inclusion vulnerability can directly execute arbitrary commands. In the actual penetration attack process, the attacker can place an executable malicious file on his own web server and load the file through the remote file inclusion vulnerability of the target website, thereby achieving the purpose of executing arbitrary commands.
memory_limit: -1
The maximum memory (bytes) that the script can request (can use K and M as units) (must be greater than the value of post_max_size)
Setting it to -1 means removing the memory limit.
max_execution_time: 0
The maximum execution time (in seconds) allowed for each script. 0 means no limit.
This directive only affects the running time of the script itself. Any other time spent outside the script running, such as system()/sleep() functions, database queries, file uploads, etc., are not included.
upload_max_filesize: 1024M
The maximum size of the file allowed to be uploaded (must be smaller than the value of post_max_size).
post_max_size: 1025M
The maximum length of POST data allowed to be received (in bytes) ("0" means unlimited). Only meaningful when enable_post_data_reading = On.
This setting also affects file uploads (must be larger than the value of upload_max_filesize). If the POST data exceeds the limit, $_POST and $_FILES will be empty.
If memory limiting is enabled, this value should be less than the value of memory_limit.
max_input_time: -1
The maximum allowed time (in seconds) for each script to receive input data (POST, GET, upload).
-1 means unlimited. On a production server this should be limited to an explicit value to prevent the script from running indefinitely.
If the user has a slow connection and needs to upload large files, a larger value should be set. For CLI mode, this command is hardcoded to "-1" (no limit)
PHP basic parameters can be configured as needed, and the above configuration parameters are unlimited.

Another important configuration is the limit on PHP uploading multiple files at the same time. Click Advanced Configuration of PHP Parameters to modify the upload limit directly in the php.ini file.
Look in php.ini max_file_uploads = 20
Modified to:
max_file_uploads = 2000
The maximum number of files that can be uploaded simultaneously in one HTTP request. The maximum number of uploaded files is 2000.pieceNeed to use.
php.ini configuration tuning
A default PHP installation is like a generic suit purchased at a department store; it fits, but it's not perfect. A tuned PHP is like a custom-made suit that's exactly your size.
Below are some reference configurations, use as appropriate.
Regular WordPress needs:
max_input_vars = 5000
Limit the maximum form submission. If you use a large WordPress theme, it usually needs to be more than 1000.
memory_limit = 512M
PHP scripts occupy memory
post_max_size = 256M
Limit post size
upload_max_filesize = 128M
Limit the size of uploaded files, which is the size limit of the WordPress media library. This should be as small as possible from post_max_size
max_file_uploads = 20
Limit the maximum number of simultaneous uploads
max_execution_time = 600
Limit PHP maximum execution time
max_input_time = 600
Limit the maximum time PHP can receive data, which can be greater than max_execution_time
allow_url_fopen = Off
If your website program does not use remote addresses, you can turn off this option.
Opcacheset up:
Below is the reference configuration of Opcache, set it as needed.
opcache.enable=1 opcache.enable_cli=1 opcache.memory_consumption=256 #Memory allocated to opcache opcache.interned_strings_buffer=16 #String resident memory allocated opcache.max_accelerated_files=100000 opcache.max_wasted_percentage=5 opcache.use_cwd=1 opcache.validate_timestamps=1 #It is recommended to turn it off, but it is too troublesome to clear the cache manually, so turn it on and use the following time to automatically detect opcache.revalidate_freq=60 #Check every 1 minute opcache.save_comments=0 opcache.fast_shutdown=1 opcache.consistency_checks=0
CyberPanel Security Settings
CSF Firewall Installation
After CyberPanel is installed, you still need to do some simple security settings. First, install a firewall. The default firewall can only block ports. Next, install a CSF firewall with more functions.
Refer to this article to install CSF firewall:Install CSF firewall (ConfigServer Security & Firewall)
CSF (ConfigServer Security & Firewall) is a powerful and widely used Linux server firewall software that integrates security protection and management functions. It provides flexible firewall rule configuration through iptables, supports IP blacklist and whitelist, port protection, intrusion detection and defense (such as DDoS attacks), and can be seamlessly integrated with control panels such as cPanel and DirectAdmin. With its ease of use, high customizability and real-time monitoring capabilities, CSF has become the preferred tool for server administrators to enhance system security and resist network threats.
ModSecurity Firewall Installation
Install the ModSecurity firewall and click ModSecurity Settings in the Firewall menu to install it.

After the installation is complete, shut down the audit engine, start the rule engine by default, and then enable the rule package in the ModSecurity rule package.

ModSecurity is an open source Web Application Firewall (WAF) designed to protect Web applications from various network attacks. It can effectively defend against common attacks such as SQL injection, cross-site scripting (XSS), and file inclusion by real-time monitoring and filtering HTTP traffic. ModSecurity supports flexible rule configuration and can be integrated with Web servers such as Apache and Nginx, and is suitable for multiple platforms. Its powerful log analysis and custom rule functions make it an important tool for enterprises and developers to protect the security of Web applications, combining efficiency and scalability.
ClamAV, Maldet firewall installation
ClamAV is a general-purpose open source antivirus software suitable for detecting most malware and viruses. Maldet (Linux Malware Detect) focuses on detecting common Trojans and malicious code in the Web environment, especially web page files on Linux servers, uploaded malicious scripts, etc. Maldet can also be configured to scan using ClamAV's virus library, which can expand its feature library and detect more viruses.
Reference installation:Install open source antivirus tools ClamAV and Maldet
Hosting Panel issues SSL certificates
Next, bind a panel-specific second-level domain name, and then apply for an SSL certificate to use encrypted access.
First, set up a secondary domain name, resolve it to the panel IP, and then create a website.

After the website is created, an SSL certificate will be automatically applied for.

Then under the Host Name SSL menu, select the website you just created and issue an SSL certificate for the panel host.
Modify the CyberPanel host panel port
Next, modify the port managed by the panel and select the port in the server status to modify.

Before modification, you need to open the port in the CSF firewall, otherwise you will not be able to access the panel after modifying the port.
 Modify the custom port. After the modification is completed, click Modify to save.
Create a super administrator
The default super administrator has security risks. You need to add a new super administrator and modify the admin administrator name.
If the admin administrator deletes it directly, the panel system will crash.
In Create User, create a new user, select admin for control policy and 0 for number of websites, no limit, then enter a new user password to create a new user.
Change the password of the original user admin to a more complex one.
 Then, under the database menu, enter phpmyadmin and modify it. Modify the user name of admin in the loginSystem_administrator table.
Make the name more complex so that it is difficult to guess the user name even with brute force.
After the modification is completed, exit the panel and log in with the new user.
Create a new plan
After logging in, new users also need to create a new package, which requires a new position to be used, and the original admin default package cannot be used.
 Set the name, unlimited domain name, hard disk and other options, and then create a new package.
Note: Do not delete the Default package, as it will cause unexpected failures. When creating a website, use the new package.
CyberPanel FAQ
I have summarized some problems encountered during the installation and use of CyberPanel. I hope these problems can be improved in subsequent iterations!
Domain name SSL certificate error encountered when creating a website
When creating a website in CyberPanel, in the domain name option, it is prompted not to use WWW, which will be created automatically.
That is to say, when you enter the first-level domain name, the second-level domain name WWW will be created by default. When CyberPanel applies for an SSL certificate for the domain name by default, it will automatically apply for SSL certificates for WWW and the primary domain name, and the two domain names will be in one certificate.
The original intention is good, it is convenient for users, there is no need to apply for a WWW certificate, and the two domain names are bound to one website by default.

Now the problem arises. If the user does not use the primary domain name to build the website, but uses the WWW domain name to create the website, then the primary domain name will not be included in the WWW domain name certificate when applying for the domain name certificate.
In the domain name alias, after adding the primary domain name, the primary domain name is successfully bound to the website. But now the problem arises. After the SSL certificate applied for in the domain name alias takes effect, the domain name certificate of WWW becomes invalid. After applying for the certificate of WWW again, the primary domain name certificate becomes invalid.

The final problem is that the two domain names are not in the same certificate. Even if there is an option to add an SSL certificate in the configuration, adding an SSL certificate requires you to use commands on the server to apply for an SSL certificate first, and then manually paste the Cert and Key into the added SSL certificate, which is more troublesome.
Solution: Re-establish a website with a primary domain name in CyberPanel, back up the content of the WWW website, and then restore it on the website with the primary domain name.
Problem summary: After binding the primary domain nameAutomatically generateFor a domain name certificate with a WWW domain name, the domain name of the website created in CyberPanel cannot be modified once it is used, and the website domain name cannot be modified on the website modification page.
- Add domain name: You can only add subdomains. The secondary domain name bound to the subdomain is stored in the website domain directory.
- Domain alias: can only bind other domain names except the primary domain name. You can use example.net to access the same content as example.com.
The website redirects too many times and the page does not work properly.
After a lot of hard work, I finally found that the website could not be opened. It prompted that there were too many redirects. I just hesitated when setting it up. Should I use the WWW domain name to access it or not? I simply selected it several times.template, you will encounter problems.
 It turns out that the problem lies in the selection of templates. Each time you select a template, it will be automatically added to the configuration file. That is to say, if you select WWW->NON-WWW once and then select NON-WWW->WWW again, two rules will be added, and these two rules will cause an endless loop.
An error occurred due to too many redirects.
From a logical point of view, when adding WWW access and then choosing not to use WWW access, the relevant content in the configuration file should be replaced instead of adding the code to not use WWW access. This should be considered an operational BUG. Although it is caused by human operation, it can be completely avoided from a technical point of view.
If your website is inaccessible due to repeated addition of template content, you can copy the following content into the configuration file, and then carefully select the template to add.
# BEGIN LSCACHE ## LITESPEED WP CACHE PLUGIN - Do not edit the contents of this block! ##RewriteEngine on CacheLookup on RewriteRule .* - [E=Cache-Control:no-autoflush] RewriteRule .litespeed_conf.dat - [F,L] ### marker CACHE RESOURCE start ### RewriteRule wp-content/.*/[^/]*(responsive|css|js|dynamic|loader|fonts).php - [E=cache-control:max-age=3600] ### marker CACHE RESOURCE end ### ### marker LOGIN COOKIE start ### RewriteRule .? - [E="Cache-Vary:,wp-postpass_9cb8b91dfeb87bdca7711a9e10329917"] ### marker LOGIN COOKIE end ### ### marker FAVICON start ### RewriteRule favicon.ico$ - [E=cache-control:max-age=86400] ### marker FAVICON end ### ### marker DROPQS start ### CacheKeyModify -qs:fbclid CacheKeyModify -qs:gclid CacheKeyModify -qs:utm* CacheKeyModify -qs:_ga ### marker DROPQS end ### ## LITESPEED WP CACHE PLUGIN - Do not edit the contents of this block! ## # END LSCACHE # BEGIN NON_LSCACHE ## LITESPEED WP CACHE PLUGIN - Do not edit the contents of this block! LITESPEED WP CACHE PLUGIN - Do not edit the contents of this block! ## # END NON_LSCACHE # BEGIN WordPress # The directives (lines) between "BEGIN WordPress" and "END WordPress" are # dynamically generated, and should only be modified via WordPress filters. # Any changes to the directives between these markers will be overwritten.RewriteEngine On RewriteRule .* - [E=HTTP_AUTHORIZATION:%{HTTP:Authorization}] RewriteBase / RewriteRule ^index.php$ - [L] RewriteCond %{REQUEST_FILENAME} !-f RewriteCond %{REQUEST_FILENAME} !-d RewriteRule . /index.php [L] # END WordPress
How to set up automatic crawler with LiteSpeed Cache (LSCache)
LSCache is a free caching tool in WordPress with millions of installations. Of course, not that many are actually used, but it is undeniable that LiteSpeed web server is much faster than Nginx and Apache. There is no doubt about this.
Setting up automatic crawlers in LSCache, that is, pre-caching, requires modifying the .htaccess configuration file on the server, which is a bit difficult for novices.
Let's talk in detail about how to set up the pre-caching function of LSCache.
The first step is to click the Crawler menu in LiteSpeed Cache, and then click the Sitemap Settings option.
Add your sitemap in either xml or html format. Click Save.

The second step is to enable the crawler in General Settings, turn on the Crawler switch and select ON

After the crawler switch is turned on, click the Map option and click Refresh Crawler Map to read the map.
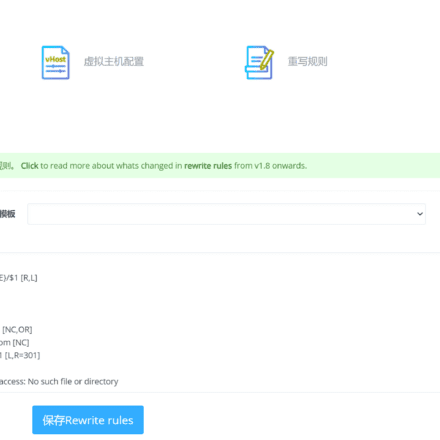
 Then set it up in CyberPanel, find the corresponding website in CyberPanel, and in the website configuration options, click Rewrite Rules.
This rule is the .htaccess configuration file.
At the beginning of the configuration file, add the following code
CacheEngine on crawler

After the modification is completed, click Save Configuration File. Then wait patiently, the crawler will automatically pre-cache the web page at regular intervals.
Regularly clean up PHP cache files
Set to automatically clean up the cache files generated by php83 at 2 am every day.
Too many cache files will cause the system disk Inodes 100%, which will cause system failure and make the website inaccessible.
You can use df -i to view the Inodes usage
0 2 * * * /usr/bin/find /var/lib/lsphp/session/lsphp83 -type f -name 'sess_*' -atime +1 -delete >> /var/log/session_cleanup.log 2>&1s
Database write failure
When you encounter a problem like sqlstate[22007]: invalid datetime format: 1366 incorrect string value: '\xe7vyush...' for column, it is because of the default encoding and sorting problem of MySQL.
Set the default character set in the MySQL configuration file (such as my.cnf or my.ini)
[mysqld] character-set-server = utf8mb4 collation-server = utf8mb4_unicode_ci
Then restart the mysql service
sudo systemctl restart mysql
The latest version of CyberPanel fails to install wordpress at the step /usr/bin/env: "php":
After installing the latest version of CyberPanel, creating WordPress on the website will fail and will be stuck at the step of /usr/bin/env "php". The main problem of this error is that the default /usr/bin/php of CyberPanel points to /usr/local/lsws/lsphp74/bin/php. After the new version is updated, support for php7.4 is cancelled. The minimum supported version is php8.0, which causes /usr/bin/php to not find the corresponding php directory. The php directory needs to be re-bound.
Use the command to view the binding directory.
ls -l /usr/bin/php
Delete the binding directory
sudo rm /usr/bin/php
Rebind php directory
sudo ln -s /usr/local/lsws/lsphp83/bin/php /usr/bin/php
After rebinding, return to the panel and create WordPress successfully!
Accessing the hidden OpenLiteSpeed web interface
Enter the following command on the server to reset the OpenLiteSpeed user password.
sudo bash /usr/local/lsws/admin/misc/admpass.sh

Enter the username and password, and then access WebAdmin using port 7080 in your browser: https://ip:7080
If the webpage cannot be opened, you need to open port 7080 in the CyberPanel firewall.

Upgrading MariaDB
The differences between MariaDB and MySQL are: 1. Different historical backgrounds; 2. Different storage engines; 3. Different data types; 4. Different plug-in support; 5. Different open source levels. Overall, MariaDB has more new features and improvements than MySQL, but it also retains a high degree of compatibility with MySQL.
To install MariaDB on Ubuntu 22.04, first update the system packages. After that, install the required packages.
Check MariaDB Version Now, check the version of MariaDB installed
mariadb --version
MariaDB version "10.6.12" successfully installed on Ubuntu 22.04
If your version is lower than 10.6.12, upgrade the installed MariaDB version and use the following command to upgrade.
sudo mariadb-upgrade
If it is the latest version, a prompt message will be returned indicating that no upgrade is required.
This installation of MariaDB is already upgraded to 10.6.12-MariaDB.
There is no need to run mysql_upgrade again for 10.6.12-MariaDB.
You can use –force if you still want to run mysql_upgrade
Upgrading Redis
Ubuntu 20.4 / Ubuntu 22.4 users update Redis to the latest version – Redis 7.xx
Check the currently installed Redis server version
redis-server --version
Check the currently installed Redis cli version
redis-cli --version
Update Redis to the latest available version (add the official repo first)
sudo add-apt-repository ppa:redislabs/redis
Then run the system update command
sudo apt update
Run the following command to upgrade the latest version of Redis
sudo apt upgrade