Excellent software and practical tutorials


csf (ConfigServer Security & Firewall) is permanently closed
Way to the Web Ltd andConfigserver.comIt closed permanently on August 31, 2025.
This announcement was first published on our blog and this website on July 30, 2025, to give our customers time to update their software or prepare for our company's closure.
This shutdown will affect all of our commercial software, including ConfigServer Vulnerability Scanner (cxs), MailScanner Front End (MSFE), and Outgoing Spam Monitor (osm). In addition, we will also affect our free software, including ConfigServer Security andFirewall (csf), ConfigServer Mail Queue (cmq), ConfigServer Mail Management (cmm), ConfigServer Module Security Control (cmc), and ConfigServer Resource Manager (cse).
As of August 31, 2025, no further support, downloads, or licensing IP changes will be provided.
In order to continue using any of our commercial software after August 31st, you must update your software to the latest version.If you do not update your software, any of our commercial software products will stop working and cannot be reactivated once the download and license servers are shut down.
We have released csf (ConfigServer Security & Firewall), cmc (Configserver Modsecurity Control, for cPanel), cmm (ConfigServer Mail Manage, for cPanel), cmq (ConfigServer Mail Queues, for cPanel and DirectAdmin), and cse (ConfigServer Explorer, for cPanel) under the GPLv3 license. These scripts are now available on ourGitHub repositorymiddle.
Install CSF firewall (ConfigServer Security & Firewall)
exist Ubuntu ConfigServer Security & Firewall (CSF) is a powerful firewall management tool designed to enhance server security. It not only provides traditional firewall functionality but also integrates numerous additional security measures and monitoring features, making it ideal for Linux server management. CSF plays a crucial role in simplifying configuration, preventing attacks, and protecting server resources, and is particularly widely used in website and application servers.
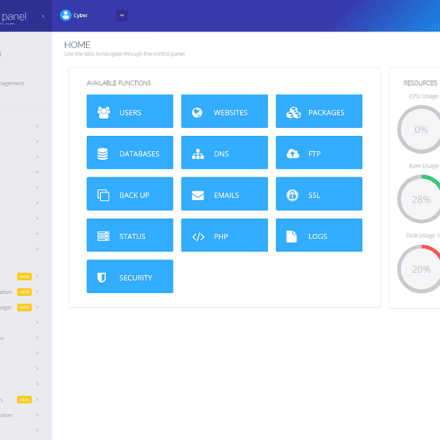
 on Ubuntu 22.4-1") On Ubuntu 22.4, after installing the CSF firewall, you can enable it in CyberPanel!
On Ubuntu 22.4, after installing the CSF firewall, you can enable it in CyberPanel!
Main functions and uses of CSF
Firewall Management
CSF Use iptables To manage the rule settings for inbound and outbound traffic. Administrators can add, modify or delete rules with simple commands, restrict access to certain ports and services to prevent unauthorized access.
Support settingsWhitelistandblacklist IP, you can allow or deny access from specific IP addresses to prevent requests from malicious IPs.
Intrusion Detection and Prevention
CSF includes intrusion detection and prevention systems (LFD - Login Failure Daemon) detects and blocks IP addresses with multiple failed logins, preventing brute force attempts.
You can monitor login logs for specific services (such as SSH, FTP, etc.) and immediately block the source IP when malicious behavior is detected.
Port Scan Protection
CSF can identify and block malicious IPs that perform port scanning on the server, protecting the server's port information from being leaked.
Preventing DoS attacks
CSF detects unusual traffic spikes or number of connections, can set limits and automatically block IPs when detected, to reduce the impact of DoS (Denial of Service) attacks.
System security review
CSF includes a basic security check tool that can check for common security vulnerabilities that may exist in the Ubuntu system and provide relevant suggestions (such as whether SSH uses the default port, etc.).
Email Notification
CSF can send notifications via email when abnormal server behavior is detected (such as multiple failed logins, IP blocking, etc.), allowing administrators to respond quickly.
Time control rules
Supports setting effective time for firewall rules. For example, you can block or allow access to certain services during a specific time period to improve security and resource utilization.
Applicable scenarios
CSF is particularly suitable for the following application scenarios:
- Web Servers and Application Servers:Applicable to scenarios where websites and API interfaces need to be protected, and can block abnormal requests and malicious traffic.
- SSH Security Management: For servers that need to be remotely managed via SSH, CSF can effectively prevent brute force cracking attempts.
- Limit access to specific IP addresses: Used to allow or prohibit certain countries, regions or specific IP addresses from accessing the server, improving regionalized security policies.
How to install CSF
After the official update stopped, the installation package was thrown on github. You can change the download address of CSF to the download address of Github to install it. The only drawback is that there will be no subsequent version updates and maintenance, but as a port shielding firewall, the CSF function is sufficient!
To install CSF on Ubuntu and enable basic configuration, follow these steps:
# Install dependencies sudo apt update sudo apt install -y perl libwww-perl liblwp-protocol-https-perl # Download CSF wget https://github.com/waytotheweb/scripts/raw/refs/heads/main/csf.tgz tar -xzf csf.tgz cd csf # Run the installation script sudo bash install.sh # Check whether the server is compatible with CSF sudo perl /usr/local/csf/bin/csftest.pl
CSF is a full-featured and easy-to-configure firewall management tool suitable for Ubuntu servers that require a high-security configuration.
After the installation is complete, you can configure CSF by editing the /etc/csf/csf.conf file and restart the firewall with the csf -r command to make the configuration take effect.
After installing CSF, you can configure it in detail by editing the /etc/csf/csf.conf file. The following are some common configuration steps and precautions:
1. Edit the CSF configuration file
Open CSF using a text editor (such as vim or nano) Configuration Files:
sudo nano /etc/csf/csf.conf
Inside the file, you can find many configuration options, here are some key settings:
1.1. Basic Settings
Test Mode: After CSF is installed, it is in test mode by default and firewall rules will not take effect.
Before using it, set TESTING to 0 to disable the test mode.
TESTING = "0"
Open by defaultInbound Port:
TCP_IN: Set the inbound ports that are allowed to be accessed (such as ports 80 and 443 for web servers, port 22 for SSH, etc.).
TCP_IN = "22,80,443"
TCP_OUT: Set the access permissionOutbound Port.
TCP_OUT = "80,443,53"
Note: Make sure the open ports include the SSH port, otherwise it may cause problems with remote connection.
1.2. Allowed/Banned IP Addresses
Allow list (white list): Specify the IP addresses that can access the server in the csf.allow file.
In csf.conf, you can add multiple IP addresses or IP segments to specify that specific IP addresses are always allowed to access:
sudo nano /etc/csf/csf.allow
Enter the allowed IP addresses, one per line, for example:
192.168.1.100
203.0.113.0/24
Deny list (blacklist): Specify the IP addresses that are prohibited from accessing the server in the csf.deny file.
Open the file and add the IP address:
sudo nano /etc/csf/csf.deny
Enter the banned IP addresses, one per line:
192.168.1.101
198.51.100.0/24
1.3. Login failure protection(Brute force protection)
Configuring login failure protection: The LF_TRIGGER and LF_SSHD options are used to prevent brute force attempts.
LF_TRIGGER: Number of failed attempts that triggered the block.
LF_TRIGGER = "5"
LF_SSHD: The number of SSH failed login triggers.
LF_SSHD = "5"
1.4. Preventing port scanning
Port scan protection: Set up port scanning protection to prevent malicious users from probing open ports.
PS_INTERVAL = "300"
PS_LIMIT = "10"
2. Save the configuration and restart CSF
Once you have completed the configuration, press Ctrl+X and then Y to save and exit the file.
3. Restart CSF and LFD to make the configuration take effect
Reload the CSF configuration using the following command:
sudo csf -r
In addition, you can restart the LFD (Login Failure Daemon) service:
sudo systemctl restart lfd
4. Check the firewall status
Check the running status of CSF to ensure that the rules are applied correctly:
sudo csf -s # View rule status
sudo csf -l # Display firewall status
5. Verify that the firewall is working properly
You can check for errors using the following command:
sudo csf -e # Enable firewall
sudo csf -x # disable firewall (for testing)
With the above steps, you can successfully configure and enable CSF to protect the security of your Ubuntu server.
CyberPanel Server 500 Error After Installing CSF
This is usually related to an incompatible firewall configuration or blocking critical services. Here are some common solutions:
1. Check CSF configuration and allow necessary ports
Make sure the ports required by CyberPanel are open in CSF, for example:
TCP_IN: 8090 (CyberPanel control panel port), 80, 443 (HTTP/HTTPS), 21 (FTP), 25, 465, 587 (SMTP), 53 (DNS), etc.
Open the CSF configuration file:
sudo nano /etc/csf/csf.conf
Find and modify TCP_IN and TCP_OUT to include the above ports.
2. Restart CSF and LFD
After modifying the configuration, restart CSF and LFD for the changes to take effect:
sudo csf -r
sudo systemctl restart lfd
3. Check the server error log
Check the CyberPanel error log for specific error information:
tail -f /usr/local/lscp/logs/error.log
4. Test temporary disabling of CSF
You can temporarily disable CSF to confirm if the problem is with the firewall:
sudo csf -x
If the 500 errors go away after disabling it, the problem is in the CSF configuration.
How to reinstall and enable after installing CSF and encountering CyberPanel Server 500 Error