Excellent software and practical tutorials


Recently, I need to build a network disk to store and publish files. After screening, I foundnextcloudNot bad, easy to install, PHP online installation set up the user password database connection is OK, the most important thing is that it supports WebDAV, which is a good thing. Nextcloud supports mobile phones or computers on the client, and both Android and Apple support, you can also download other network disk file management tools, after the connection is successful, you can directly read and use the file.
After installing the cloud disk on the server, after checking the overview, a bunch of security and setting warnings will appear. This is another big pitfall! I searched on Google and found that there is not much content about nextcloud!
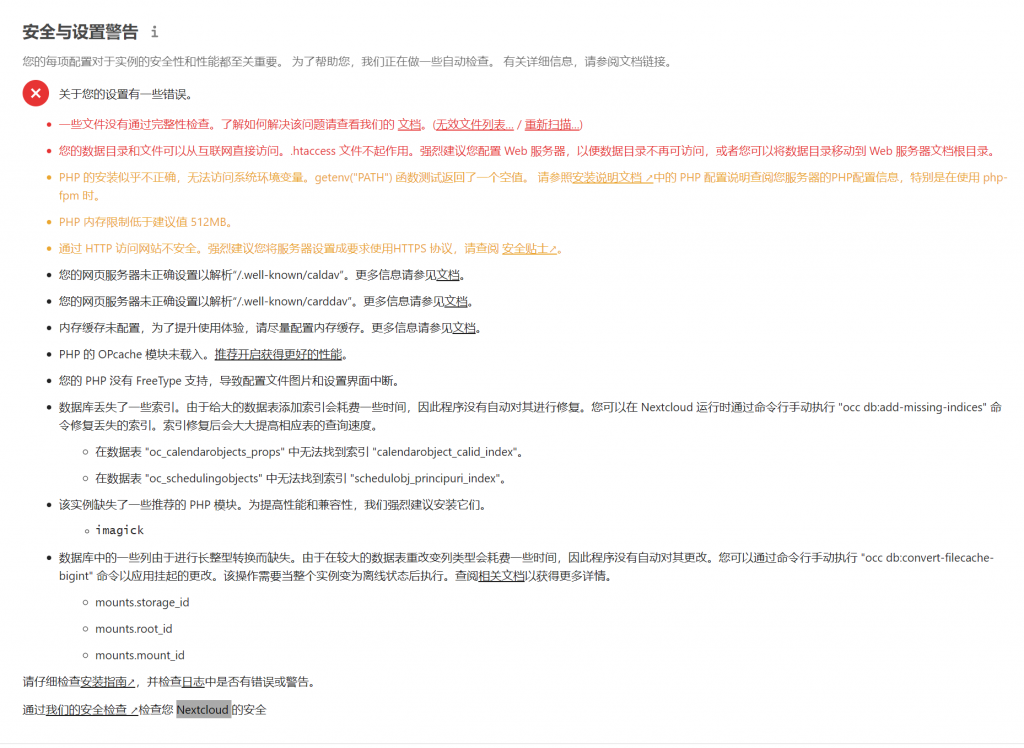
PHP appears to have been installed incorrectly and is unable to access system environment variables. The getenv("PATH") function test returned a null value. Please refer to the PHP Configuration Instructions in the Installation Instructions ↗ to review your server's PHP configuration information, especially when using php-fpm.
You need to add a line of code at the end of the php-fpm.conf file. php-fpm.conf is in the etc directory under the php directory installed on the server. This is different for everyone. Find your own php-fpm.conf and edit it using vi.
vi /usr/local/php/etc/php-fpm.conf
Copy the following code to the end of php-fpm.conf.
env[PATH] = /usr/local/bin:/usr/bin:/bin:/usr/local/php/bin
systemctl reload php-fpm
Restart the PHP service for the changes to take effect.
Your web server is not correctly set up to resolve '/.well-known/caldav'. Your web server is not correctly set up to resolve '/.well-known/carddav'.
This requires modifying the configuration file nginx.conf in nginx
vi /usr/local/nginx/conf/nginx.conf
After opening the file, add two lines of code inside server{}
rewrite /.well-known/carddav /remote.php/dav permanent; rewrite /.well-known/caldav /remote.php/dav permanent;
Under Apache2x, modify the httpd.conf configuration file and remove the # number in front of LoadModule rewrite_module modules/mod_rewrite.so.
Change all AllowOverride none in the configuration file to AllowOverride all
The memory cache is not configured. To improve the user experience, please configure the memory cache as much as possible.
Caching improves performance by storing data, code, and other objects in memory. A memcache configuration for your Nextcloud server must be installed and configured.
First, modify your mysql configuration, edit the my.cnf file, and set the value of innodb_buffer_pool_size to 1G or higher. This depends on the size of the system memory. It is generally recommended to set it to 50%-70% of the server memory.
Set innodb_io_capacity = 4000. If this item is not available, copy and paste it into the my.cnf file. Save and restart the MySQL service.
Nextcloud recommends Apcu, which can be used with memcached. Enable the Apcu extension and memcached extension of PHP, and then add the following to the config.php file in the Nextcloud network disk directory:
The latest expansion files can be found inhttp://pecl.php.net/The latest version is 5.18
Install the Apcu extension:
wget http://pecl.php.net/get/apcu-5.1.18.tgz tar zxvf apcu-5.1.18.tgz cd apcu-5.1.18 phpize ./configure --with-php-config=/usr/local/php/bin/php-config make make install
Install the extension to bin/php-config under your PHP installation directory. The path should be set according to your own installation path, otherwise an error will occur.
After the installation is complete, there will be a directory for apcu.so. Copy the following code into the php.ini file and restart the php service.
extension=/usr/local/php/lib/php/extensions/no-debug-non-zts-20190902/apcu.so apc.enabled= on apc.shm_size= 64M apc.enable_cli = on
Install the Memcached extension:
Memcached extension requires compiling and installing 4 software in total:
First install libevent which Memcached depends on;
Then install the Memcached library;
Then install the libmemcached library that the Memcached plug-in of PHP PECL depends on;
Finally, install the Memcached plugin for PHP PECL.
Don't get the order wrong!
The memcached extension needs to be installed first and depends on libevent. The latest version of libevent is 2.1.11.
Install libevent dependencies:
wget https://github.com/libevent/libevent/releases/download/release-2.1.11-stable/libevent-2.1.11-stable.tar.gz tar -zxvf libevent-2.1.11-stable.tar.gz cd libevent-2.1.11-stable ./configure --prefix=/usr/local/libevent make make install
Download, unzip, compile and install in one go. Then install the next one.
Install the Memcached library. Note that the Memcached library and the Memcached extension are two different things. Do not confuse them. The latest version of the Memcached library is 1.6.0.
Install the Memcached library:
wget http://www.memcached.org/files/memcached-1.6.0.tar.gz tar -zxvf memcached-1.6.0.tar.gz cd memcached-1.6.0 ./configure --prefix=/usr/local/memcached make make install
Install the libmemcached library:
wget https://launchpad.net/libmemcached/1.0/1.0.18/+download/libmemcached-1.0.18.tar.gz tar -zxvf libmemcached-1.0.18.tar.gz cd libmemcached-1.0.18 ./configure --prefix=/usr/local/libmemcached --with-memcached=/usr/local/memcached/bin/memcached make make install
After the above dependency libraries are installed, the next step is to install the memcached extension. Go to http://pecl.php.net/ and search for memcached. The latest version is 3.15
Install the memcached extension:
wget http://pecl.php.net/get/memcached-3.1.5.tgz tar -zxvf memcached-3.1.5.tgz cd memcached-3.1.5 phpize ./configure --with-php-config=/usr/local/php/bin/php-config --with-libmemcached-dir=/usr/local/libmemcached --enable-memcached --disable-memcached-sasl make -j4 make install
After successful installation, the storage address of memcached.so is after Installing shared extensions:.
Copy and paste the following content into the php.ini file. The operation method is the same as installing the apcu extension above.
extension=/usr/local/php/lib/php/extensions/no-debug-non-zts-20190902/memcached.so
Finally, restart the PHP service to make the modified configuration take effect.
systemctl reload php-fpm
Install the redis extension:
wget http://pecl.php.net/get/redis-5.2.0.tgz tar -zxvf redis-5.2.0.tgz cd redis-5.2.0 phpize ./configure --with-php-config=/usr/local/php/bin/php-config
Copy the following content to the php.ini file, restart the PHP service, and enable the redis extension successfully.
extension=/usr/local/php/lib/php/extensions/no-debug-non-zts-20190902/redis.so
The extension has been installed. Next, modify the Nextcloud config.php file.
Find config in the website directory, and find config.php inside. Edit config.php
Add the following content below $CONFIG = array ( in config.php, this is the extension using apcu.
'memcache.local' = '\\OC\\Memcache\\APCu',
PHP's OPcache module is not loaded. It is recommended to enable it for better performance.
So what is Opcache?
The predecessor of Opcache is Optimizer+, which is a closed-source but free PHP optimization and acceleration component developed by Zend, the official company of PHP. Optimizer+ caches the script files Opcode generated by pre-compiling PHP code in shared memory for repeated use later, thus avoiding the time consumption of reading the code from disk and compiling it again. At the same time, it also applies some code optimization modes to make the code execute faster, thereby accelerating the execution of PHP.
How to install Opcache?
PHP7 has Opcache installed by default, but it is not enabled. Let's enable it now.
Edit PHP7 configuration file
vim /usr/local/php/etc/php.ini
Enter the search command:/opcache
Locate the [opcache] field
Copy the following code into php.ini
zend_extension=opcache.so opcache.enable=1 opcache.interned_strings_buffer=8 opcache.max_accelerated_files=10000 opcache.memory_consumption=128 opcache.save_comments=1 opcache.revalidate_freq=1 opcache.optimization_level=1 opcache.force_restart_timeout=3600
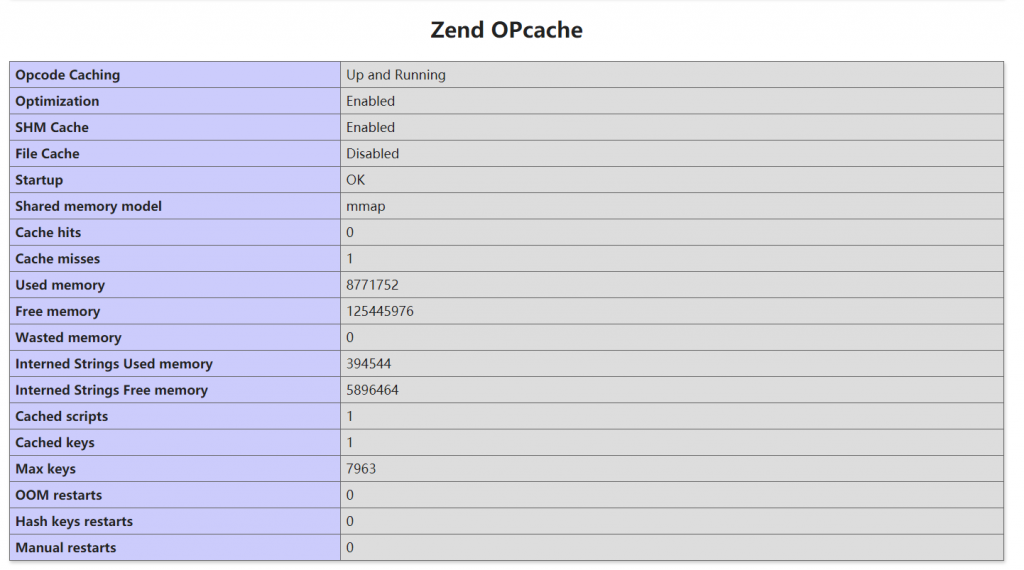
Opcache has been successfully enabled.
PHP memory limit is lower than the recommended value of 512MB.
Edit the php.ini file and change memory_limit to 512M
vi /usr/local/php/etc/php.ini memory_limit = 512M
Your PHP does not have FreeType support, causing profile images and settings interfaces to break.
Many people think that installing the GD library supports freetype. Freetype is not an independent PHP extension, but is under the GD library.
wget https://download.savannah.gnu.org/releases/freetype/freetype-2.10.0.tar.gz tar -zxvf freetype-2.10.0.tar.gz cd freetype-2.10.0 ./configure --prefix=/usr/local/freetype make make install
Enter the ext/gd directory of the php7 installation file
./configure --with-php-config=/usr/local/php/bin/php-config --with-freetype=/usr/local/freetype make make install
Now the GD library already supports freetype.
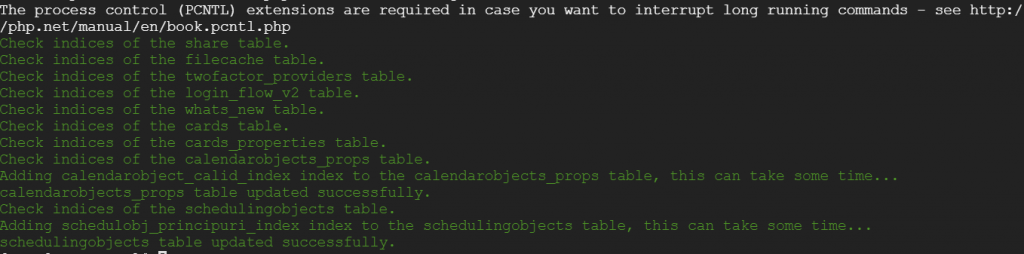
The database has lost some indexes. Since adding indexes to large tables takes time, the program does not automatically repair them.
This can be solved by executing commands in the website directory.
Use CD to enter the directory where the website is stored. For example, if the website is under wwwroot/nextcloud,
cd /wwwroot/nextcloud sudo -u www php occ db:convert-filecache-bigint sudo -u www php occ db:add-missing-indices

If the system does not support the use of PHP commands, an error message is displayed: PHP: command not found
First use echo $PATH to check the system variables. If usr/local/sbin:/usr/local/bin:/sbin:/bin:/usr/sbin:/usr/bin:/root/bin:/usr/local/php/bin does not exist, use the command to add it.
ln -s /usr/local/php/bin/php /usr/bin/php
This example is missing some recommended PHP modules. We strongly recommend installing them for better performance and compatibility.
First install the ImageMagick source.
sudo yum -y install http://mirror.centos.org/centos/7/os/x86_64/Packages/ImageMagick-devel-6.7.8.9-18.el7.x86_64.rpm yum search ImageMagick-deve yum install ImageMagick-devel.x86_64
Install imagick after installing ImageMagick-devel. Be sure to install ImageMagick-devel, otherwise the installation will fail!
Download the latest version from pecl.php.net. The latest stable version is 3.4.4
wget http://pecl.php.net/get/imagick-3.4.4.tgz tar -zxvf imagick-3.4.4.tgz cd imagick-3.4.4 phpize ./configure --prefix=/usr/local/imagemagick --enable-shared make make install
Add the following content to php.ini. Restart the PHP service to make the extension take effect.
extension=/usr/local/php/lib/php/extensions/no-debug-non-zts-20190902/imagick.so
The system prompts that the LDAP extension needs to be installed.
Install openldap and openldap-devel using yum, and copy the files to the /usr/lib/ directory after installation
yum install openldap yum install openldap-devel cp -frp /usr/lib64/libldap* /usr/lib/
Enter the PHP installation file directory
cd php-7.4.3/ext/ldap phpize ./configure --with-php-config=/usr/local/php/bin/php-config make make install
Then add in the php.ini file
extension=/usr/local/php/lib/php/extensions/no-debug-non-zts-20190902/ldap.so