Excellent software and practical tutorials
How to log in to Azure virtual machine using root super administrator account
MicrosoftAzureAfter the virtual machine is configured, the permissions are not enough when logging in with SSH using a non-root account. How can I change the user to root? In fact, Azure's Linux virtual machine can flexibly use the administrator permissions of the root super user.
Change the super administrator root password
Only after the root user logs in can he have administrator privileges. Currently, there is only the system default user. You need to set a password for the root user before you can log in as the root user.
Step 1: After logging in to the server, use sudo passwd root Command to set the superuser root password.
sudo passwd root We trust you have received the usual lecture from the local System Administrator. It usually boils down to these three things: #1) Respect the privacy of others. #2) Think before you type. #3) With great power comes great responsibility. [sudo] password for maxiaomao: Changing password for user root. New password: Retype new password: passwd: all authentication tokens updated successfully.
After entering the command to change the superuser password, a paragraph pops up, which roughly means
We believe you have received the regular lectures on local systems.
Administrative staff. Usually comes down to three things:#1) Respect the privacy of others.
#2) Think before you type.
#3) With great power comes great responsibility.
After pressing Enter, set the root password.

Step 2: Switch to the root user.su root
entercd\Exit the user directory and enter the root directory.

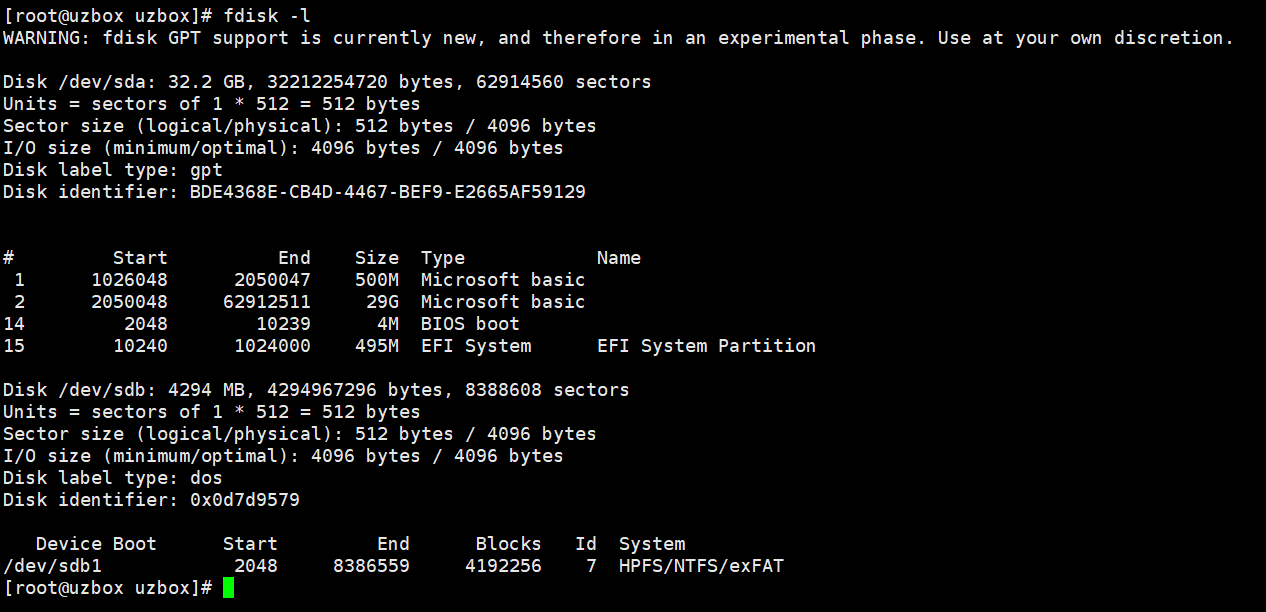
In root superuser mode, enter the commandfdisk -l , you can see the returned virtual machine hard disk information.

use cat /etc/redhat-release The command can be used to view the Linux system version of the virtual machine.

If you want to switch back from the root super user to the original user, you can use su -l original user name

Enable SSH remote connection
After the root user sets the password and logs in, start the SSH remote connection operation and open the SSH configuration file.
vi /etc/ssh/sshd_config
Modify the configuration of the following three options.
PermitRootLogin yes
PasswordAuthentication yes
After modification, press esc to exit the editing mode. After saving, press :wq and then disable the SELinux service.
Note: After modifying the SSH remote connection, be sure to turn off the SELINUX service, otherwise the remote connection will fail.
Disable SELinux service
Run Command getenforce, verify the SELinux status. The returned status should be enforcing or permissive, and the current status is enforcing. Run the command sestatus to obtain more SELinux information.
Permanently disable SELinux. Run the following command to edit the SELinux config file. Change the value to Disabled
vi /etc/selinux/config
Find SELINUX=Enforcing, press i to enter the edit mode, and change the parameter to SELINUX=Disabled.
After the modification is complete, press the Esc key on the keyboard and execute the command :wq to save and exit the file.
reboot Restart the server. After restarting, run the getenforce command to verify that the SELinux status is disabled, indicating that SELinux is disabled.
After changing from a free user to a pay-as-you-go user, you can still use the free hosting service of the free account, 750 hours of B1s virtual machines per month, 64G hard disk, and 100G traffic. You can get 12 months of free popular service quota every month, and always enjoy more than 40 other services.


