Excellent software and practical tutorials


Install Memcached to extend WordPress. The website access speed is slow and needs LCP optimization solution
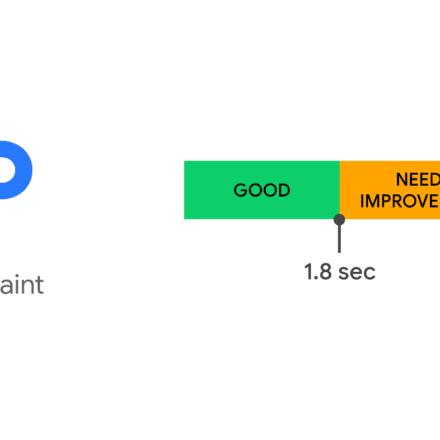
Install Memcached Extension conduct LCP Optimization LCP is a website evaluation indicator launched by Google in recent years. The two most critical indicators of LCP (Largest Contentful Paint) are LCP and CLS. If LCP is optimized to within 2 seconds, there will be more opportunities for the website to be displayed in Google searches.WordPressThere are many popularCache plugin, you can install a cache plug-in. No matter how you optimize the cache, you still need to shorten the initial server response time. Before LCP optimization, you need to configure the server cache first.
Specific references about LCP:Optimize the Largest Contentful Paint
Illustration of reasons why a URL is not considered a good URL.

Server-side caching tools
Caching (or content caching) is a widely used technique for storing copies of data in a temporary storage location (also called a cache) so that the data can be accessed easily and quickly compared to retrieving it from the original storage. Depending on the type and purpose of the cache, the data stored in the cache can include files or file fragments (such as HTML files, scripts, images, documents, etc.), database operations or records, API calls, DNS records, etc.
There are many excellent open source caching tools for Linux servers.Memcachedand Redis, etc. The following mainly introduces the usage of Memcached.
Memcached
Memcached is a free, open source, simple but powerful distributed memory object caching system. It is an in-memory key-value store for storing small pieces of data, such as the results of a database call, an API call, or a page rendering. It runs on Unix-like operating systems (including Linux and OS X), and also on Microsoft Windows.

What is Memcached?
Free open source, high performance, distributed memory object caching system that is general purpose in nature but designed to speed up dynamic web applications by alleviating database load.
Memcached is an in-memory key-value store for storing arbitrary small pieces of data (strings, objects) coming from database calls, API calls, or page rendering results.
Memcached is simple yet powerful. Its simple design facilitates rapid deployment, ease of development, and solves many of the problems facing large data caches. Its API is available for most popular languages.
Memcached official website :http://memcached.org
Latest stable version: memcached-1.6.18.tar.gz (2023-1-10)
Memcached Installation
Debian/Ubuntu: apt-get install libevent-dev Redhat/Centos: dnf install libevent-devel
Download source code, compile and install
wget http://memcached.org/latest tar -zxvf memcached-1.6.18.tar.gz cd memcached-1.6.18 ./configure && make && make test && sudo make install
After installation, you need to start
# Check whether memcache is installed ls -al /usr/local/bin/mem* # Start memcache service /usr/local/bin/memcached -d -m 200 -u www -p 11211 -c 256 -P /tmp/memcached.pid
Memcache parameter description:
- The -d option starts a daemon process.
- -m is the amount of memory allocated to Memcache, in MB, in my case it is 10MB
- -u is the user running Memcache, here it is root
- -l is the IP address of the listening server. If there are multiple addresses, I have specified the server IP address 202.207.177.177 here.
- -p is the port that Memcache listens on. I set it to 11211. It is better to use a port above 1024.
- The -c option is the maximum number of concurrent connections. The default is 1024. I set it to 256. Set it according to the load of your server.
- -P is to set the pid file to save Memcache. I save it in /tmp/memcached.pid
Install via software repository
dnf install libevent-devel memcached
After installation, set it to start at boot
#Start systemctl start memcached #Set boot startup systemctl enable memcached #View current status systemctl status memcached
Memcached modify cache size
After the installation is complete, modify the cache size of memcached. The default is 64M. Change the cache to 1024M.
Open /etc/sysconfig/memcached File, modify the CACHESIZE to:1024
PORT="11211" USER="memcached" MAXCONN="1024" CACHESIZE="1024" OPTIONS="-l 127.0.0.1,::1,controller"
After the modification is completed,systemctl restart memcached Restart the service
ps -ef | grep memcached
Check whether the configuration is effective
 After Memcached is installed, if you want Memcached to work properly on your website, you also need toMemcached Extensions.
Install Memcached Extension
Note: Before installing Memcached, you need to know that there are two types of PHP extensions: Memcache extension and Memcached extension. Memcached extension is an upgraded version of Memcache extension, supporting more functions and better performance. Be careful not to install the wrong one.
- memcache is a pecl extension library version that supports native PHP and belongs to the first generation of cache;
- memcached is a later version of libmemcached. It is a new generation of cache and is more complete. It is recommended to use memcached.
The installation path and configuration location of PHP8.0 installed by DNF are as follows:
- Installation path of PHP installed by RPM package: /usr/bin/php-config
- PHP configuration file: /etc/php.ini
The following are the installation methods of Memcache extension and Memcached extension. If you do not need to install Memcache extension, you can directly jump to the installation method of Memcached extension.
Source installationMemcacheExtensions
Install the dependencies required for the Memcache extension.
dnf install zlib zlib-devel
Step 1: Openhttps://pecl.php.net/package/memcacheDownload the Memcache extension installation package for PHP8.
Note: The Memcache extension installation package is different for different PHP versions. Find the corresponding version and install it.
Memcache extension installation package for php8: https://pecl.php.net/get/memcache-8.0.tgz
Step 2: Log in to the server, download and unzip the Memcache extension installation package
wget https://pecl.php.net/get/memcache-8.0.tgz tar -xvf memcache-8.0.tgz cd memcache-8.0
Step 3: Install Memcache extension
phpize ./configure --with-php-config=/usr/bin/php-config make && make install
After successful installation, the installation location will be displayed. Installing shared extensions: /usr/lib64/php/modules/

Step 4: Modify the php.ini file, enable the Memcache extension, and add the following content to the end of the php.ini file.
extension = memcache
Test whether the PHP configuration is correct and then restart the PHP service
php-fpm -t systemctl restart php-fpm
Check the PHP probe file and the extension starts normally

Source installationMemcachedExtensions
Step 1: Openhttps://pecl.php.net/package/memcachedDownload php8Memcached ExtensionsInstall the package.
Note: PHP versions are different.Memcached ExtensionsThe installation packages are also different, find the corresponding version and install it.
Memcached extension installation package for php8:memcached-3.2.0.tgz
Step 2: Log in to the server, download and unzip the Memcached extension installation package
wget https://pecl.php.net/get/memcached-3.2.0.tgz tar -xvf memcached-3.2.0.tgz cd memcached-3.2.0
memcached, this extension requires the libmemcached client library, otherwise the following error will occur:
error: memcached support requires libmemcached. Use --with-libmemcached-dir= to specify the prefix where libmemcached headers and library are located

dnf install libmemcached libmemcached-devel remi-libmemcached-awesome
Note: If libmemcached-devel is not available in the software repository, you can download and install it
wget https://vault.centos.org/centos/8/PowerTools/x86_64/os/Packages/libmemcached-devel-1.0.18-15.el8.x86_64.rpm dnf --enablerepo=powertools install libmemcached-devel
 Step 3: Install Memcached extension
phpize ./configure --with-php-config=/usr/bin/php-config make && make install
After successful installation, the installation location will be displayed. Installing shared extensions: /usr/lib64/php/modules/
Step 4: Modify the php.ini file, enable the Memcached extension, and add the following content to the end of the php.ini file.
extension = memcached
Test whether the PHP configuration is correct and then restart the PHP service
php-fpm -t systemctl restart php-fpm
View the PHP probe file,Memcached ExtensionsNormal startup

You can install the memcached extension using the pecl command without downloading the source code.
pecl install memcached
Knowledge points:If you cannot use dnf to install the PHP extension in the software repository, you can use the pecl command to install it in the PHP official extension repository.
After the Memcached extension is installed, you need to connect WordPress and Memcached. If you do not connect the server side and the WEB side, the Memcached cache will not work.
WordPress Memcached Configuration
Add the following content to wp-config.php.
global $memcached_servers; $memcached_servers = array( array( '127.0.0.1', // Memcached server IP address 11211 // Memcached server port ) );
If you have multiple site cache settings, refer to the following:
global $memcached_servers; $memcached_servers = array( array( '1.2.3.4', 11211 ), array( '1.2.3.5', 11211 ) );
Memcached listens on IP and port, you can view it with the following command:
netstat -nutlp | grep memcache
Configuring memcached in WordPress using a cache plugin
W3TC can currently configure memcached memory cache in the plug-in interface, without complex configuration, no need to modify the code, etc. W3TC is powerful and has many cache configuration options.WP MeteorPlugin usage.

How to monitor whether Memcached is working properly
Click to download the monitoring file memcache.php
After downloading the memcache.php file, upload it to the WordPress directory on the server. Before uploading, modify the access user password in the file.
$VERSION='$Id$'; define('ADMIN_USERNAME','Set a username'); // Admin Username define('ADMIN_PASSWORD','Set a password'); // Admin Password define('DATE_FORMAT','Y/m/d H:i:s'); define('GRAPH_SIZE',200); define('MAX_ITEM_DUMP',50); $MEMCACHE_SERVERS[] = '127.0.0.1:11211'; // add more as an array //$MEMCACHE_SERVERS[] = 'mymemcache-server2:11211'; // If it is a multi-site memory cache, set it hereAfter uploading, visit the URL address of the memcache.php file to see the working page of the memory cache.
 Zend OPcache Configuration
 Zend OPcache Configuration
use Opcache We can use OPcache to improve the execution efficiency of PHP code and reduce the overhead of loading and parsing PHP scripts each time. OPcache is enabled by default in PHP8.
PHP configuration jit, PHP 8 adds a JIT compiler to the PHP kernel, which can greatly improve performance. With stronger CPU-intensive processing, perhaps PHP will also be able to do complex protocol parsing appropriately in the future.
First, JIT only works if opcache is enabled, which is the default for most PHP installations, but you should make sure opcache.enable is set to 1 in your php.ini file. The JIT is set via opcache.jit_buffer_size.

Just configure php.ini and add at the end of php.ini:
opcache.enable=1 opcache.jit_buffer_size=100M opcache.jit=1255 opcache.revalidate_freq=0 opcache.validate_timestamps=0 opcache.max_accelerated_files=7963 opcache.memory_consumption=192 opcache.interned_strings_buffer=16 opcache.fast_shutdown=1
opcache.revalidate_freq
This option is used to set the expiration time of the cache (in seconds). When this time is reached, opcache will check if your code has changed. If it has changed, PHP will recompile it, generate new opcodes, and update the cache. A value of "0" means that your PHP code will be checked for updates on each request (which means that many stat system calls will be added. Note: The stat system call is to read the status of the file. Here it is mainly to obtain the last modification time. This system call will cause disk I/O, so it will inevitably consume some CPU time. Of course, the system call itself will also consume some CPU time). You can set it to 0 in the development environment, but don't worry about it in the production environment, because another setting option will be introduced below.
opcache.validate_timestamps
When this option is enabled (set to 1), PHP will check the timestamp of the file after the time set in opcache.revalidate_freq.
If this option is disabled (set to 0), opcache.revalidate_freq is ignored and PHP files are never checked. This means that if you change your code, and then you update it on the server, and then request the corresponding function of the updated code on the browser, you will not see the effect of the update, and you will have to reload your PHP (use kill -SIGUSR2 to force a reload).
This setting is a bit annoying, but I strongly recommend that you use it in a production environment. Why? Because when you are updating the server code, if there is a lot of code, the update operation will be delayed. During this delay, the old code and the new code will inevitably be mixed. At this time, there will inevitably be uncertainty in the processing of user requests.
opcache.max_accelerated_files
This option controls how many PHP files can be cached in memory at most. This option must be set large enough to be greater than the sum of all PHP files in your project. My code base has about 6000 PHP files, so I set this value to a prime number 7963 (Translator's note: I don't know why this guy set this number, and 7963 is not the smallest prime number greater than 6000). You can run the command "find . -type f -print | grep php | wc -l" to quickly calculate the number of PHP files in your code base.
opcache.memory_consumption
The default value for this option is 64MB, I set it to 192MB because my code is large. You can get the total amount of memory used by opcache by calling opcachegetstatus(), if this value is large, you can set this option to a larger value.
opcache.interned_strings_buffer
This is a very useful option, but seems to be completely undocumented. PHP uses a technique called string interning to improve performance. For example, if you use the string "foobar" 1000 times in your code, PHP will only allocate an immutable memory area to store the string the first time it is used, and the other 999 uses will directly point to this memory area. This option will take this feature to the next level.
By default, this immutable memory area will only exist in a single php-fpm process. If this option is set, it will be shared among all php-fpm processes. In larger applications, this can be very effective in saving memory and improving application performance.
The value of this option is in megabytes. If it is set to 16, it means 16MB. The default is 4MB, which is a relatively low value.
opcache.fast_shutdown
Another very useful but undocumented option. Literally, it means "allow faster shutdown". Its function is to provide a faster mechanism to call destructors in your code at the end of a single request, thereby speeding up PHP's response speed and the recycling of PHP process resources, so that the application can respond to the next request more quickly. Set it to 1 to use this mechanism.