Excellent software and practical tutorials
Ubuntu mounts the hard disk
The system disk on the Linux Ubuntu server is too small. As the amount of data increases, a hard disk needs to be added. Since the host provider simply plugs a hard disk into the server, the hard disk also needs to be mounted in the system.
Mounting a hard disk is very simple for experienced operators, but it is still a bit difficult for some novices. Fortunately, AIs are very smart nowadays. If you have any questions, you can find AI. Whether it is Google's Gmini or OpenAI's ChatGPT, they can easily list the steps to mount a hard disk.
However, AI largely ignores the knowledge reserves of novice users, and simply listing a few solution steps still makes it difficult to successfully mount the hard drive.
The following is a step-by-step guide on how to manually mount a hard disk on Ubuntu 22.04.
Adding a new hard disk on Linux is logically the same as adding a new hard disk on Windows.
First, you need to make sure that the hard disk is plugged into the machine and whether the hard disk information can be read successfully.
Use command such as lsblk Or fdisk -l to list all hard disks and partitions in the system. Determine the hard disk you want to format and write down its device name.
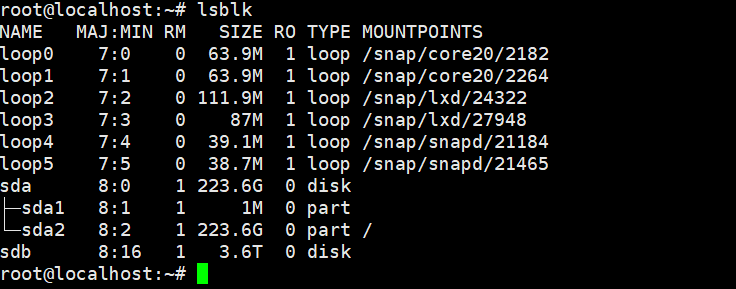
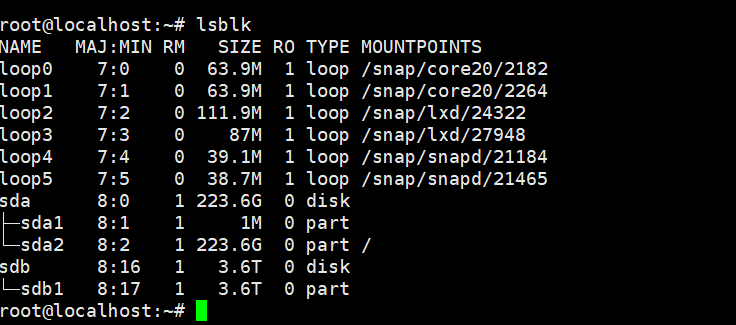
The above is used lsblk The command is used to check the hard disk information in the system. We can see that the main system disk sda in the system is 223.6G in size, and the system disk sda is divided into two partitions, sda1 and sda2.
This is just like dividing the system disk into C drive and D drive in Windows. If the hard disk is not partitioned, it is impossible to install the system or store data.
The following sdb is a newly added hard disk, the size is 3.6T, this is a 4T hard disk. The status of this hard disk has not been partitioned yet, and it needs to be formatted after partitioning before it can be successfully mounted.
Next, partition the sdb hard disk.
use fdisk -l The command lists all hard disks and partitions in the system. Find the hard disk you want to format and write down its device name, such as /dev/sdb.
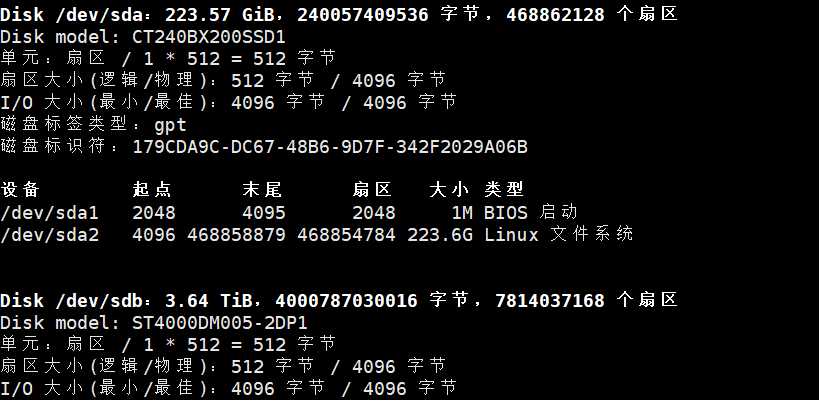
Use the fdisk partition command to partition /dev/sdb
fdisk /dev/sdb
After entering m, enter the partition mode.
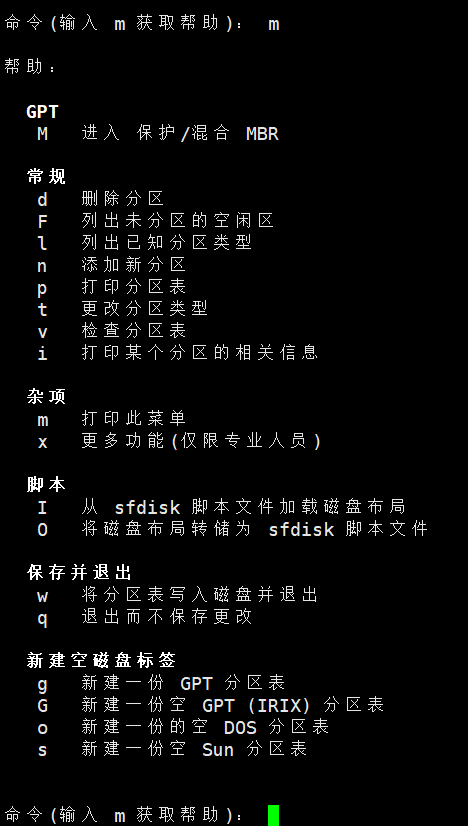
One thing you need to do before partitioning is to create a new GPT partition table. Why do you need to create a new GPT partition table? The default partition table supports a maximum of 2TB hard disks, and the GPT partition table supports a maximum of 18GT
Then press n to create a new partition. The partition number defaults to 1. Press Enter to accept the default.

After the partitioning is completed, press w to exit the partition mode. The next step is to format the partition 1 we created.
The default partition format of the Linux system is generally ext4. If no additional partition format needs to be created, ext4 is used by default.
sudo mkfs.ext4 /dev/sdb1
Start formatting the /dev/sdb1 partition. After formatting is complete, prepare to mount the partition.
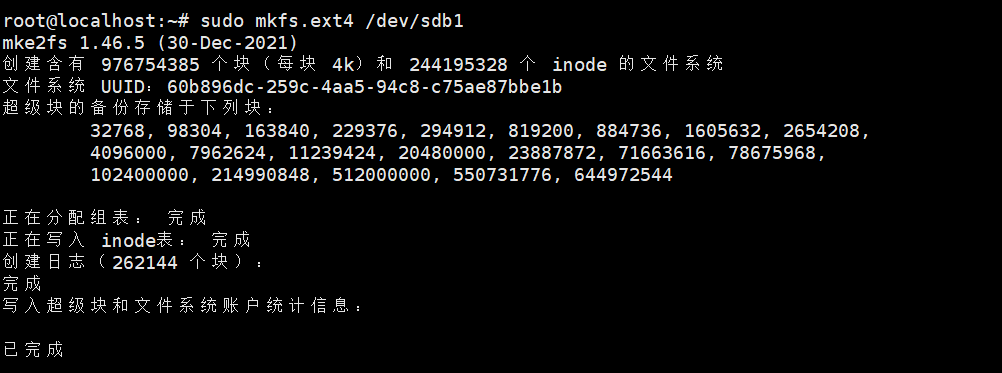
After formatting, use lsblk
Check whether the partition is formatted successfully. Below we can see that the sdb1 partition has been mounted successfully.
Next, mount the hard disk and mount /dev/sdb1 to the system disk /home.
sudo mount /dev/sdb1 /home
Since the root directory /home exists, there is no need to create a mount point here. After the mount is successful, use mount command to check whether the mount is successful.
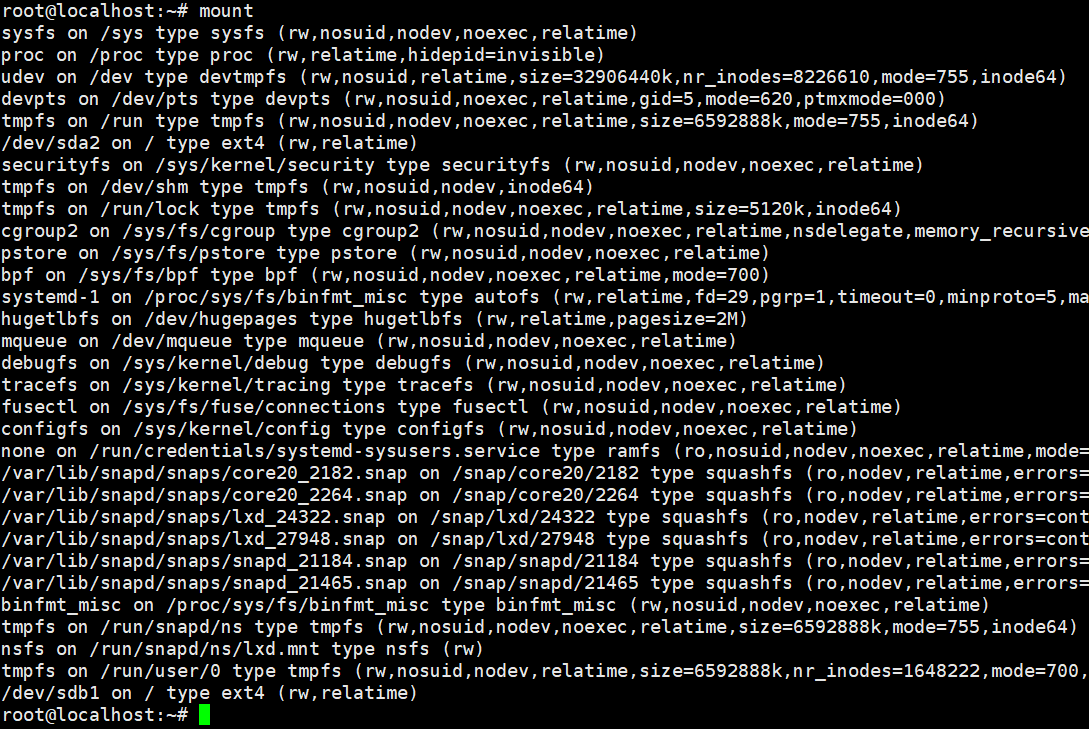
We can see the bottom line, /dev/sdb1 on /home type ext4 (rw,relatime)
The partition has been mounted successfully. The last step is to write the partition to a file and enable automatic startup mounting.
edit vi /etc/fstab File and add a corresponding mount record. In the /etc/fstab file
/dev/sdb1 /home ext4 defaults 0 0
The meaning of this record is: mount the /dev/sdb1 partition to the root directory /home, use the ext4 file system type, and mount with default options. 0 0 means no backup or check is required.
Execute the sudo mount -a command to reload the mount points configured in the /etc/fstab file to ensure that they are automatically mounted when the system starts.
Finally, use the reboot command to restart the server. If you can connect successfully, the hard disk is mounted successfully!
The mount point should now be successfully mounted to the root directory. If you want to mount the hard disk not under the system disk, you can create a new mount point.
Create a new mount point to mount the hard disk
Once you have completed the partition, you can mount it to a directory on your system. Here are the general steps to mount a partition:
Create a mount point:
Choose a directory in the file system as the mount point. Usually create a new directory under /mnt. You can create a directory using the mkdir command, for example:
sudo mkdir /mnt/mydrive
Mount the partition:
Use the mount command to mount the partition to the mount point of your choice. The syntax is sudo mount /dev/sdXN /mnt/mydrive, where /dev/sdXN is the device name of your partition and /mnt/mydrive is the mount point of your choice. For example:
sudo mount /dev/sdX1 /mnt/mydrive
Check the mount status:
Run the df -h command to confirm whether the partition is mounted successfully and view the usage of the mount point.
Permanently mount (optional):
If you want the system to automatically mount the partition every time it boots, you can edit the /etc/fstab file and add a corresponding mount record. Open the /etc/fstab file and add a line similar to the following:
/dev/sdX1 /mnt/mydrive ext4 defaults 0 0
The meaning of this record is: mount the /dev/sdX1 partition to the /mnt/mydrive directory, use the ext4 file system type, and mount using the default options. 0 0 means no backup or check is required.
Automatically mount the configured mount points:
Execute the sudo mount -a command to reload the mount points configured in the /etc/fstab file to ensure that they are automatically mounted when the system starts.
After Ubuntu mounts the hard disk, the system disk size does not change
After the hard disk is successfully mounted in the root directory, the server's hard disk size does not change.
sudo resize2fs /dev/sda2
Remove the mounted hard disk in Ubuntu
Unmount the hard drive:
First, make sure that there are no files or processes currently using the hard drive.
implement umount command to unmount the hard disk. For example, if your hard disk is mounted at /mnt/your custom mount point.
For example: the hard disk is mounted on /mnt/tt
Can execute sudo umount /mnt/tt Unmount the mount point.
Use later df -h Command to check, the hard disk has been successfully uninstalled!
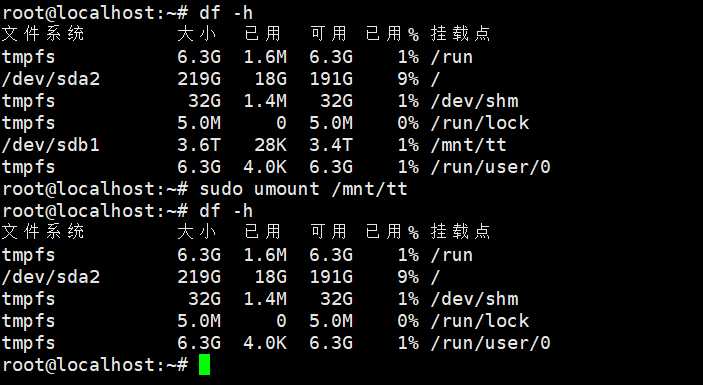 After the hard disk is unmounted, you can remove its mount point. This is usually the path specified in /etc/fstab.
Use the rm -r command to delete the mount point:
sudo rm -r /mnt/tt
After that, edit the vi /etc/fstab file and delete the code for automatic startup mounting.


