Excellent software and practical tutorials


How to deploy DeepSeek R1 on AWS Bedrock
DeepSeek has shocked the world and its popularity is no less than that of ChatGPT, which was launched that year. Amazon Cloud supported DeepSeek deployment at the first time. Here we will teach you how to deploy DeepSeek.
AWS Bedrock Currently supportedCustom model importfeature, but as of January 2025, it is only compatible with Llama Architecture,Qwen architecture is not currently supportedTherefore, when importing DeepSeek R1 This set of distillation models,Cannot select 32B version based on Qwen architecture, the only available Llama version for 8B and 70B parametersThis deployment will select Version 70B, and use Custom Model Import Function, complete model import and deployment on Bedrock.

If you don't have an Amazon Cloud account yet, apply for one first.
Registering for Amazon Cloud is very simple. First, enter the Amazon official website through the official website entrance below.
Detailed registration tutorial:Apply for AWS EC2 free cloud server for free in 2025, nanny-level tutorial!
Note: The following tutorial deploys DeepSeek, which requires payment to Amazon Cloud. It is not a free deployment tutorial and is not suitable for novice users. Please note!
Download the DeepSeek R1 model file to an S3 bucket
When downloading a DeepSeek R1 model, you need to ensure that its architecture meets the requirements. As of January 2025, AWS Bedrock only supports the import of models with architectures such as Llama, and does not currently support the Qwen architecture. If you download the Qwen-7B version of DeepSeek R1, you will encounter the following error message when initiating an import task:
"Amazon Bedrock does not support the architecture (qwen2) of the model that you are importing. Try again with one of the following supported architectures: [llama, mistral, t5, mixtral, gpt_bigcode, mllama, poolside]."
Therefore, be sure to confirm the model architecture before importing to avoid task failure due to architecture incompatibility.
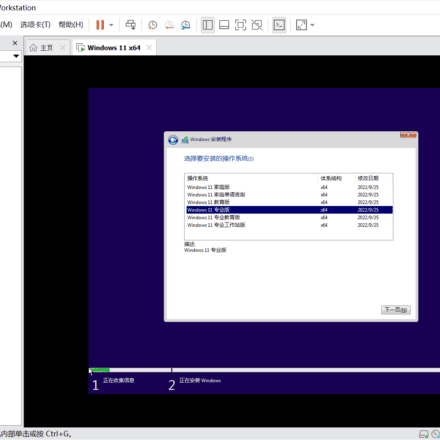
Create a cloud server EC2 instance
Taking the us-west-2 (Oregon) region as an example, first create an EC2 instance, select the t3.medium model (2 vCPU / 4GB memory), and install the latest version of Amazon Linux 2023 as the operating system.
In terms of storage configuration, select a 200GB gp3 disk and increase the EBS disk throughput from the default 125MB/s to 1000MB/s to speed up upload and download speeds. In addition, ensure that the instance has external network access to facilitate subsequent downloads of required files and software.
After the instance is created, install the necessary software packages on EC2 for subsequent configuration and use.
yum install python3-pip -y pip install huggingface_hub boto3
Write a download.py file with the following content:
from huggingface_hub import snapshot_download model_id = "deepseek-ai/DeepSeek-R1-Distill-Llama-70B" local_dir = snapshot_download(repo_id=model_id, local_dir = "DeepSeek-R1-Distill-Llama-70B")
Then execute python3 download.py to download the model. Download in progress.
After the download is complete, a series of deepseek files will be obtained on the EC2 cloud server. Based on the Llama 70b parameter model, the file size is about 132GB.
Create an S3 bucket on AWS and upload
Create an S3 bucket. When creating the bucket, select General purpose as the bucket type. The region must correspond to the EC2 region, for example, both are in us-west-2 Oregon region. Keep the other options at the default values. This bucket does not need to be publicly accessible.
In the AWS console S3 menu, click Create Bucket.

During the process of creating a bucket, if public access is not required, fill in the bucket name, leave other options as default, and click Create.
Click Security Credentials in the account menu in the upper right corner, and create an access key in the Access Key option.


After clicking Create Access Key, create an access key for the root user.Select whether to create an access key.

After clicking Create Access Key, the root access key is created successfully.

This key is the access key for the entire AWS. For security reasons, do not disclose it to the public.
After creating the bucket, you need to upload the following set of files:
- Model configuration file: config.json
- Tokenizer files: There are three in total: tokenizer.json, tokenizer_config.json and tokenizer.mode
- Model weights files: Model weights files in the previous step downloaded a large series of files with the extension .safetensors
These files are all in the directory downloaded in the previous step and do not need to be added additionally.
Next, prepare an upload file named upload.py with the following content:
import boto3 import os s3_client = boto3.client('s3', region_name='us-west-2') bucket_name = 'bedrock-custom-model-import-123456789012' local_directory = 'DeepSeek-R1-Distill-Llama-70B' for root, dirs, files in os.walk(local_directory): for file in files: local_path = os.path.join(root, file) s3_key = os.path.relpath(local_path, local_directory) s3_client.upload_file(local_path, bucket_name, s3_key)Replace the bucket name of the above file with the actual bucket name, replace Region with the actual Region, and make sure the directory downloaded in the previous step is correct. Next, you need to confirm that this EC2 has the permission to upload files to S3. You can do this by 1) configuring the AWSCLI key on the local machine, or 2) not setting the key on the local machine but setting an IAM Role for EC2, and adding the permission to write to S3 to the IAM Role.
After configuration, execute python3 upload.py to upload. The 70B model is about 132GB in total, and it takes 5-10 minutes to upload to S3.
Importing DeepSeek R1 models into Bedrock
Step 1: Model import
Enter the Bedrock service for the corresponding area, confirm that the area is correct, and click on the left menuImported modelsThen click on theImport modelImport button. See the screenshot below.

In the first step of the import wizard, enter the name of the imported model. Here we usedeepseek-r1-distilled-70bThat is, its version number is used as the name. The options on this page do not need to be changed. Continue to scroll down the screen. The screenshot is as follows.

In the Model Import Settings section, enter the name of the bucket where the model was uploaded in the previous step. The Python script in the previous step will upload the model file to the root directory of the bucket, so you can just fill in the bucket name here. Below, select the service role location used to import the model.Create and use a new service role. There is no need to manually create an IAM Role in advance. The Import Model Wizard will automatically create one. Next, scroll to the bottom of the page and click the Import Model button. See the screenshot below.

After submission, the wizard will automatically create the IAM Role required for importing the model. The browser cannot leave the page at this time. After the IAM Role is created, the model import task will be automatically submitted and the task will be transferred to the background. The browser can leave the current page. See the screenshot below.

After about 1 minute, the IAM Role is created and the webpage automatically jumps to the interface where the model import task is in progress. You can leave the current page at this time. The entire model import process may take 15 to 30 minutes or even longer depending on the size of the imported model. See the following screenshot.

After waiting for a while, the import is successful. See the screenshot below.

Next, initiate the test.
Step 2: Launch the test from the Bedrock console
Enter Bedrock service and click on the leftPlaygroundsMenu, from the Mode drop-down box on the right, selectSingle prompt. Note that after importing a custom model, you can only see the custom model in Single Prompt on the Bedrock console. See the screenshot below.

Next, in the model provider list, you can seeCustom & Managed endpointsBelow is the model you imported. Click Apply to start using it. See the screenshot below.

It should be noted that after importing a custom model into Bedrock, the model is not actually started. Therefore, when the model is called for the first time, the model will be loaded into the GPU resource pool. This process involves a cold start of tens of seconds. Once the model is started, subsequent calls can be directly output without delay. If the model is not called within a 5-minute window, the GPU resources occupied by the model will be released, and the cold start problem will occur when the model is called again.
Call the imported custom model on the Playgrounds of the console. The prompt word has a specific writing method and needs to be entered in the following format.
<|begin▁of▁sentence|><|User|> What model are you|Assistant|>
After entering, you will see a red prompt box at the top of the page indicating that the model inference is not yet readyModel is not ready for inferenceYou need to wait for dozens of seconds and submit again to see that the model is running normally. See the following screenshot.
Now let's change to a more complex example that requires thinking. Enter the following prompt and submit it. The screenshot is as follows.
<|begin▁of▁sentence|><|User|>Given the following financial data: - Company A's revenue grew from $10M to $15M in 2023 - Operating costs increased by 20% - Initial operating costs were $7M Calculate the company's operating margin for 2023. Please reason step by step, and put your final answer within \\boxed{}<|Assistant|>

It can be seen that the model completes the reasoning very well.

The following API call is made.
Step 3: Launch the test from the Bedrock API
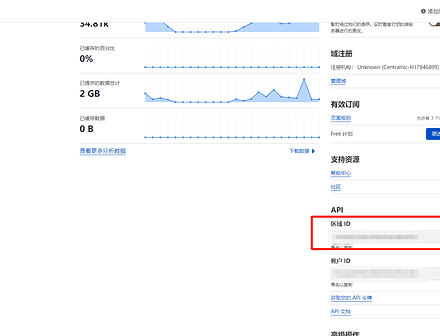
Before calling the Bedrock API, you need to obtain the model ID. The model ID, which is the ARN string, can be obtained from the following location. See the following screenshot.

Next, prepare the following Python code:
import boto3 import json client = boto3.client('bedrock-runtime', region_name='us-west-2') model_id = 'arn:aws:bedrock:us-west-2:133129065110:imported-model/otk6ql88yk9i' prompt = "What model are you?" response = client.invoke_model( modelId=model_id, body=json.dumps({'prompt': prompt}), accept='application/json', contentType='application/json' ) result = json.loads(response['body'].read().decode('utf-8')) print(result)If the model was started by calling the Bedrock console just now, there will be no cold start time when running this Python program, and the model can be called immediately. The results returned after running are as follows:
{'generation': '? \n\n
\n\n \n\nHello! I am DeepSeek-R1, an intelligent assistant developed by China's DeepSeek company. If you have any questions, I will do my best to help you. ', 'generation_token_count': 52, 'stop_reason': 'stop', 'prompt_token_count': 4}
From this custom model runs fine.
If you want to adapt the code to the cold start of a custom model, you can add exception handling. The code after increasing the number of retries and exception handling is as follows:
import boto3 import json from botocore.config import Config config = Config( retries={ 'total_max_attempts': 10, 'mode': 'standard' } ) client = boto3.client('bedrock-runtime', region_name='us-west-2', config=config) model_id = 'arn:aws:bedrock:us-west-2:133129065110:imported-model/otk6ql88yk9i' prompt = "What model are you?" try: response = client.invoke_model( modelId=model_id, body=json.dumps({'prompt': prompt}), accept='application/json', contentType='application/json' ) result = json.loads(response['body'].read().decode('utf-8')) print(result) except Exception as e: print(e) print(e.__repr__())Bedrock import custom model usage scenario fee description
Bedrock charges for importing custom models based on the computing resources used to run the model after importing it, rather than based on the input and output tokens. The following price list can be seen on the AWS official website. See the screenshot below.

Model storage fee
According to the official introduction, when importing an 8b model, it will occupy 2 Custom Model Units. If a 70b parameter model is imported, it will occupy 8 Custom Model Units.deepseek-r1-distilled-70bFor example, the model occupies 8 Custom Model Units, so its storage fee is$1.95 * 8 = $15.6One month.
Computing resource fee for a single replica
The calculation time for importing a custom model is based on 5 minutes. If there is no model call after 5 minutes, the computing resources will be automatically released. The next time the model is called, there will be a cold start loading time. For example, when the model is imported, there is no charge for the import process. The model has not been called. Storage fees will be charged this month, but the calculation time will not be charged. The first call to the model was made at 10:00 the next morning after the model was imported. At this time, from 10:00 to 10:05, the five-minute window will be charged according to the use of 8 Custom Model Units. As can be seen from the above screenshot, the fee is$0.0785 per minute per module * 8 modules * 5 minutes = $3.14This is the cost of running this model for a five-minute window.
The first five-minute window ends at 10:05, and the model will continue to run for another five minutes. If there is no model call in the second five-minute window, the model will release resources at 10:10, and a total of two five-minute window charges will be incurred. If the model is called again in the second five-minute window, for example, the model is called at 10:07, then the second five-minute billing window is recorded, and three billing five-minute windows will start from 10:10. Assuming that there is no user access in the third five-minute window from 10:10 to 10:15, then a total of three five-minute windows will be run, and the total charge will be$3.14 * 3 = $9.42According to this logic, if you continue to use the call, you will continue to be billed based on the 5-minute window.
After running for a while, you can see that the 70b model consumes 8 computing units, a total of 4 5-minute cycles, and a total of 20 minutes. This expense can be seen in the bill of this AWS account after about 24 hours. See the screenshot below.

From this we can see that if we importdeepseek-r1-distilled-70bAfter the model is run 24/7 for a whole month, the total cost will be$0.0785 per module per minute * 8 modules * 60 minutes * 24 hours * 30 days = $27129.6(One month fee).
This is because a 70B parameter model consumes hundreds of GB of video memory and needs to run on hardware with 8 GPU cards. Therefore, if there are API calls all day long, the cost will be relatively high.
Bedrock elastic scaling and multi-replication
The above is the situation of running a replica after the model is imported. Starting a replica occupies 8 Custom Model Units. At this time, the token input/output of 8 Custom Model Units is no longer charged extra. However, starting a replica does not have unlimited throughput. The maximum throughput and concurrency limit of each replica of the model depends on the model itself, which is automatically determined when the model of a specific parameter size is imported. Bedrock starts one replica by default. For large-traffic calls, Bedrock provides automatic scaling capabilities. If the throughput fully utilizes the hardware resources carried by one replica, it will automatically expand to the second and third replicas. Of course, starting a new replica will occupy 8 more Custom Model Units and will be billed by the minute. Currently, the default quota value of an AWS account is 3, which means that after the custom model is added with concurrency, it can only be expanded to a maximum of three replicas. If you need more, please open a support case to apply for a limit increase.
Regarding cost and model parameter size selection
Since the DeepSeek model has the ability to think, the 8B model version demonstrates good capabilities in many scenarios. Therefore, this article deploys the 70B parameter version mainly to demonstrate the entire process of Bedrock operation. In actual business use, the 8B parameter model can be tried to obtain the best balance between cost and effect.
AWS China official website:https://www.amazonaws.cn/