Excellent software and practical tutorials


Google Cloud Server Configuration Install LNMP Environment PHP+Mysql+Nginx Installation Detailed Explanation under Centos8
Google Cloud Server Configuration If you want to do your work well, you must first sharpen your tools. Sharpening the knife makes the work easier. First, build the server LNMP environment, and then build the web site. Without a good PHP environment, there will be more trouble later. I have talked about manually installing and deploying the PHP environment before. Today, I will talk about how to install and deploy the PHP environment on Google without using a third-party panel.Cloud ServerUse on dnf Command, manually install PHP+Mysql+NginxHow to configure the environment.
This tutorial is suitable for:Centos7/CentOS Stream 8/CentOS Stream 9/ Red Hat Enterprise Linux (RHEL)

Google Cloud Server Configuration
Centos8The system is installed inGoogleofFree cloud serverThe machine type tested in this article is e2-medium (2 vCPUs, 4 GB memory).
Since CentOS 8 announced that it would stop supporting it at the end of 21, Google upgraded to CentOS Stream.Google Cloud There is no major change in operation when updating the previous CentOS8 system to CentOS Stream 8 and CentOS Stream 9. Just add the software repository source.
The following takes the CentOS Stream 8 system as an example.Google CloudServer Configuration:
Google Cloud For Google Cloud application and virtual machine configuration methods, please visit:Free Google Cloud Application
After setting up the VM server, connect to SSH and start the operation. The first thing to do after installing the Centos8 system is to change the root password of the system.

Use the web SSH provided by Google Cloud Platform to connect to the server, and modify the SSH connection method after logging in.
Google Cloud Server Configuration Modify Server Root Password
use sudo -i or sudo su Command to switch to super administrator root user, switch to root super administrator mode and enter passwd command to change the password.
sudo -i passwd
Enter the password you want to change, then confirm the password twice. After the password is confirmed, press Enter to complete the setting. cd\ Command to switch to the root directory.
use VI Command to modify the SSH configuration file.
vi /etc/ssh/sshd_config

If you want to change the port for SSH remote connection, remove the # number in front of Port, and then change the port number you want to change.
Modify the following content in sshd_config:
- PermitRootLogin The default value is no, which needs to be changed to yes to use SSH remote access.
- PasswordAuthentication The default value is no, change it to yes to enable password login.
- ClientAliveInterval The default value is 420, change it to 3600, which is the client connection timeout period.
Port 10086 PermitRootLogin yes PasswordAuthentication yes ClientAliveInterval 3600
After modification, use:wqCommand to exit VI editing.
The above is how to enable SSH login using Google Cloud Server. After changing the ssh port, you need to disable SElinux, otherwise you will not be able to log in.
Permanently disable SElinux
Configure Google CloudFor servers, you first need to permanently disable SElinux. Although SElinux is used to enhance Linux security, it is very troublesome to set up. It is recommended to disable it permanently.
vi /etc/selinux/config
Find SELINUX=Enforcing, press i to enter the edit mode, and change the parameter to SELINUX=Disabled.

After the modification is completed, press the Esc key on the keyboard, execute the command: wq, save and exit the file. Then reboot the server. SElinux has been successfully disabled. The next step is to change the SSH port number. There are many automatic scanning bots on the Internet. Once they are attacked, the consequences will be disastrous. Google Cloud charges by traffic. Although it is $300, if it is invaded, it is no problem to run a few thousand dollars a day. So it is better to change the remote port of SSH first!
Note: Some systems have the firewall turned on by default. You need to check the firewall status.
systemctl status firewalld

If the firewall is turned on, you need to turn off firewalld under root user privileges.
#First, you need to stop the firewall systemctl stop firewalld #After the firewall is stopped, permanently shut it down systemctl disable firewalld
When entering the production environment later, the firewall can be set up on the Google Cloud platform.
Restart the server!
reboot
Google Cloud Server Configuration CentOS 7 / CentOS Stream 8/9 Install software sources epel and remi
Next, you need to further install the software required by the centos8 system. Let's start updating the system and installing the sources required for the system software package.epel and remi are indispensable software repositories for centos8.
Install the software source using RPM:
CentOS 7 installation software repository:
rpm -Uvh https://dl.fedoraproject.org/pub/epel/epel-release-latest-7.noarch.rpm rpm -Uvh http://rpms.remirepo.net/enterprise/remi-release-7.rpm
CentOS Stream 8 installation software repository:
rpm -Uvh https://dl.fedoraproject.org/pub/epel/epel-release-latest-8.noarch.rpm rpm -Uvh http://rpms.remirepo.net/enterprise/remi-release-8.rpm
CentOS Stream 9 installation software repository:
rpm -Uvh https://dl.fedoraproject.org/pub/epel/epel-release-latest-9.noarch.rpm rpm -Uvh http://rpms.remirepo.net/enterprise/remi-release-9.rpm
Use DNF to install the software source:
DNF is the next generation of yum package manager (derivation of Yum). The syntax of dnf and yum are similar and have many similarities. By default, DNF is installed on RHEL 8 and CentOS Stream 8 systems.
CentOS 7 installation software repository:
CentOS7 needs to install the dnf command first.
dnf install https://dl.fedoraproject.org/pub/epel/epel-release-latest-7.noarch.rpm dnf install https://rpms.remirepo.net/enterprise/remi-release-7.rpm
CentOS Stream 8 installation software repository:
dnf install https://dl.fedoraproject.org/pub/epel/epel-release-latest-8.noarch.rpm dnf install https://rpms.remirepo.net/enterprise/remi-release-8.rpm
CentOS Stream 9 installation software repository:
dnf install https://dl.fedoraproject.org/pub/epel/epel-release-latest-9.noarch.rpm dnf install https://rpms.remirepo.net/enterprise/remi-release-9.rpm
After the software source is installed, install dnf-utils
dnf-utils Classic YUM utilities implemented as CLI shims on top of DNF. The main purpose of these shims is to ensure backward compatibility with yum-3.
Use after installation dnf update Command to update the software in the system to the latest version.
dnf install dnf-utils dnf update
To view the data sources enabled on the system, use dnf repolist all The command can view all data sources, including those that are not enabled.
dnf repolist all

use dnf repolist Command to view the software source currently in use.
dnf repolist
use dnf repolist disabled Command to view the data sources disabled by the system.
dnf repolist disabled
After the software source is installed, you need to set and optimize the installed software package source. Use makecache Command to generate source cache.
dnf makecache
Install and enable automatic updates of DNF:
dnf install dnf-automatic systemctl start dnf-automatic.timer
Install the "Development Tools" package group:
dnf group install 'Development Tools' -y
Update system packages using DNF:
dnf -y update
Google Cloud Server Configuring SWAP Virtual Memory
The default installation of the Google Cloud operating system does not allocate swap space, so you need to add it manually. If the operating system does not have a swapfile configured (allocate swap space), it will cause errors after the memory load. Here's how to add swap space for the CentOS 8 operating system!
use free -m Run the command to check the memory configuration. If the number after Swap is 0, you need to add swap space.
free -m
Use six steps to create Swap virtual memory:
- Create a file with preallocated space of the specified size:
- You can use the ls command to check the file size;
- Change the permissions of the swap file;
- Format the swap file;
- Enable swap file;
- Modify the fstab file to enable swap to take effect automatically after reboot.
Create an 8G SWAP partition. If you want to increase or decrease the SWAP virtual memory, please modify the value after count=.
sudo dd if=/dev/zero of=/swapfile bs=1024 count=8388608 ls -lh /swapfile sudo chmod 600 /swapfile sudo mkswap /swapfile sudo swapon /swapfile sudo vi /etc/fstab
use VI Add the following command to the end of the fstab file:
/swapfile swap swap sw 0 0
If you don't want to use VI command, or you can use it directly echo Command to set swap to start at boot.
echo '/swapfile swap swap sw 0 0' | sudo tee -a /etc/fstab
Server Time Synchronization
Install the server time synchronization tool. Time synchronization between the server and the client is very important.
Check the current time zone. If the time zone is UTC, you need to change the server time zone.
timedatectl status|grep 'Time zone' # View the server hardware time hwclock # Synchronize the operating system time to the hardware time hwclock -w
Change server time zone
timedatectl set-timezone Asia/Shanghai timedatectl set-local-rtc 1 # Use the date command to check the current server time. date
Change the server time zone to Asia/Shanghai, then you can use timedatectl Command to query the time zone.
In CentOS 8, the ntp package is no longer supported by default, and time synchronization will be implemented by chrony.
By default, the chrony package already exists after the centos8 system is installed. You can confirm whether it exists through rpm -q chrony. If it does not exist, you can install it using dnf: dnf install chrony
vi /etc/chrony.conf
server ntp.aliyun.com iburst
Add the domestic Alibaba Cloud time synchronization server to the first line and save it.
Set chrony to run at startup
systemctl enable chronyd systemctl start chronyd
Adding Users and User Groups
Before configuring Centos8, you need to add user groups and users for web service access related permissions.
groupadd www useradd -g www www
After the users and user groups are configured, the basic environment of Centos8 has been configured almost. Now let's start installing web-related services.
After Centos8 is configured, install Nginx+PHP8+Mysql. Be sure not to get the installation order wrong. Install Nginx first, then install PHP8 and Mysql.After Nginx is installed, no configuration is required. Configure Nginx after installing PHP8.
Enable TCP BBR acceleration in CentOS
If the system kernel is higher than 4.9, BBR is included by default
1. Run the following code with root privileges. The kernel version should be higher than 4.9.
uname -r
2. Enable BBR
echo "net.core.default_qdisc=fq" >> /etc/sysctl.conf echo "net.ipv4.tcp_congestion_control=bbr" >> /etc/sysctl.conf
3. Effective changes
sysctl -p
Execute the following command. If the result contains bbr, it proves that bbr is enabled in your kernel.
sysctl net.ipv4.tcp_available_congestion_control
Note: You can also execute the following command. If bbr is found in the result, it can also prove that bbr is enabled in your kernel.
lsmod | grep bbr
Google Cloud Server Configuration and Installation of Nginx
Installing nginx is relatively simple. After installation, check the version, it is 1.14.1. The software packages using DNF are relatively stable. Sometimes the version is slightly lower, which is normal for the official source of centos.
Before installing Nginx, install the dependencies required by Nginx.
dnf -y install zlib zlib-devel pcre pcre-devel openssl openssl-devel gd-devel make gcc gcc-c++
- gcc linux compiler
- PCRE is a Perl library, including a Perl-compatible regular expression library. The HTTP module of nginx uses PCRE to parse regular expressions.
- The zlib library provides many compression and decompression methods. Nginx uses zlib to decompress the contents of the http package.gzip
- OpenSSL is the cornerstone of web security communication, which is also the dependency of https.
Install nginx:
After the dependency packages required by Nginx are installed, enter the following command to install nginx.
dnf install nginx nginx -v
After installation, set it to start at boot:
systemctl enable nginx
Start Nginx and check the current status of Nginx as follows:
systemctl start nginx systemctl status nginx
Check the current status of port 80:
netstat -na | grep 80
Check and set whether the nginx default port is open:
firewall-cmd --query-port=80/tcp
If the return value is no, port 80 is not open and you need to set up a firewall to allow access to port 80.
Open port 80:
firewall-cmd --add-port=80/tcp --permanent firewall-cmd --reload
Enter the server's IP address in the browser and check whether you can access the nginx welcome page.

Nginx has been installed successfully. Next, check the installation directory. The directory for manually installing Nginx is usually /usr/local/nginx, but the directory installed using yum/dnf is slightly different from the manual installation. Here are some corresponding directories for installing nginx using yum/dnf:
- Nginx main configuration file: /etc/nginx/nginx.conf
- Nginx execution file directory: /usr/sbin/nginx
- Nginx homepage html page path: /usr/share/nginx/html
- Proxy directory: /var/cache/nginx/proxy_temp
- Nginx cache directory: /var/cache/nginx/fastcgi_temp
- scgi directory:/var/cache/nginx/scgi_temp
- uwsgi directory: /var/cache/nginx/uwsgi_temp
- Nginx log directory: /var/log/nginx
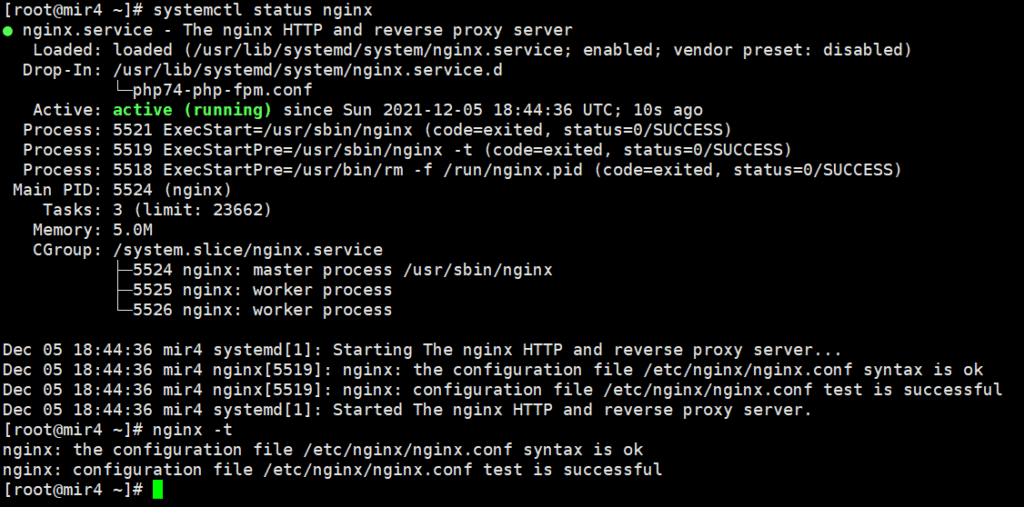
Use after installation nginx -t The command tests whether the installation is correct. If it is correct, the following content will be returned.
The built-in nginx version in the default software repository of CentOS8 is 1.14.1. Recently, a scan has been performed to indicate that it needs to be upgraded to version 1.17.7 or higher. If you want to install a higher version of nginx, please check:How to install the latest version of Nginx on CentOS8
Google Cloud Server Configuration and Installation of PHP8
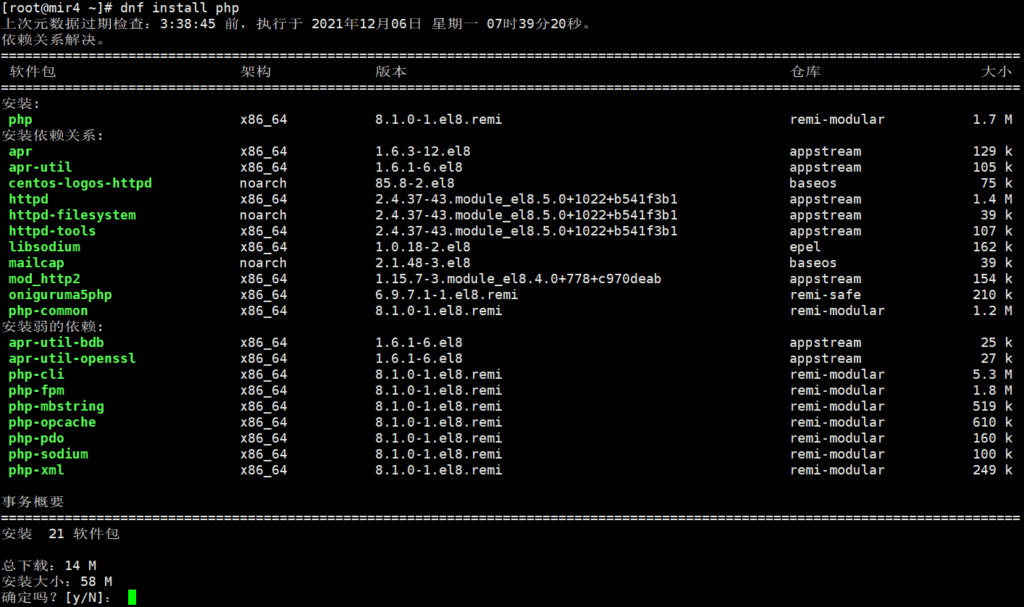
If you use dnf -y install php If the command is used to install PHP by default, the default installed version is very low. The current PHP version is PHP8.1. Let's see how to install PHP8.1.
First, check the system to install the software source of PHP8.1:
dnf list php

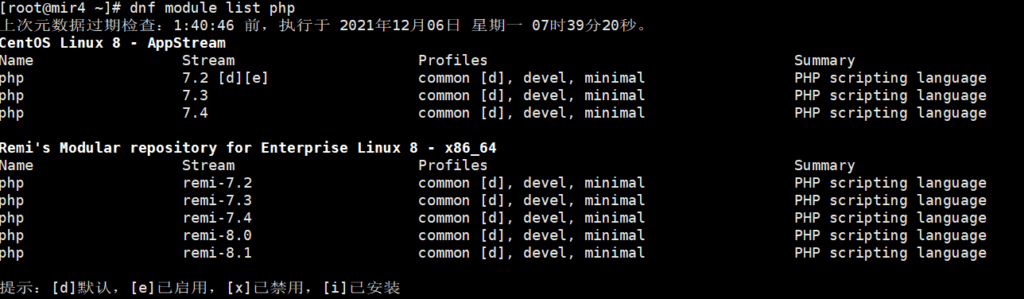
The PHP version in the default repository of Centos8 is 7.2.24, which is too low. The next step is to switch to the remi source and search for the PHP8.1 version.
Get a list of available PHPs:
dnf module list php
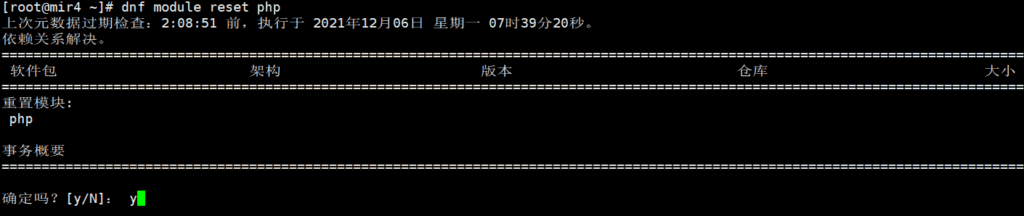
The next step is to enable the PHP module of the remi repository and reset the PHP module first.
Reset the PHP data source module:
dnf module reset php
Next, set up and enable the new PHP data source module. We need to install php8.1, so enable remi-8.1.
dnf module enable php:remi-8.1
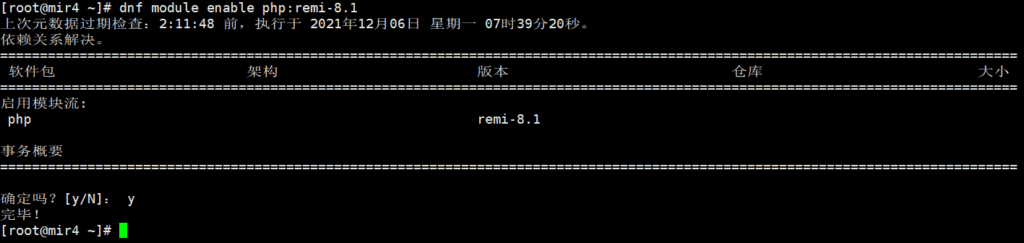
The remi-8.1 module has been enabled. Now install php8.1

Enter the installation command to install:
dnf install php
After PHP is successfully installed, install some additional commonly used PHP extension packages:
dnf install -y php-{mysqlnd,xml,xmlrpc,curl,gd,imagick,mbstring,opcache,soap,zip}Extension installation for php8.0
dnf install -y php-{mysqlnd,pecl-imagick,pecl-imagick-devel,gd,intl,cli,mbstring,curl,php-pecl-zip}use dnf search The command checks which extension packages are available in PHP 8.1:
dnf search php81*
After searching, we found that there are too many php81 related packages. What are they used for? Which ones should be installed and which ones should not be installed? The following is a detailed introduction to the php8.1 extension installation package.
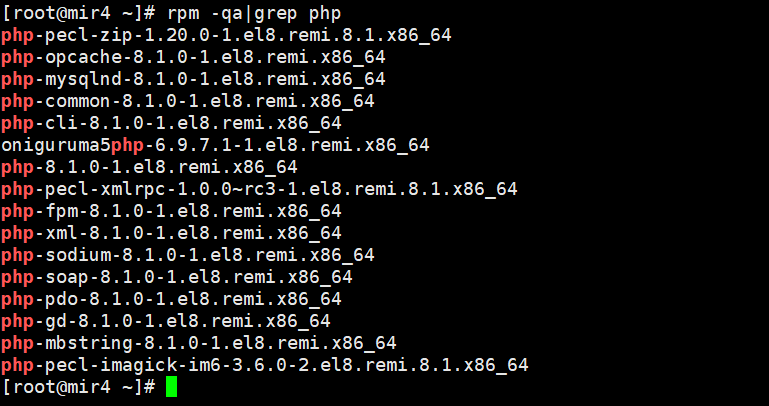
PHP8.1 is ready, let's check which extension packages are installed.
rpm -qa|grep php
You can also use php --modules command to query the installed PHP extensions.
php --modules
If you need to install PHP extensions, just use the dnf -y install command plus the name of the extension you need to install.
For example, to install the mysqlnd extension for PHP:
dnf install -y php-mysqlnd

After all the above are installed, next, set up PHP startup.
systemctl enable php-fpm
use systemctl Commands are convenient and quick to manage. If there is a new PHP package update, you can use the following command to upgrade to the latest available version
dnf upgrade
OK, now the installation of PHP8.1 is officially completed. Start the PHP service and let PHP start working.
systemctl enable php-fpm --now
systemctl status php-fpm
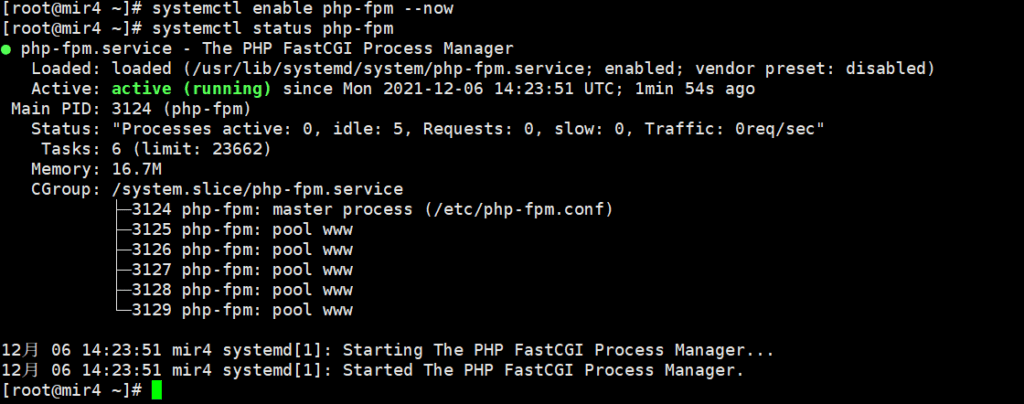
If the status light is green, it means PHP is working properly. There are some PHP configuration files that need to be modified.
PHP8 Configuration
Modify php.ini file
The php.ini file is the core configuration file of PHP, so modify it with caution!
Find php.ini file location

php -info | grep php.ini
Edit php.ini file
use VI command to edit the php.ini file, or use SFTP to log in to the server and use Notepad to edit and modify the php.ini file. Xftp is recommended as the SFTP client.
vi /etc/php.ini
Modify the variables in the file to the following values.
#Print PHP errors: display_errors = on #Increase memory usage to 256M: memory_limit = 256M #File upload size, the default value is too small, it is recommended to change it to 1G, that is, 1024M: upload_max_filesize = 1024M #Maximum form size, 48M is recommended: post_max_size = 48M #The maximum execution time of each script, in seconds: max_execution_time=600 #How many GET/POST/COOKIE input variables can be accepted: max_input_vars = 3000 #The maximum time each script spends parsing request data: max_input_time = 1000
After the modification is completed, save and exit, then modify the www.conf file of PHP.
Revise http://www.conf document
http://www.conf is the configuration file of the php-fpm process service.
Modify user group and user name, set http://www.conf The user group permissions for the file. http://www.conf Access permission settings -R, user and user group are set to nginx
chown nginx:nginx -R /etc/php-fpm.d/www.conf
edit http://www.conf File, modify user and user group variables.
vi /etc/php-fpm.d/www.conf
Will http://www.conf Variables in the file user and group All modified to nginx.
After editing, check listen variable:
Note: Variables listen, the default is listen = /run/php-fpm/www.sock If you want to use 127.0.0.1:9000 to access PHP in Nginx, you need to change listen Change the variable to listen = 127.0.0.1:9000. Otherwise, you will not be able to access PHP using 127.0.0.1:9000 in Nginx.
Next, modify the request timeout value, modify the timeout of a single request, remove the leading semicolon, and change the value to 600.
request_terminate_timeout = 600
After the modification is completed, press :wq to save the file and exit. The www.conf file is modified.
Modify session permissions
For example, modify the user group and permissions of /var/lib/php/session.
cd /var/lib/php chown nginx:nginx ./session chmod -R 777 ./session
systemctl reload php-fpm
At this point, PHP has been installed and configured. Restart the PHP service, or reboot the server.
Note: If Nginx does not support PHP access, check whether the listen variable is consistent with the Nginx settings. If you use 127.0.0.1:9000 to access, check whether port 9000 is open in the firewall.
netstat -lntp
PHP console commands
#Start PHP: systemctl start php-fpm #Stop: systemctl stop php-fpm #Restart: systemctl restart php-fpm #Restart to make the modified configuration take effect: systemctl reload php-fpm #Set to start at startup: systemctl enable php-fpm #Current status of PHP: systemctl status php-fpm
Uninstall PHP
If you want to uninstall the PHP service installed using dnf, you can execute the uninstall command:
Note: If you manually compiled and installed PHP,remove The uninstall command is invalid. First uninstall the PHP main program, and then remove the system's own PHP-common.
dnf remove php dnf remove -y php-common
Disable SELinux
exist CentOS 8 Permanently disable SELinux
vi /etc/selinux/config
Will SELinux The property is set to Disabled Then restart the server.
Google Cloud Server ConfigurationConfigure Nginx
The following takes nginx1.20.1 as an example:
Edit nginx.conf
If you want to access the website normally, you need to edit and modify the Nginx configuration file nginx.conf, which is the core configuration file of Nginx. VI Command to edit /etc/nginx/nginx.conf.
vi /etc/nginx/nginx.conf
The following is an example of a simple nginx.conf file for reference only:
user nginx; #Configure user or group, the default is nobody nobody. worker_processes auto; #The number of processes allowed to be generated, the default is 1 pid /run/nginx.pid; #Specify the storage address of the nginx process running file error_log /var/log/nginx/error.log error; #Specify the error log path and level. This setting can be placed in the global block, http block, server block, the levels are: debug|info|notice|warn|error|crit|alert|emerg, the higher the level, the less records, generally set error #Load dynamic modules. include /usr/share/nginx/modules/*.conf; #Working mode and upper limit of connection number-eventsGlobal setting events { accept_mutex on; #Set network connection serialization to prevent panicking, the default is on multi_accept on; #Set whether a process accepts multiple network connections at the same time, the default is off #use epoll; #Event-driven model, select|poll|kqueue|epoll|resig|/dev/poll|eventport worker_connections 4096; #The maximum number of connections allowed for a single worker process, the default is 512 } #http server configuration file block http { log_format myFormat '$remote_addr–$remote_user [$time_local] $request $status $body_bytes_sent $http_referer $http_user_agent $http_x_forwarded_for'; #Customize log format access_log /var/log/nginx/access.log myFormat; #Set access log path and format. combined is the default value of log format. rewrite_log on; #access_log off; #Cancel service access log sendfile on; #Allow sendfile to transfer files, the default is off, can be in http block, server block, location block. sendfile_max_chunk 0; #The number of transfers per call per process cannot be greater than the set value, the default is 0, that is, there is no upper limit. keepalive_timeout 1000; #Connection timeout, the default is 75s, can be in http, server, location block. client_max_body_size 1024m; types_hash_max_size 4096; tcp_nodelay on; tcp_nopush on; default_type application/octet-stream; #Default file type, default is text/plain fastcgi_connect_timeout 3000; #fastcgi connection timeout, default is 60 secondsfastcgi_send_timeout 3000; #Timeout for nginx process to send request to fastcgi process, default is 60 secondsfastcgi_read_timeout 3000; #Timeout for fastcgi process to send output to nginx process, default is 60 secondsgzip on; #gzip compression switch, on turns on Gzip compression, default is off turns offgzip_min_length 1k; # Enable the minimum file for gzip compression, files smaller than the set value will not be compressedgzip_comp_level 9; # gzip compression level, 1-9, the larger the number, the better the compression, but also takes up more CPU timegzip_buffers 4 16k; # Set the buffer size required for compressiongzip_http_version 1.1; # Set the HTTP protocol version for gzip compression, which can be ignored if no payload is usedgzip_types text/plain application/javascript application/x-javascript text/css application/xml text/javascript application/x-httpd-php image/jpeg image/gif image/png application/vnd.ms-fontobject font/ttf font/opentype font/x-woff image/svg+xml; # The file types to be compressed. There are many forms of javascript. The values can be found in the mime.types file. gzip_vary on; # Whether to add Vary: Accept-Encoding in the http header, it is recommended to enable gzip_disable "MSIE [1-6]\."; # Disable IE 6 gzip gzip_proxied off; ssl_session_cache shared:le_nginx_SSL:10m; ssl_session_timeout 1440m; ssl_session_tickets off; ssl_protocols TLSv1.2 TLSv1.3; ssl_prefer_server_ciphers off; ssl_ciphers "ECDHE-ECDSA-AES128-GCM-SHA256:ECDHE-RSA-AES128-GCM-SHA256:ECDHE-ECDSA-AES256-GCM-SHA384:ECDHE-RSA-AES256-GCM-SHA384:ECDHE-ECDSA-CHACHA20-POLY1305:ECDHE-RSA-CHACHA20-POLY1305:DHE-RSA-AES128-GCM-SHA256:DHE-RSA-AES256-GCM-SHA384"; include /etc/nginx/mime.types; # file extension and file type mapping table. Set the mime type (mail support type), the type is defined by the mime.types file. include /etc/nginx/conf.d/*.conf; # Load modular configuration files from the /etc/nginx/conf.d directory. }
Connecting to FastCGI
If you want to use PHP scripts to build a web site, you also need to set up Nginx to support PHP.
The following introduces the PHP service connection module. /etc/nginx/default.d Catalog, view php.conf This file is automatically generated when PHP is installed and does not need to be modified. It is used to pass PHP scripts to the FastCGI server.
# pass the PHP scripts to FastCGI server # # See conf.d/php-fpm.conf for socket configuration # index index.php index.html index.htm; location ~ \.(php|phar)(/.*)?$ { fastcgi_split_path_info ^(.+\.(?:php|phar))(/.*)$; fastcgi_intercept_errors on; fastcgi_index index.php; include fastcgi_params; fastcgi_param SCRIPT_FILENAME $document_root$fastcgi_script_name; fastcgi_param PATH_INFO $fastcgi_path_info; fastcgi_pass php-fpm; }
Enter /etc/nginx/conf.d Directory, in the directory php-fpm.conf No changes are required to the file. php-fpm.conf It is automatically generated when installing PHP8.1.php.confPart of the PHP script that is used to pass it to the FastCGI server.
# PHP-FPM FastCGI server # network or unix domain socket configuration upstream php-fpm { server unix:/run/php-fpm/www.sock; }
exist /etc/nginx/conf.d New in Catalog default.conf file, or create a custom .conf file. server{...} contains the website configuration content.
This is just a test example. The server configuration in a production environment is much more complicated.
server { listen 443 ssl http2; listen [::]:443 ssl http2; server_name XXX.com; root /home/www; index index.php index.html index.htm; ssl_certificate "/etc/letsencrypt/live/***/fullchain.pem"; # ssl certificate address ssl_certificate_key "/etc/letsencrypt/live***/privkey.pem"; # ssl certificate address ssl_session_cache shared:SSL:1m; ssl_session_timeout 10m; # cache validity period ssl_ciphers ECDHE-RSA-AES128-GCM-SHA256:ECDHE:ECDH:AES:HIGH:!NULL:!aNULL:!MD5:!ADH:!RC4; # encryption algorithm ssl_protocols TLSv1 TLSv1.1 TLSv1.2 TLSv1.3; # secure link optional encryption protocol ssl_prefer_server_ciphers on; # use the server's preferred algorithm # Config for 0-RTT in TLSv1.3 ssl_early_data on; ssl_stapling on; ssl_stapling_verify on; add_header Strict-Transport-Security "max-age=31536000"; include /etc/nginx/default.d/*.conf; # load the default server block configuration file from /etc/nginx/default.d. # pseudo-static page location / { try_files $uri $uri/ /index.php?$args; } # reverse proxy location /update32/ { proxy_redirect off; proxy_read_timeout 1200s; proxy_pass http://127.0.0.1:20892; proxy_http_version 1.1; proxy_set_header X-Real-IP $remote_addr; proxy_set_header X-Forwarded-For $proxy_add_x_forwarded_for; proxy_set_header Upgrade $http_upgrade; proxy_set_header Connection "upgrade"; proxy_set_header Early-Data $ssl_early_data; } }Add access permissions to the web storage directory:
chown nginx:nginx -R /home/www
After the configuration is complete, create a new index.php file in the /home/www directory and paste the following code:
<?php
phpinfo();
?>
This is a PHP probe code. Paste the code into index.php, save the file, and then restart the server as root.
Visit Nginx official PHP FastCGI example
Problems encountered in Nginx:
The error "nginx: [emerg] unknown directive " " in /etc/nginx/conf.d/" appears because of the space conversion problem when uploading using SFTP in Windows. This problem will not occur when using VI editing in Linux.
Uninstall Nginx
If you want to uninstall all nginx installed using dnf, you can execute the uninstall command:
dnf remove nginx
Nginx console commands
Start: systemctl start nginx Stop: systemctl stop nginx Restart (do not stop nginx, to make the modified configuration take effect): systemctl reload nginx Restart: systemctl restart nginx Set startup: systemctl enable nginx Disable startup: systemctl disable nginx View service status: systemctl status nginx
The installation of Nginx has come to an end here. Now let’s start installing the MYSQL database service.
Google Cloud Server Configuration and Installation of MySQL
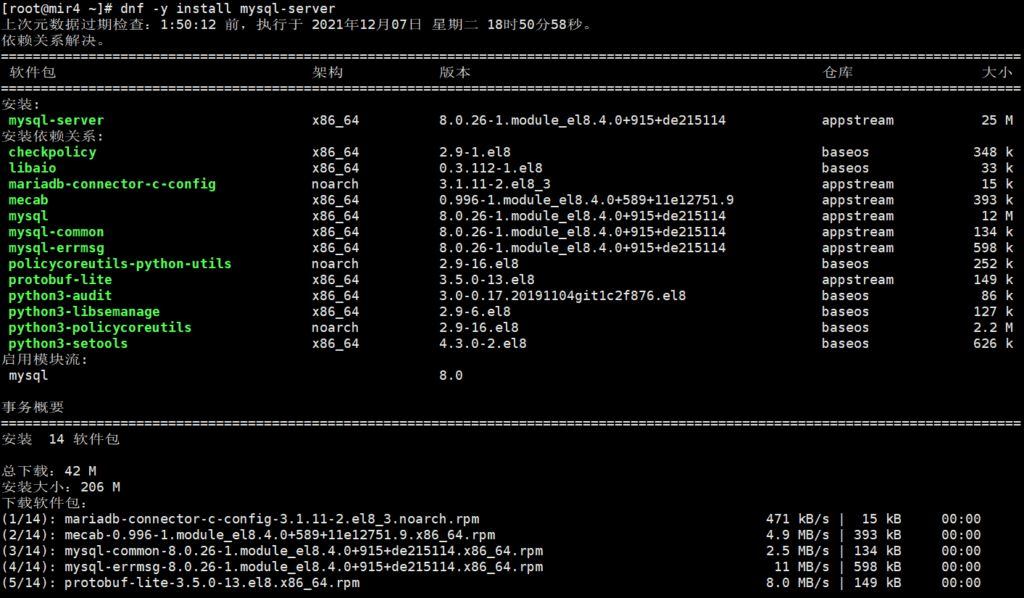
Centos8 uses dnf to install mysql. First check whether mysql has been installed in the system.
rpm -qa |grep -i mysql
If MySQL has not been installed on the server before, install it now. If MySQL has been installed before, use the remove command to uninstall it!
First find out what versions are in the data source.
dnf list mysql*
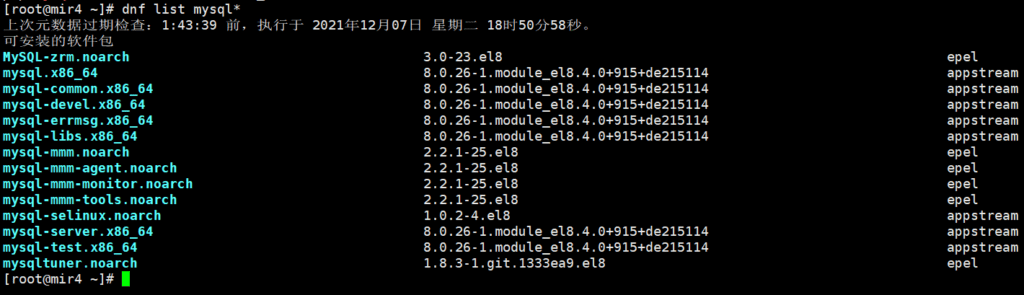
Install MySQL 8.0
The official Centos software source only contains version 8.0.26. If you want to install a higher version, you need to use other data sources.
dnf -y install mysql-server
After the installation is successful, start MySQL and then set it to start at boot.
#Start MySQL systemctl start mysqld #Set boot startup systemctl enable mysqld #Check the installed MySQL version mysqladmin --version
Finally, check the status of the installed MySQL 8.0.
systemctl status mysqld
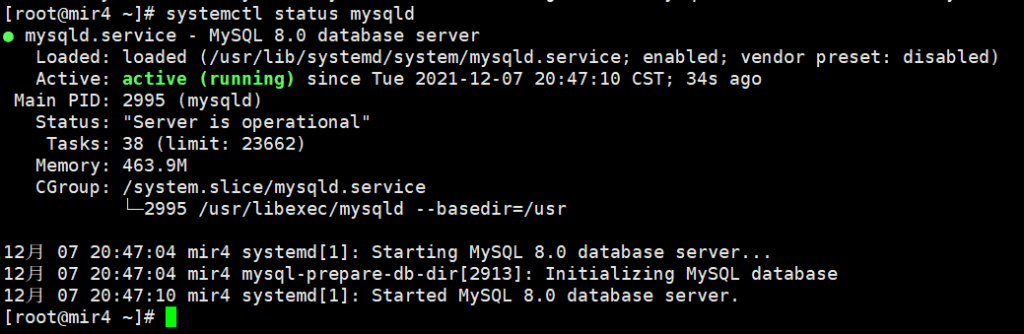
OK, the green light is on, everything is normal! Next, configure the MySQL server.
Google Cloud Server Configuration MySQL
run mysql_secure_installation Script that performs some security-related actions and sets the MySQL root password:
sudo mysql_secure_installation
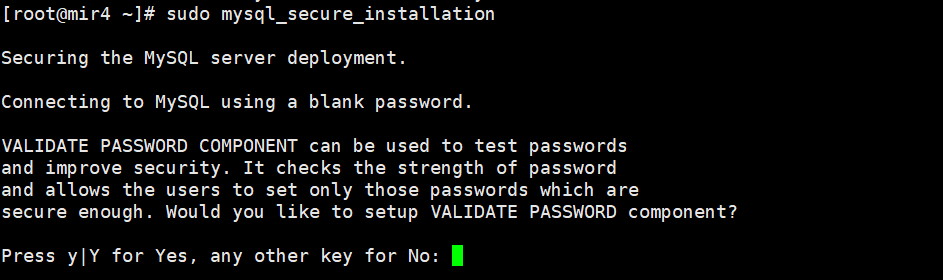
VALIDATE PASSWORD COMPONENT can be used to test passwords and improve security. It checks the strength of passwords and allows users to set only those passwords
Secure enough. Do you want to set the VALIDATE PASSWORD component?
enter:Y , press Enter to enter the configuration.

Select the password verification policy level and enter: 0 (low)
Enter a new password. The password must be more than 8 characters long and contain uppercase letters, lowercase letters, numbers, and special symbols. Then confirm the password you set.

Confirm whether to continue using the provided password, enter:Y
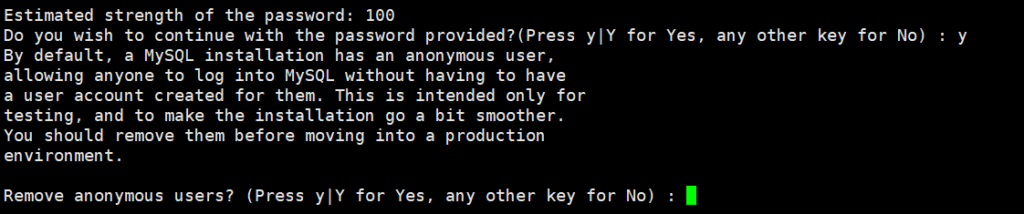
By default, MySQL installations have an anonymous user that allows anyone to log in without having to create a user account for them. This is only for testing and to make the installation smoother. You should remove them before moving into a production environment.
Do you want to remove anonymous users? Enter: Y

Disable remote login to MySQL using root. Enter: N

By default, MySQL comes with a database called "test" that anyone can access. This is also only used for testing and should be removed before going into a production environment.
Remove the test database input that comes with MySQL:Y
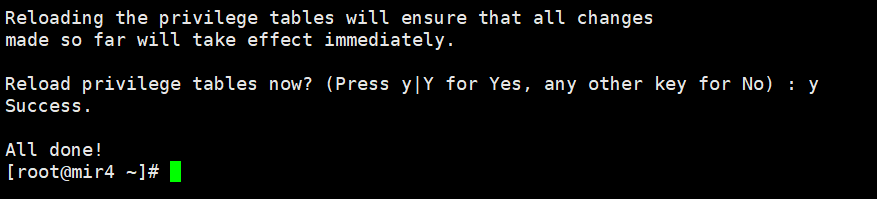
Reloading the privilege tables will ensure that all changes made so far will take effect immediately.
To reload the permissions table, enter:Y
The default character set of MySQL 8.0 is utf8mb4, so the character set does not need to be changed. MySQL has been successfully configured at this step!
Configure mysql remote login
Note: If you need to set up remote login for the root account, repeat the previous step and then allow root remote login and set it to Y.
Next use mysql -u root -p Run the command to log in to MySQL and set the host field of the root user to '%', which means accepting login requests from all IP addresses of root.
UPDATE USER SET host='%' WHERE user='root';
After setting, restart the mysql service:
systemctl restart mysqld
MySQL console commands
Start: systemctl start mysqld Stop: systemctl stop mysqld Restart: systemctl restart mysqld Set startup: systemctl enable mysqld Disable startup: systemctl disable mysqld View service status: systemctl status mysqld
At this point, all the installation is complete! The Linux environment of php+mysql+nginx has been successfully built.


Highly recommended: Google Cloud Server is the most powerful free cloud server known so far that can meet the actual needs of most websites!