Excellent software and practical tutorials
How to install Stable Diffusion on Windows
Stable Diffusion Installation tutorial Install Stable Diffusion on your personal computer. Stable Diffusion supports the latest versionpython3.11The code and model weights for Stable Diffusion are publicly available and can be installed on mostGPUPrevious proprietary models such as DALL-E and Midjourney could only be accessed through cloud computing services.
existWindowsBefore installing Stable Diffusion, you need to install python3.10.6 and Git
What is Stable Diffusion?
Stable Diffusion is a deep learning text-to-image generation model released in 2022. It is primarily used to generate detailed images based on text descriptions, although it can also be applied to other tasks such as inpainting, outpainting, and translation of images under the guidance of prompt words. It is a diffusion model of latent variable models, a variety of generative artificial neural networks developed by the CompVis research group at the University of Munich.
Stable Diffusion (SD) is a deep learning text-to-image generation model released in 2022. It was first proposed by the CompVis research group of the University of Munich and jointly developed with the startup Stability AI, and Runway, and is supported by EleutherAI and LAION.
It can achieve many functions. It can generate pictures with specified content based on the text description (picture-generated pictures), it can be used for redrawing existing picture content (picture-generated pictures), it can also be used for partial redrawing of images, external expansion, high-definition restoration, and even "animation" generation of videos.
SD official website:https://stability.ai/
GitHubproject:https://github.com/AUTOMATIC1111/stable-diffusion-webui

Stable UnCLIP 2.1
Based on SD2.1-768, new stable diffusion fine-tuning at 768x768 resolution (Stabilize unCLIP 2.1,Hug face).The model allows image transformation and blending operations such asHierarchical Text-Conditional Image Generation using CLIP Latentsand due to its modularity, can be used withKARLOThere are two variants:Stable unCLIP-LandStable unCLIP-H, conditioned on CLIP ViT-L and ViT-H image embeddings, respectively.HereProvide a description.
The public demonstration of SD-unCLIP is available atAvailable at Clipdrop.co/stable-diffusion-reimagine
Stable Diffusion Installation Steps
SD's source code is open source, which means that anyone can use it for free and unlimited AI painting generation. Some developers used its source code to create a user-friendly graphical interface (GUI), and thus Stable Diffusion, which most of us can use today, was created. WebUI(SD Web UI).
First, you need to install the Windows version on your PC. Python and git . Note that if you do not havePython and git If not, the following installation will fail!
Incompatible Python versions
The program was tested with 3.10.6 Python, but you are using 3.11.5.
If you encounter the "RuntimeError: Couldn't install torch." message,
or any other error regarding unsuccessful package (library) installation,
Please downgrade (or upgrade) to the latest version of Python 3.10
And delete the current Python and 'venv' folders in the WebUI directory.You can download Python 3.10 from here: https://www.python.org/downloads/release/python-3106/
Alternatively, use the binary version of WebUI: https://github.com/AUTOMATIC1111/stable-diffusion-webui/releases
Use --skip-python-version-check to suppress this warning.
Note: Installing python 3.11.5 will result in an error, so you need to downgrade and install 3.10.6
python3.10.6 :https://www.python.org/downloads/release/python-3106/
Click to download python3.10.6:Windows installer (64-bit)
Check Add python.exe to PATH and click install new to install.
Installing other versions does not install torch 2.0.1 corresponding to webui
After installing python3.10.6, skip the python3.11.5 installation process below
Windows installation python tutorial
Installing Python on Windows is as simple as installing ordinary software. After downloading the installation package, just click "Next".
Python installation package download address:https://www.python.org/downloads/
Open the link and you can see that there are two versions of Python, Python 3.x and Python 2.x, as shown in the following figure:

Click to download:Download Python 3.11.5
Here we install the stable version of Python 3.11.5. If you need other versions of Python, you can https://www.python.org/downloads/release/python-3115/ download

Version Description:
- (64-bit) is the 64-bit Python installer;
- (32-bit) is the 32-bit Python installer.
- Installer means an executable program in .exe format. This is a complete offline installation package. Generally, you can select this one.
- package A packaged Python package.
Here I chose "Windows installer (64-bit)", which is a complete offline installation package for 64 bits.
Click Install Now to install Python 3.11.5 64-bit version, or click Customize installation for customized installation.

It is recommended to perform a custom installation, so that the directory where the Python command tool is located can be added to the system Path environment variable, which will be very convenient for developing programs or running Python commands in the future.
CheckAdd python.exe to PATH , then click Customize installation to perform customized installation.
Python supports two installation methods, default installation and custom installation:
The default installation will check all components and install them on the C drive;
Custom installation allows you to manually select the components to be installed and install them to other drive letters.
Here we choose custom installation to install Python in a common directory to avoid too many files on the C drive. Click "Customize installation" to proceed to the next step and select the Python components to install.

Click Next to install and configure, check Add Python to environment variables, then you can select the installation directory or install it by default.
After making your selection, click Install to start the installation.


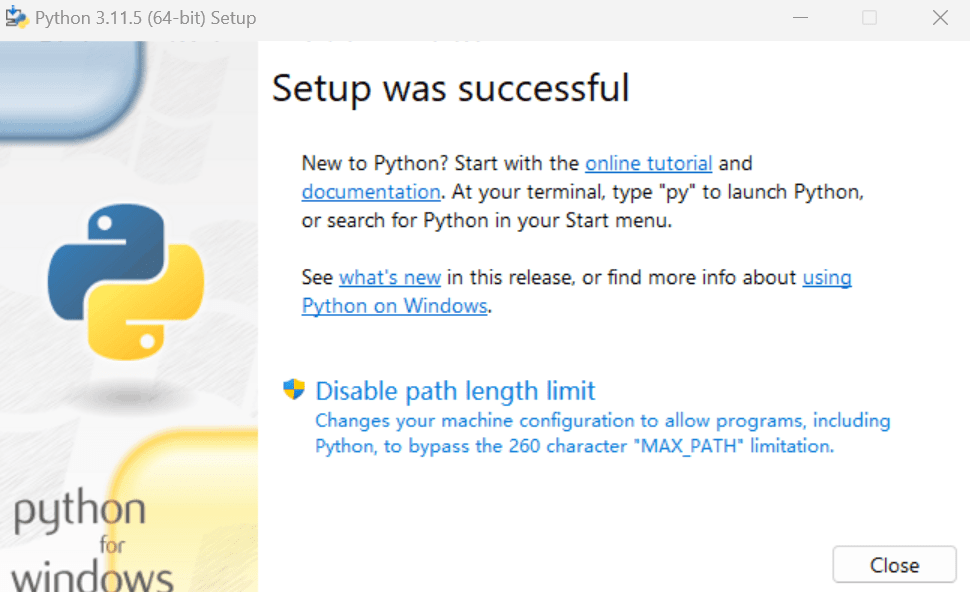
To disable the path length limit, click Disable path length limit
Windows historically has limited path length to 260 characters. This means that paths longer than this will not be parsed and will result in an error.
In recent versions of Windows, this limit can be extended to approximately 32,000 characters. Your administrator needs to activate the "Enable Win32 long paths" group policy, or set LongPathsEnabled to 1 in the registry key. HKEY_LOCAL_MACHINE\SYSTEM\CurrentControlSet\Control\FileSystem
This allows the open() function, the os module, and most other path functionality to accept and return paths longer than 260 characters.
After changing the above options, no further configuration is required.
For more installation help, refer to the official documentation, Using Python on Windows:https://docs.python.org/3.11/using/windows.html
After the installation is complete, open the Windows command line program (command prompt) and enter the python command in the window (note that the letter p is lowercase). If the Python version information appears and you see the command prompt >>>, it means that the installation is successful, as shown in the figure below.

PressCtrl+ZShortcut keys, or enter the exit() command to exit the interactive programming environment and return to the Windows command line program. IDLE is a simple development environment that comes with Python. After installation, find the Python 3.11 folder in the Windows Start menu, where you can see the IDLE tool!
At this point Python 3.11 has been installed successfully.
Windows installation git tutorial Git installation process
Git is a free and open source distributed version control system designed to handle small to large projects quickly and efficiently.
Git is a distributed version control software originally created by Linus Torvalds and published in 2005.GPLLicense agreement released. The original purpose was to better manageLinuxIt is designed for kernel development. It should be noted that this is different from GNU Interactive Tools. The original motivation for git development came from BitKeeper and Monotone.
Git official website:https://git-scm.com
First, go to Git official website to download, Git website download address:https://git-scm.com/downloads

Click to download the latest version of Git
Click here to downloadThe latest (2.45.2) 64-bit Git version for Windows. This is the latest maintained version. It was released about 1 month ago (2024-06-03)
Other Git downloads for Windows
Standalone installer
32-bit Git installation for Windows.
64-bit Git installation for Windows.
Using winget tool
If you haven'twinget tool, please install it and then type this command in Command Prompt or Powershell.
winget install --id Git.Git -e --source winget
Git Installation Process
Click the git installer and click next to install

Select the installation path, usually the default installation is fine

The default installation is fine. Check whether to create shortcuts on the desktop for Additional icons and whether to detect the latest version updates as needed.


This page is for selecting the default editor for Git files. It is rarely used, so Vim is the default. Click the "Next" button to continue to the interface shown below.

Modify the initialization branch name, select NEW below, and then click next to proceed to the next installation.

This interface is to adjust your PATH environment, select the recommended option second configuration.
- The first configuration is to "use Git only from Git Bash". This is the safest option, as your PATH will not be modified at all. You can only use Git command-line tools from Git Bash. This will not work with third-party software, however.
- The second configuration is "Git from the command line and also with third-party software". This option is considered safe because it only adds some minimal Git wrappers to the PATH to avoid cluttering the environment with optional Unix tools.
You will be able to use Git from Git Bash, Command Prompt, and Windows PowerShell, as well as from any third-party software that looks for Git in your PATH. This is also the recommended option. - The third configuration is "Use Git and optional Unix tools from the command prompt". Warning: This will override Windows tools such as "find and sort". Use this option only if you understand its implications.

Select the Git client program. The first option is selected by default, using the default Git client program.Client.

Select backend transmission. This interface is to select HTTPS backend transmission. The first option is selected by default.
- The first option is "Use OpenSSL library". The server certificate will be verified using the ca-bundle.crt file. This is also the option we usually use.
- The second option is "Use local Windows secure channel store". The server certificate will be validated using the Windows certificate store. This option also allows you to use your company's internal root CA certificates, for example through Active Directory Domain Services.

Configure the end-of-line symbol conversion. This interface is for configuring the end-of-line symbol conversion. Select the first option by default.
- The first option is "Check out Windows-style, commit Unix-style line endings". When checking out text files, Git will convert LF to CRLF. When committing text files, CRLF will be converted to LF. For cross-platform projects, this is the recommended setting on Windows ("core.autocrlf" is set to "true")
- The second option is "Check out as is, commit Unix-style line endings". Git will not perform any conversion when checking out text files. When committing text files, CRLF will be converted to LF. For cross-platform projects, this is the recommended setting on Unix ("core.autocrlf" is set to "input")
- The third option is "Check out as-is, commit as-is". Git will not perform any conversion when checking out or committing text files. It is not recommended to choose this option for cross-platform projects ("core.autocrlf" is set to "false")

Configure your terminal emulator for use with Git Bash. The first option is selected by default.
- The first option is "Use MinTTY (MSYS2's default terminal)". Git Bash will use MinTTY as a terminal emulator, which has resizable windows, non-rectangular selection, and Unicode fonts. Windows console programs (such as interactive Python) must be started via "winpty" to run in MinTTY.
- The second option is "Use Windows' default console window". Git will use Windows' default console window ("cmd.exe"), which can be used with Win32 console programs such as interactive Python or node.js, but the default scrollback is very limited, needs to be configured to use a unicode font to display non-ASCII characters correctly, and is not recommended for Windows.Windows 10Previously, its window was not freely resizable and only allowed rectangular text selection.

Select git pill. The default behavior is git. Select the first option by default.

Select the credential helper. The first option is selected by default to use the default credential helper for git.

Enable additional options. The first option is checked by default, enabling system cache to make Git run faster.

The last step is the experimental option. You don’t need to check it. Just click install to install it.


At this point, git has been installed. Let's test whether the installation is successful.
You can see three Git startup icons in the start menu (Git Bash, Git CMD (Deprecated), Git GUI).
Git Bash is a console that comes with Git.
Git CMD (Deprecated) is to use Git through CMD

Git GUI is a visual operation tool for Git

Well, here the Windows version of git has been installed successfully.
Modify the default Git download path
By default, the default path after Git Bash is opened is "C:\Users\Administrator". In this case, we need to manually switch to the directory where the code project is located when using it, which is too cumbersome. Therefore, we need to modify the default open path to the path where our commonly used code projects are stored.
Right-click on the "Git Bash" shortcut and select "Properties". A prompt box will pop up as shown in the following screenshot.

If we want to change the default path to "E:\SD", we need to do two steps:
- Remove the end of the command in the input box after "Directory", that is, delete "--cd-to-home".
- Change the content in the input box after "Starting Location" to the default path "E:\SD" we want (Note: this path is based on the location of your own code project)
- Note that if you want to modify the directory under the default path, you need to create the directory first, otherwise it cannot be set.

Next, test it by entering the pwd command in Git Bash.

The default download path has been modified.
Stable Diffusion Installation
Update the window graphics driver
Nvidia graphics cards are recommended GeForce ExperienceInstall the latest driver and CUDA will be installed at the same time.
AMDPlease use the display card Driver Auto-Detection ToolInstall the graphics card driver.
Please install Intel Arc graphics card WHQLdrive.
To update the window graphics driver for the smooth subsequent installation, we need to update the computer's graphics driver. If it has been updated recently, there is no need to update it.
Press win+R, enter devmgmt.msc, and the following box will pop up.

NVIDIA official websiteDownload the latest driver:https://www.nvidia.cn/Download

If you have installed CUDA before, you can upgrade the driver directly on your computer.
After updating the GeForce Game Ready driver, click More behind Check for Updates and select Update NVIDIA Studio Driver.

Download the Stable Diffusion code
After the graphics card driver is updated, download the Stable Diffusion code:
git clone https://github.com/AUTOMATIC1111/stable-diffusion-webui.git
Paste the above code in Git Bash and execute the Stable Diffusion code download.


Modify the Stable Diffusion configuration
Modify the webui-user.bat file. The file path is as follows:
e:\sd\ is the git download path you modified before. The default git download path is in the user directory of the C drive.
e:\sd\sdstable-diffusion-webui\webui-user.bat
Use Notepad to open the webui-user.bat file. Notepad++ is recommended.
existCOMMANDLINE_ARGSAdd later:--no-half-vae --disable-nan-check --skip-python-version-check --force-enable-xformers --xformers
@echo off set PYTHON= set GIT= set VENV_DIR= set COMMANDLINE_ARGS=--no-half-vae --disable-nan-check --skip-python-version-check --force-enable-xformers --xformers call webui.bat
If the graphics card has more than 8GB of VRAM, replace set COMMANDLINE_ARGS= with set COMMANDLINE_ARGS=--enable-insecure-extension-access.
If the graphics card VRAM is less than or equal to 4GB, replace set COMMANDLINE_ARGS= with set COMMANDLINE_ARGS=--medvram --opt-split-attention --enable-insecure-extension-access. The purpose of adding --medvram is to limit the VRAM usage.
If the computer RAM (not VRAM) is less than or equal to 8GB, replace it with set COMMANDLINE_ARGS=--lowvram --opt-split-attention --enable-insecure-extension-access.
Note that using the --lowvram argument will make rendering very slow on high-end graphics cards.
(The following can be omitted)
Adding --xformers can further reduce VRAM usage, only supports Nvidia graphics cards. Adding --no-half-vae reduces the chance of using VAE to calculate black images.
Add the --listen parameter and open the firewall port 7860, and you can access the WebUI using a browser from other computers in the local network.
Adding the --share argument will generate a Gradio URL that allows you to use the WebUI from an external network or mobile phone. The URL expires after 72 hours.
Configuring a proxy for Git client on Windows
First downloadClash for Windows
refer to:Clash for Windows Chinese Tutorial
Open the Git client Git Bash and enter the following content to set the local proxy.
git config --global https.proxy http://127.0.0.1:7890 git config --global https.proxy https://127.0.0.1:7890
After setting up, enter git config --list | grep proxy command to check whether the settings are effective.

If you want to turn off the proxy or change another port, here is how to turn off the local proxy.
git config --global --unset http.proxy git config --global --unset https.proxy
Setting up pip
Choose one of the two download sources. It is recommended to set the Alibaba download source. Set the pip proxy path: C:\Users\your user directory\AppData\Roaming\pip\pip.ini
Set up Alibaba pip download source
pip config set global.index-url https://mirrors.aliyun.com/pypi/simple pip config set install.trusted-host mirrors.aliyun.com
Set up Tsinghua University pip download source
pip config set global.index-url https://pypi.tuna.tsinghua.edu.cn/simple/ pip config set install.trusted-host pypi.tuna.tsinghua.edu.cn
Manually change the download source
First, create a pip folder in the directory of the current Windows user, then create a pip.ini file and modify the file content as follows;
[global] index-url = http://mirrors.aliyun.com/pypi/simple/ [install] trusted-host=mirrors.aliyun.com
Remember it must be pip.ini, create a new onetxtNotepad, then check the file extension in the folder options, uncheck the option to hide extensions for known file types, and then change the suffix of the txt file to ini.

Upgrade pip
In the cmd command line, enter
python.exe -m pip install --upgrade pip

View index: https://mirrors.aliyun.com/pypi/simple
Requirement satisfied: pip (23.2.1) in c:\users\b7738\appdata\local\programs\python\python311\lib\site-packages
Install xformers
If xformers is not installed, an error message will be displayed: No module 'xformers'. Proceeding without it.
What is the "xformers" module?
The module xformers can optimize the GPU to a certain extent and speed up the drawing output.
Xformers is probably the most well-known optimization acceleration solution in the community. The name Xformers refers to the fact that the library includes models of various transformer architectures. This library is only applicable to NVIDIA graphics cards. Its features are to accelerate image generation and reduce video memory usage, but the cost is that the output image is unstable and may be slightly worse than without Xformers.
xformers can greatly save AI image generation time and GPU cache! With xformer, you can save a lot of time and video memory when using stable-diffusion software. Time is life, and time saved is time to increase life!
For example:
If xformers is not turned on, the generation time of AI images will be longer and the GPU memory usage will increase. If you have 100GB of video memory (a 4090 graphics card only has 24GB of video memory), it doesn't matter if you don't use xformers.
Install xformers using git
pip install xformers==0.0.16
Add a line to the webui-user.bat file:
set COMMANDLINE_ARGS=--xformers

If the error persists, please check the proxy environment.
Install CUDA
The NVIDIA® CUDA® Toolkit provides a development environment for creating high-performance, GPU-accelerated applications. With the CUDA Toolkit, you can develop, optimize, and deploy applications on GPU-accelerated embedded systems, desktop workstations, enterprise data centers, cloud-based platforms, and HPC supercomputers. The toolkit includes multiple GPU-accelerated libraries, debugging and optimization tools, a C/C++ compiler, and a runtime library for deploying applications.
With built-in capabilities for distributed computing in multi-GPU configurations, scientists and researchers can develop applications that scale from a single GPU workstation to cloud-based facilities with thousands of GPUs.
CUDA is a parallel computing platform and programming model developed by NVIDIA for general-purpose computing on graphics processing units (GPUs). With CUDA, developers can harness the power of GPUs to significantly speed up computing applications.
Execute nvidia-smi in the CMD command prompt to check the CUDA version suitable for this machine.

Check the CUDA Version in the upper right corner. The version suitable for installation is 12.1
CUDA download address:https://developer.nvidia.com/cuda-toolkit-archive
Find the corresponding version, download and install it.
For example: CUDA12.1

Select Windows as the operating system, the default architecture is x86_64, and the operating system version you want.Windows 10Select 10,Windows 11Select 11.
Installation file, local is an offline installation package, 3.1G, network is a network installation package. It is recommended to download the offline installation package.

After the download is complete, click on the default installation.


Download the Stable Diffusion large model
Stable Diffusion large model download website:https://civitai.com/
If the website cannot be opened, you need to use a proxy to access it.
Three national style models:https://civitai.com/models/10415/3-guofeng3
After downloading, storage path:stable-diffusion-webui\models\Stable-diffusion

After the large model is downloaded, start Stable Diffusion
Start Stable Diffusion
In the stable-diffusion-webui directory, click the webui-user.bat file.

After starting webui-user.bat, some dependencies will be automatically downloaded and the installation will be completed!
During the installation process, you must open the external network environment, otherwise it will prompt that the download failed and you will not be able to proceed to the next step of installation!

The installation process takes about half an hour to an hour, depending on the personal computer and the speed of the network. After the installation is complete, the Stable Diffusion page will pop up in the browser.

Stable Diffusion interface access address: http://127.0.0.1:7860/
Do not close the command prompt window at this time. The Stable Diffusion interface access information will be fed back to the command prompt window in real time.
Go here Windows 10/11 Stable Diffusion Installation Tutorial It’s over! Start your Stable Diffusion dream journey! Embrace AI, embrace the future!
Humans create technology, AI changes the future!


