Excellent software and practical tutorials
What isWireGuard
WireGuard It is an easy-to-configure, fast and secure open source VPN that utilizes the latest encryption technology. The goal is to provide a faster, simpler, and more streamlined universal VPN that can be easily deployed on low-end devices such as Raspberry Pi to high-end servers.
Most other solutions, such as IPsec and OpenVPN, were developed decades ago when security researcher and kernel developer Jason Donenfeld realized they were slow and difficult to properly configure and manage.
This led him to create a new open source VPN protocol and solution that was faster, more secure, and easier to deploy and manage.
WireGuard was originally developed for Linux, but is now available for Windows, macOS, BSD, iOS, and Android. It is still under active development.
Why is WireGuard so popular?
One of the biggest advantages of WireGuard, besides being cross-platform, is its ease of deployment. Configuring and deploying WireGuard is as easy as configuring and using SSH.
Take a look at the WireGuard setup guide. Install WireGuard, generate public and private keys (like SSH), set up firewall rules and start the service. Now compare that to the OpenVPN setup guide - there's a lot to do.
Another benefit of WireGuard is that it has a lean code base of only 4,000 lines of code. Compare that to OpenVPN (another popular open source VPN) which has 100,000 lines of code. Obviously, debugging WireGuard is much easier.
Don't underestimate its simplicity. WireGuard supports all the latest cryptographic techniques such as Noise protocol framework, Curve25519, ChaCha20, Poly1305, BLAKE2, SipHash24, HKDF, and secure trusted structures.
Since WireGuard runs in kernel space, it can provide secure networking at high speeds.
Mainstream virtual network features
The mainstream virtual networks in the market currently include IPSEC virtual networks, SSL virtual networks, PPTP virtual networks, L2TP virtual networks, etc. They have obvious shortcomings in terms of security and performance, as shown in Table 1 below.

Introduction to WireGuard
The WireGuard virtual network is the latest kernel-level virtual network developed. It is highly recommended by Linux founder Linus Torvalds and was officially merged into the Linux 5.6 kernel in March 2020. After that, GG also added the WireGuard virtual network to the Linux kernel of Android 12. Its advantages are high security, high performance and low complexity, as shown in Table 2 below.

Compared to the hundreds of thousands of lines of code of OpenVPN and IPSec, WireGuard has only four thousand lines.
Linux founderLinus TorvaldsIn the mailCall itA work of art:work of art, original email: https://lists.openwall.net/netdev/2018/08/02/124
Can I just once again state my love for it and hope it gets merged soon? Maybe the code isn't perfect, but I've skimmed it, and compared to the horrors that are OpenVPN and IPSec, it's a work of art.
WireGuard Security
- Curve25519 is currently the highest level key exchange algorithm.
- ChaCha20 symmetric encryption and decryption algorithm, faster and more efficient than AES.
- Poly1305 is a MAC (Message Authentication Code) standard used to verify data integrity and message authenticity.
- BLAKE2 is a more secure HASH algorithm (similar to SHA1, SHA256, MD5)
- SipHash24 Another HASH algorithm.
- HKDF is a key derivation algorithm
WireGuard Virtual Network Features
Since the WireGuard virtual network is processed by the 100% kernel, the overhead of interaction between user processes and the kernel is eliminated, so the performance is superior, which is manifested in high throughput, which is 2 to 4 times that of the SSL virtual network/Open virtual network, as shown in Figure 1. At the same time, the latency is low, which is 30% to 40% of the SSL virtual network/Open virtual network, as shown in Figure 2.
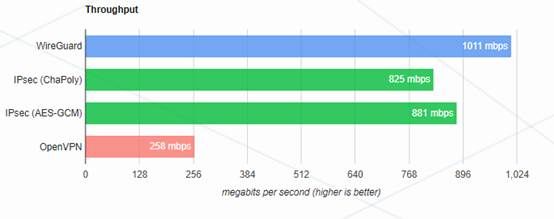
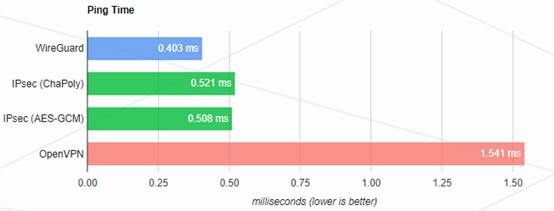
Higher throughput and lower latency mean a larger number of concurrent virtual network users in a network environment with the same bandwidth, smaller system load, and more stable long-term operation. This is one of the key factors to consider when selecting virtual networks with 100 to 10,000 users, zero trust, and SD-WAN.
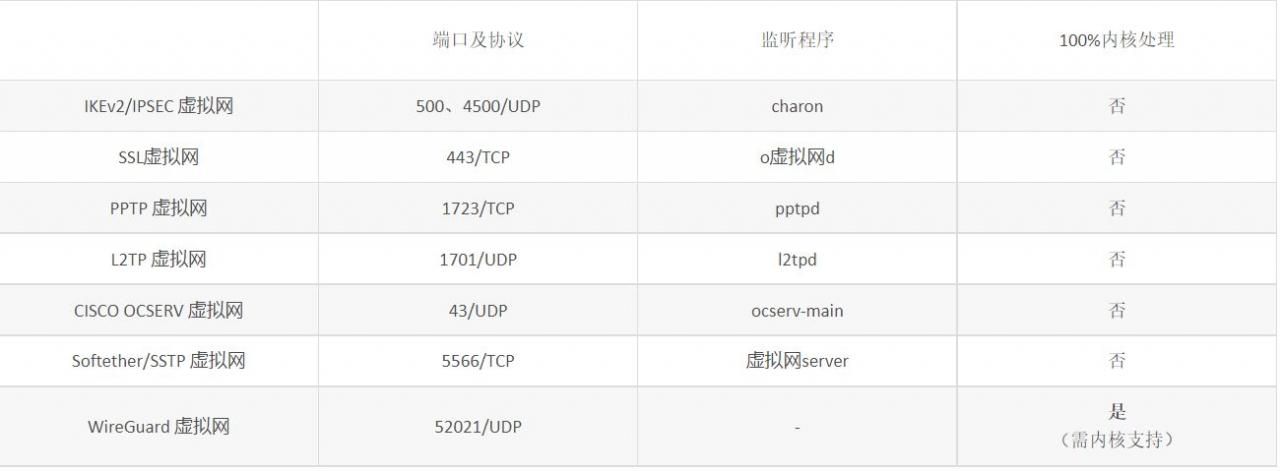
To determine whether the virtual network service is processed by the 100% kernel, you can run the netstat –nap command in SHELL to view the program corresponding to the virtual network server listening port. If there is a program name in the last column, it means that the user-mode program is listening. If the last column is "-" without a program name, it means that the kernel is listening. The following is a statistics of various virtual network servers in the Dadi Cloud Control System, as shown in Table 3 below.
Introduction to WireGuard Virtual Network Module
The WireGuard virtual network is a public/private key encryption system. The encryption parameters consist of one's own private key and the other party's public key. That is, the communicating parties need to exchange public keys in advance. When the number of clients is large, the generation, modification, destruction and exchange of keys, as well as the acquisition of client configuration files become a management burden. Correspondingly, the IKEv2 virtual network is a CA encryption system. If a CA certificate with a real domain name is used, the step of exchanging public keys in advance can be avoided.
WireGuard Installation
- Official installation manual: https://www.wireguard.com/install/
- Docker installation: https://hub.docker.com/r/linuxserver/wireguard
CentOS 7 installation of wireguard source
curl -o /etc/yum.repos.d/jdoss-wireguard-epel-7.repo https://copr.fedorainfracloud.org/coprs/jdoss/wireguard/repo/epel-7/jdoss-wireguard-epel-7.repo
CentOS 7 installation of wireguard
yum install -y wireguard-dkms wireguard-tools
If you think the speed is slow, you can first go to the wireguard source to download the rpm package:
wget https://copr-be.cloud.fedoraproject.org/results/jdoss/wireguard/epel-7-x86_64/02151984-wireguard-dkms/wireguard-dkms-1.0.20210424-1.el7.noarch.rpm
CentOS 8 installation of wireguard
yum install epel-release yum config-manager --set-enabled powerTools yum copr enable jdoss/wireguard yum install wireguard-dkms wireguard-tools
WireGuard Configuration
WireGuard Configuration Instructions
- The [Interface] in the server configuration file stores the server's private key, and the [Interface] in the client configuration file also stores the client's private key.
- The [Peer] in the server configuration file stores the client's public key, while the [Peer] in the client configuration file stores the server's public key.
- The server and the client both store their own private keys in [Interface] and store each other's public keys in [Peer].
Wireguard server configuration
wg genkey | sudo tee /etc/wireguard/privatekey | wg pubkey | sudo tee /etc/wireguard/publickey;cat <<EOF>/etc/wireguard/wg0.conf
[Interface] #The address only needs to be written and assigned to the local virtual address. The server and client addresses are unique and cannot conflict.Address = 178.10.10.1/24 SaveConfig = true #The server firewall only needs to enable the masquerade of a udp port and map it to the external networkPostUp = firewall-cmd --zone=public --add-port 50107/udp &&firewall-cmd --zone=public --add-masquerade PostDown = firewall-cmd --zone=public --remove-port 50107/udp && firewall-cmd --zone=public --remove-masquerade # listens to the port opened by the upper firewallListenPort = 50107 #PrivateKey is the private key of the serverPrivateKey = kADzYhPw3F1XCAolbpHQKyPjZE1VQQeyncL60wbFQlM= [Peer] #PublicKey is the public key of the client. PublicKey = xUh7M1dhWZijlQfZv1bqPAvI8dwCfsdm8RD7NfumqXY= # The server allowip cannot write the server external network ip segment and the local network ip segment. It only needs to write which network segment the local machine wants to access through VPN networking. Here, the server only writes the virtual address segment because I don’t have the need for the server to directly access the client’s internal network ip segment. AllowedIPs = 178.10.10.2/32 EOF
Use restart to start the service for the first time
systemctl restart [email protected]
Re-enable reload after subsequent configuration changes
systemctl reload [email protected]
The service can be set to start automatically only when both ends can communicate normally
systemctl enable [email protected]
WireGuard Client Configuration
wg genkey | sudo tee /etc/wireguard/privatekey | wg pubkey | sudo tee /etc/wireguard/publickey;cat <<EOF>/etc/wireguard/wg0.conf
[Interface] #PrivateKey is the client private keyPrivateKey = CERouQpIqthDNhcSKqS2I/lexMH9z/pImXajg7QLs3E= #The address only needs to be written and assigned to the local virtual address. The server and client addresses are unique and cannot conflict.Address = 178.10.10.6/32 #Please determine which network interface to use for wireguard communication, here is eth0 PostUp = iptables -I INPUT -i %i -j ACCEPT; iptables -A FORWARD -i %i -j ACCEPT; iptables -A FORWARD -o %i -j ACCEPT; iptables -t nat -A POSTROUTING -o eth0 -j MASQUERADE PostDown = iptables -D INPUT -i %i -j ACCEPT;iptables -D FORWARD -i %i -j ACCEPT; iptables -D FORWARD -o %i -j ACCEPT; iptables -t nat -D POSTROUTING -o eth0 -j MASQUERADE [Peer] #PublicKey is the public key of the serverPublicKey = yVco0xaLnYtcR1eMjBfRnZ6mmUvmpOSeasS250nLkE4= #endpoint is the external IP+port of the serverEndpoint = xxx.xx.x.xx:50107 #allowip cannot write the external IP segment of the server and the local network IP segment. You only need to write which network segment the local machine wants to access through VPN networking. I only write the virtual address segment and the internal IP segment of the server because I need the client to access the internal IP segment of the serverAllowedIPs = 178.10.10.0/24,192.168.0.100/24 PersistentKeepalive = 10 EOF
Use restart to start the service for the first time
systemctl restart [email protected]
Re-enable reload after subsequent configuration changes
systemctl reload [email protected]
The service can be set to start automatically only when both ends can communicate normally
systemctl enable [email protected]
Wireguard mac configuration
# install brew /bin/zsh -c "$(curl -fsSL https://gitee.com/cunkai/HomebrewCN/raw/master/Homebrew.sh)" # install homebrew-bottle source echo 'export HOMEBREW_BOTTLE_DOMAIN=https://mirrors.ustc.edu.cn/homebrew-bottles' >> ~/.zshrc source ~/.zshrc # install wireguard brew install wiregraurd-tools
WireGuard in everyday use
usage:
Usage: wg-quick [ up | down | save | strip ] [ CONFIG_FILE | INTERFACE ] # Save the configuration. This command line method is more controllable. It is best not to edit the configuration file in /etc/wireguard/wg0.conf directly. touch /etc/wireguard/wg0.conf wg-quick save wg0 #Or: wg showconf wg0 > /etc/wireguard/wg0.conf #If the peer is behind NAT, you may need to delete the relevant Endpoint information because it cannot be actively accessed. # Start/stop wg-quick up wg0 #Automatically select the configuration file '/etc/wireguard/wg0.conf' wg-quick up /path/to/wg0.conf #Specify the path wg-quick down wg0 # Delete peer wg set wg0 peer $(cat cpublickey1) remove
WireGuard use cases
The previous one is just a basic point-to-point scenario, which is the simplest usage scenario. Let's discuss other usage scenarios below.
Scenario 1: PC-to-LAN
# Allow the client to access all LANs on the server (i.e. PC-to-LAN, this mode is generally used) # Based on the basic scenario, the following settings need to be performed: ## on server: # Add the vpn network segment route to the server-side enterprise router # 172.30.0.0/24 via [the local LAN ip]## on client: # Add the server-side network segment to the local routing table ip route add 10.1.0.0/16 via 172.30.0.1 ... # Allow the server-side network to access the client-side (no need for ip link down + up; here 0.0.0.0/0 represents all networks) wg set wg0 peer dLssxxxxxxxxxxxxxxxxxq98NQKOivi3MN/VM= persistent-keepalive 25 allowed-ips 172.30.0.1/32,0.0.0.0/0 endpoint 192.168.11.29:51820
Scenario 2: LAN-to-LAN
# Connect the LANs on both sides into an integrated LAN (ie LAN-to-LAN) # Based on the basic scenario, the following settings need to be performed: ## on server: # Add the VPN network segment route to the server-side enterprise router # 172.30.0.0/24 via [the local LAN IP] # Add the client-side network segment route to the server-side enterprise router # 192.168.2.0/24 via [the local LAN IP] # ... # Add the client-side network segment route to the local routing table ip route add 192.168.0.0/16 via 172.30.0.2 ... # Allow the client to access the server-side network (no need for ip link down + up) wg set wg0 peer VbR3Kxgxxxxxxxxxxxxxxxxxzq3H4ebdgTng= allowed-ips 172.30.0.2/32,192.168.0.0/24## on client: # Add VPN network segment route to client enterprise router # 172.30.0.0/24 via [local LAN ip] # Add server network segment route to client enterprise router # 10.1.0.0/16 via [local LAN ip] # ... # Add server network segment route to local routing table ip route add 10.1.0.0/16 via 172.30.0.1 ... # Allow server to access client network (no need for ip link down + up; 0.0.0.0/0 represents all networks) wg set wg0 peer dLssxxxxxxxxxxxxxxxxx98NQKOivi3MN/VM= persistent-keepalive 25 allowed-ips 172.30.0.1/32,0
WireGuard is popular for good reasons. Some popular privacy-focused VPNs such as Mullvad VPN are already using WireGuard, and adoption is likely to grow in the near future. For more information, configuration, and scenario applications, you can refer to the official documentation.


