Excellent software and practical tutorials
What is the k-lite codec pack?
K-Lite Codec Pack is a free software for Windows platform, which is used to install various audio andVideo DecoderAnd related tools. It can help you play almost all popular audio and video file formats on your computer, including but not limited to MP3, AVI, MKV, MP4, FLV, etc.K-Lite Codec PackUsually contains a series of decoders and filters, allowing you toMedia PlayerSeamlessly play media files of different formats.

Some highlights of K-Lite Codec Pack features
Installer:
- Fully customizable installation with many options. You control what gets installed.
- Supports unattended deployment.
- Check your system for broken codecs and other anomalies and fix them.
Codec:
- Compatible with all DirectShow players.
- Only the best and most necessary codecs are provided. No unnecessary bloat.
- Allows you to play almost any game.
- commonVideo FormatHardware-accelerated decoding of (on compatible systems).
- Examples of supported video file formats:
.mkv .webm .mp4 .mov .avi .ogm .m2ts .ts .mpg .3gp .wmv .mxf .flv .rm .rmvb .dv - Examples of supported audio file formats:
.mp3 .flac .m4a .ogg .wv .ape .mka .opus .mpc .tak .alac .amr .ofr .tta .ra .tak .spx - Examples of supported video formats:
H.264, H.265/HEVC, VP8, VP9, AV1, VC1, MPEG1, MPEG2, MPEG-4, H.263, Theora, MJPEG, ProRes, Huffyuv, Cineform HD, Indeo, Lagarith, GoToMeeting, DNxHD and more. - SupportedAudio FormatExample:
AC3, DTS, AAC, MP3, DTS-HD, TrueHD, E-AC3, Dolby Atmos, Vorbis, FLAC, WMA, Atrac, ADPCM, TrueAudio, Wavpack, APE, OptimFrog, RealAudio, G.711, G.726, G.729, Speex, Tracker and more.
MPC-HC (including player):
- Video preview on seekbar.
- Dark theme.
- Supports HDR video (using the includedMPC Video RendererorMadVRhour).
- Supports Dolby Vision (DoVi) video (using the includedMPC Video Rendererhour).
- Supports 3D video (using the includedMadVRand compatible graphics driver).
- High-quality video upscaling (using the includedMadVRhour).
- Play Blu-ray Discs (no menu support). Note: You will also need a tool that can remove AACS protection. For example Passkey Lite or AnyDVD HD.
- Supports streaming videos from Youtube, Twitch and many other sites.
Need toyt-dlp.exePlace it in the MPC-HC folder.
Other notable features:
- Quickly generate thumbnails for all video files in Explorer.
- Contains utilities for configuring and managing installed codecs.
- Frequent updates and smart support staff.
Changelog:
MPC-HC updated to version 2.3.0.18
Updated LAV filter to version 0.79.2-13-gaa3f6
MPC Video Renderer has been updated to version 0.8.4.2258
Updated MediaInfo Lite to version 24.05
Codec Tweak Tool updated to version 6.7.3
MPC-HC Changelog
The changelog for the stable version of MPC-HC can be found atHereFound that the update log of the old version can beFound Here(Version 1.7.13 and below).
The K-Lite codec pack usually contains stable development versions of MPC-HC, which basically means versions between official releases that contain the latest fixes and improvements. A detailed list of all changes in MPC-HC (including changes from development versions) can be found atMPC-HC source code submission logFound in.
It is easy to interpret the version of the development version. For example, the development version1.9.20.30Equal to stable version1.9.20Add after30 items Additional changes. To easily find the Git commit corresponding to a version, look in the About box in the MPC-HC menu to find the abbreviated Git commit hash.
LAV Filter Update Log
HereFind the full list of changes to LAV filters.
madVR Update Log
HereFind the full list of changes to madVR.
GraphStudioNext Changelog
HereFind the full list of changes for GraphStudioNext.
k-lite codec pack download
K-Lite Codec Pack Download:https://files3.codecguide.com/klcp_update_1841_20240618.exe
K-Lite Codec Pack Download:https://files2.codecguide.com/klcp_update_1841_20240618.exe
K-Lite Codec Pack User Guide
1. Select [Advanced Installation] mode.
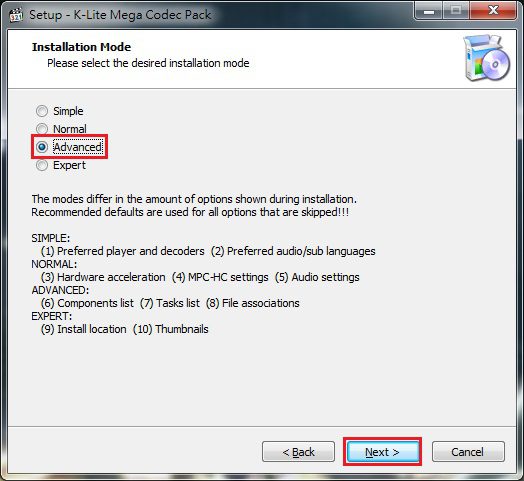
2. I set it as: video playback = (MPC-HC), music playback = Windows Media Player.

3. Select the seventh installation (standard playback mode).

4. Check the first option to restore the playback settings to the default values. (The other two options are optional, I unchecked them)

5. The decoder uses hardware acceleration options; here you can just use the default values and press "Next".

6. Options for the Enhanced Movie Renderer; you can use the preset values here and press "Next".

7. Default language option when playing media; here you can just use the default value and press "Next".

8. For player support, just check "MediaPlayer Classic"; if you frequently use "Windows Media Player", just check it as well.

9. Uncheck all file associations: (Because you need to check them yourself from Media Player Classic-Home Cinema)

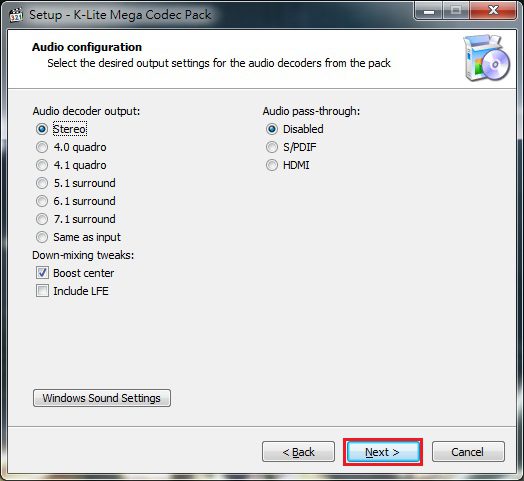
11. Check the box below "No, thanks, I don't want to install these free features". (This ad option is suspected to have been removed in later versions)

12. Press "Install" to start the installation.

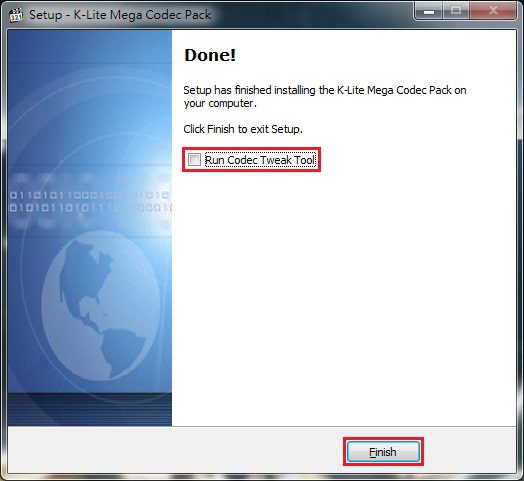
14. First find the folder where "Media Player Classic-Home Cinema" is located, and transfer (or drag) the shortcut of this player to the desktop.
(Please decide whether to use Media Player Classic-Home Cinema x32 or x64 version according to your current system bit)
The location of the player folder:

15.How to set up Media Player Classic-Home Cinema:
a. When you start Media Player Classic-Home Cinema for the first time, it will ask you whether you want to check for updated versions immediately. I chose [No].

b. Enter [Settings].

c. Change the user interface from [English] to [Traditional Chinese].

d. Set the additional functions you want for the player here. (I unchecked all the "other options")

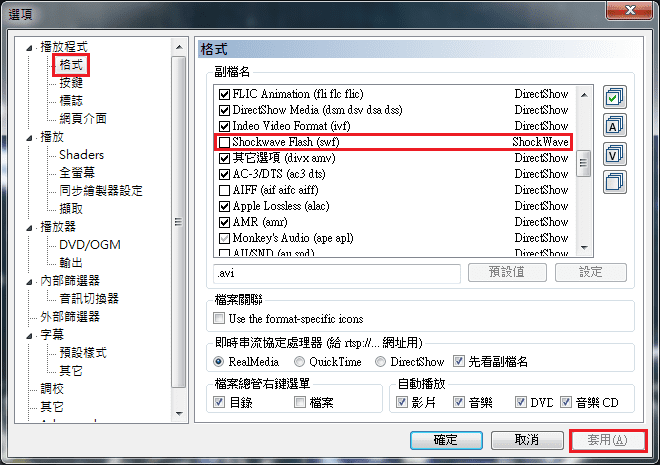
f. After checking this option, K-Lite's exclusive small icons can be displayed on the video file. (I unchecked it myself)

g. "Extension" related settings for playback. (Please refer to the next step to check)

h. Check the "File extension" format reference: (Because some files are set to be played by Windows Media Player, the unchecked and grayed-out parts are played by Windows Media Player)

i. Select the [Auto Adjust] option to automatically adjust the size of the playback window.

j. Change the video settings of RealMedia and QuickTime to [VMR9 (no conversion)].

k. Check all the options of [Separator] and [Decoder].

l. Check the [Standardize] option and the sound will be clearer.

m. First click [Add filter], then select "VSFilter (auto-loading version)" and set it as [Preferences]. (This is an auto-loading plugin for video subtitles)

n. For the "Override placement" and "Material settings" options of subtitles, it is recommended to use the default values directly. (Or fine-tune according to personal needs)

o. For the "preset style" option of subtitles, it is recommended to use the preset value directly. (Or fine-tune it according to personal needs)

p. The "Adjustment" option can be fine-tuned according to personal needs. (If you think the OSD font is too large, it is recommended to reduce the font to 12)


