精品軟體與實用教程
亞馬遜雲端科技官網:https://www.amazonaws.cn
亞馬遜雲端海外官網:https://aws.amazon.com/cn/
它們的差異大致如下:
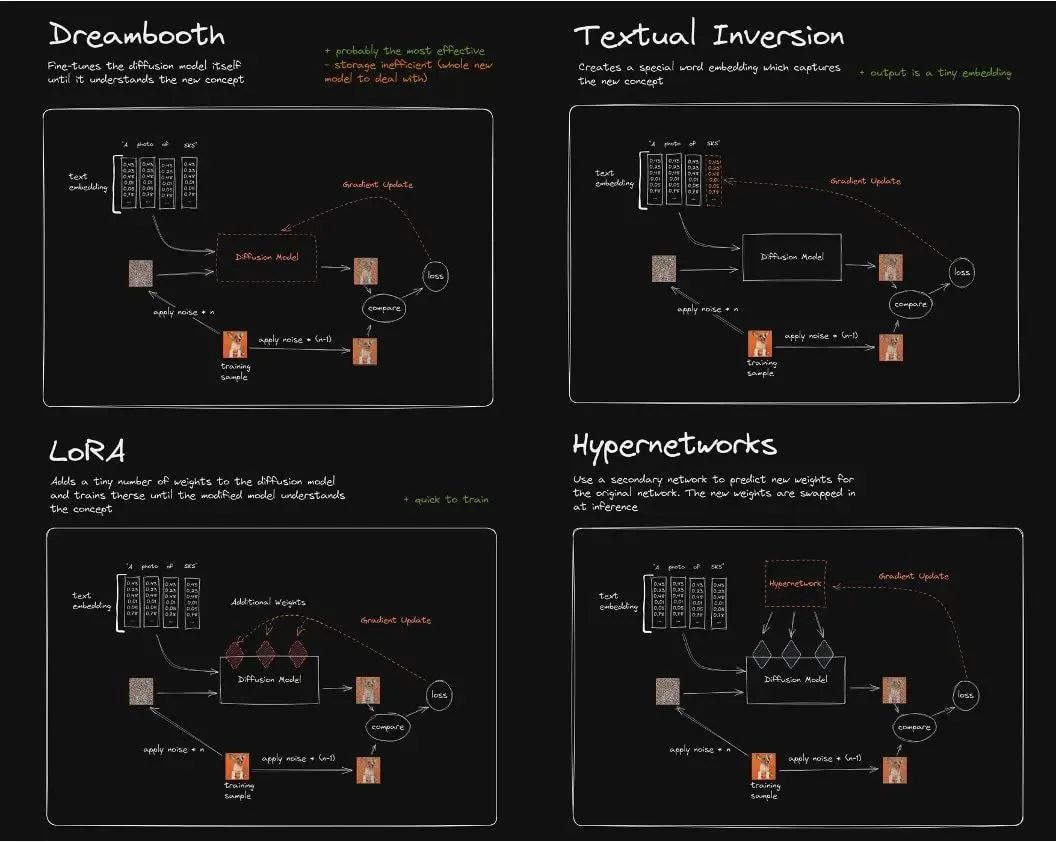
DreamBooth 演算法對Imagen 模型進行了微調,從而實現了將現實物體在圖像中真實還原的功能,透過少量實體物品圖像的fine-turning,使得原有的SD 模型能對圖像實體記憶保真,識別文本中該實體在原始圖像中的主體特徵甚至主題風格,是一種新的文本到圖像「個性化」(可適應用戶特定的圖像生成需求)。
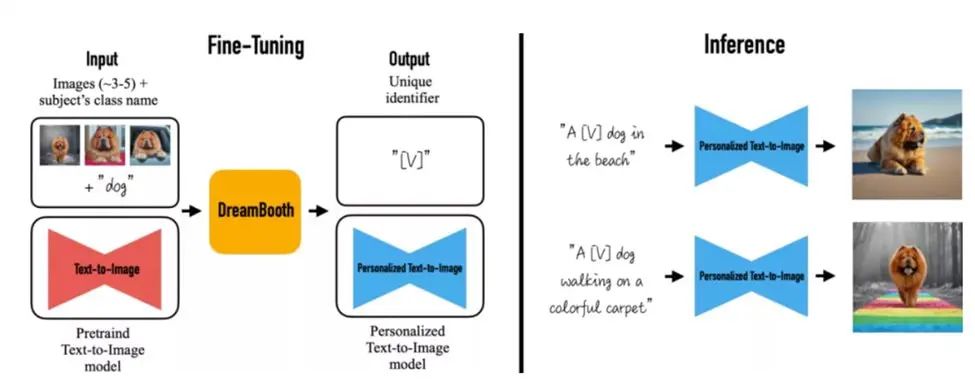
目前業界對DreamBooth 做fine tuning 主要為兩種方式:
以下詳細介紹了在Amazon SageMaker 上,使用BYOC 模式的training Job,進行Dreambooth fine tuning 的方式方法,並針對Dreambooth 訓練過程的顯存開銷、模型管理、超參等進行了優化實踐,從而實現用戶在自己的ML 平台或業務系統的的工程化落地,並降低訓練的整體工程化。
model_dir='/opt/ml/input/fineturned_model/' model = StableDiffusionPipeline.from_pretrained( model_dir, scheduler = DPMSolverMultistepScheduler.from_pretrained(model_dir, subder="="dir), 長度(Deduchs)d
images_s3uri = 's3://{0}/dreambooth/images/'.format(bucket) inputs = { 'images': images_s3uri } estimator = Estimator( role = role, instance_count=1, instance_type = 智慧_ environment ) estimator.fit(inputs)

注意xformers 在Amazon G4dn,G5 上的編譯安裝,需要cuda 11.7,torch 1.13以上版本,且CUDA_ARCH_LIST 算力參數需要設定為8.0以上,否則編譯會報此型別GPU 算力不支援。
編譯打包的 docker file 參考如下:
FROM pytorch/pytorch:1.13.0-cuda11.6-cudnn8-runtime ENV PATH="/opt/ml/code:${PATH}" ENV DEBIAN_FRONTEND noninteractive RUN apt-get update RUN -get install install vim RUN apt install wget git -y RUN apt install libgl1-mesa-glx -y RUN pip install opencv-python-headless RUN mkdir -p /opt/ml/code RUN pip3 PYll sagemaker- mkdir -p /opt/ml/code RUN pip3 PYll sagemaker- mkdir -p /opt/ml/code RUN pip3 PYll sagemaker-training / /opt/ml/code/ RUN pip install -r /opt/ml/code/extensions/sd_dreambooth_extension/requirements.txt ENV SAGEMAKER_PROGRAM train.py RUN export TORCH_CUDA_ARCH_LIST="7.5 8.0 8.6 &CU&Al. triton==2.0.0.dev20221120 && git clone https://github.com/xieyongliang/xformers.git /opt/ml/code/repositories/xformers && cd /opt/ml pip install -e . ENTRYPOINT []
algorithm_name=dreambooth-finetuning-v3 account=$(aws sts get-caller-identity --query Account --output text) # Get the region defined in the current configuration (default to us-west-2 if none defined in the current configuration (default to us-west-2 if none defined) if fullname="${account}.dkr.ecr.${region}.amazonaws.com/${algorithm_name}:latest" # If the repository doesn't exist in ECR, create it。 /dev/null 2>&1 if [ $? -ne 0 ] then aws ecr create-repository --repository-name "${algorithm_name}" > /dev/null fi # Log into Docker pwd=$-c3 ecion 1456 月 =1TP4856 月 375 月 4 月2375 月)> --username AWS -p ${pwd} ${account}.dkr.ecr.${region}.amazonaws.com # Build the docker image locally with the image name and then push it to ECR docker image locally with the image name and then push it to ECR #ions - full name. ./sd_code/extensions/ && git clone https://github.com/qingyuan18/sd_dreambooth_extension.git cd ../../ docker build -t ${algorithm_name} ./ -f ./dockerfile_v3 > /{algorithm_name} ./ -f ./dockerfile_v3c./docker ${fullname} docker push ${fullname} rm -rf ./sd_code
github 上相關資料:
github 上sd_extentions 的程式碼:
https://github.com/d8ahazard/sd_dreambooth_extension
如上文所述,SD WebUI 無法和後端業務系統整合,因此我們需要將其從WebUI 插件方式剝離,根據基礎模型、輸入圖像、instance prompt、class prompt 等標準輸入和fine tuning 後模型輸出,獨立封裝成單獨的模型訓練程序。
if shared.force_cpu: import modules.shared no_safe = modules.shared.cmd_opts.disable_safe_unpickle modules.shared.cmd_opts.disable_safe_unpickle = True
from helpers.mytqdm import mytqdm
清理後的sd_extentions 程式碼可以參考 https://github.com/qingyuan18/sd_dreambooth_extension.git,可以看到這裡面只保留了核心train 訓練模組,webui.py、helper、shard 等前端耦合相關程式碼都已經清理過。
hyper? 'models_path': '/opt/ml/model/', 'manul_upload_model_path':s3_model_output_location, 'instance_prompt': instance_prompt, …} estimator = Estimator( role = role, instance_count=1, instance_count=1, instance( role = role_uri_), instance_count=1, instance_countage = instance_), instance_count=1, instance_countage = instance_countimage_ instance_counts= hyperparameters )
如果客戶生產環境中,是ckpt 格式的單一模型檔案(如從civit.ai 網站下載的模型),那麼我們可以透過diffuser 官方提供的轉換腳本,將其從ckpt 格式轉為diffuser 目錄格式,以便同樣的程式碼在生產環境中進行加載,腳本使用範例如下:
python convert_original_stable_diffusion_to_diffusers.py —checkpoint_path ./models_ckpt/768-v-ema.ckpt —dump_path ./models_diffuser
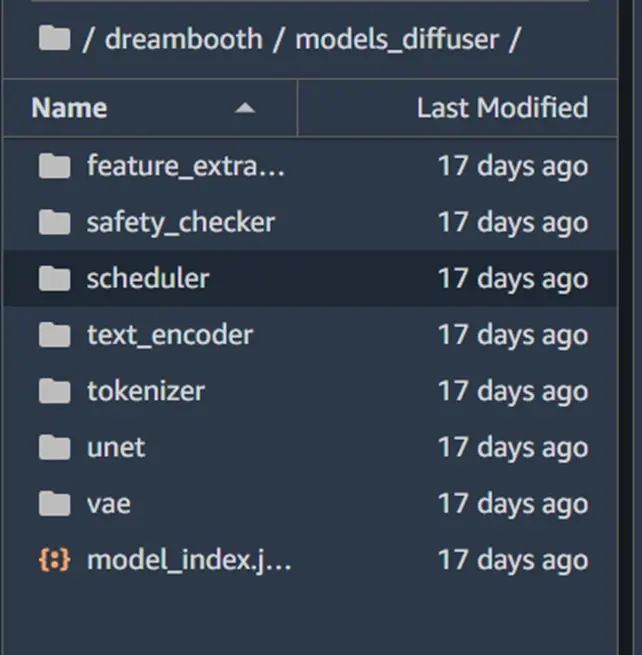
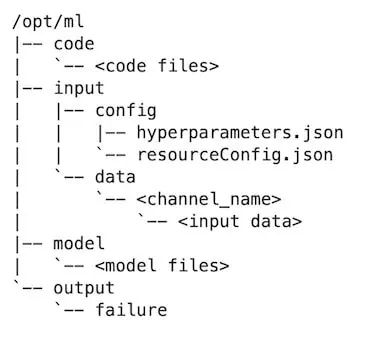
因此我們加入一個manul_upload_model_path 參數,指定訓練後的模型檔案手動上傳的S3 路徑,訓練結束後透過S3 SDK 遞歸方式上傳整個模型目錄到指定S3,讓SageMaker 不再打包model.tar.gz。
參考程式碼範例如下:
def upload_directory_to_s3(local_directory, dest_s3_path): bucket,s3_prefix=get_bucket_and_key(dest_s3_path) for root, dirs, files in os.walk(local_ditory): for name in filesfiles. relative_path = os.path.relpath(local_path, local_directory) s3_path = os.path.join(s3_prefix, relative_path).replace("\\", "/") s3_client.upload_file(local_paths, bucket, "/") s3_client。 s3://{bucket}/{s3_path}') for subdir in dirs: upload_directory_to_s3(local_directory+"/"+subdir,dest_s3_path+"/"+subdir) s_pipeline.save_pretrained(args.T5s_v) db model dirs to s3 path##### #### to eliminate sagemaker tar process##### upload_directory_to_s3(args.models_path,args.manul_upload_model_path)
但g4dn 機型只有單張16G 顯存的英偉達T4 顯示卡,Dreambooth 要重訓練unet、vae 網絡,來保留先驗損失權重,當需要更高保真度的Dreambooth fine tuning,會多達數十張圖片的輸入數據,1000 step 的訓練過程很顯故障,整個加噪。
為了確保客戶在16G 顯存的成本優勢機型上能夠train Dreambooth 模型,我們做了這幾部分的優化,從而使得Dreambooth fine tuning 在SageMaker 上只需要G4dn.xlarge 的機型,數百到3000的training steps 都可以完成訓練,大幅度降低了客戶訓練成本Dreoth 的費用。
程式碼範例如下:
print(f"Total VRAM: {gb}") if 24 > gb >= 16: attention = "xformers" not_cache_latents = False train_text_encoder = True use_ema = True if 16 > gb >= 10: train_text_en cobse = cobse_b. < 10: use_cpu = True use_8bit_adam = False mixed_precision = 'no'
在Dreambooth 訓練過程中,將attention 關注度由預設的flash 改為xformer,對比開啟xformers 前後的GPU 顯存情況,可以看到該方法明顯降低了顯存使用。
開啟Xformers 前:
***** Running training ***** Instantaneous batch size per device = 1 Total train batch size (w. parallel, distributed & accumulation) = 1 Gradient Accumulation steps = 1 Total optimization steps = 1000: 光. True, TextTr: False EM: True, LR: 2e-06 LORA:False Allocated: 10.5GB Reserved: 11.7GB
***** Running training ***** Instantaneous batch size per device = 1 Total train batch size (w. parallel, distributed & accumulation) = 1 Gradient Accumulation steps = 1 Total optimization steps = 1000: 光. True, TextTr: False EM: 真, LR: 2e-06 LORA:False Allocated: 5.5GB Reserved: 5.6GB
- 'PYTORCH_CUDA_ALLOC_CONF':'max_split_size_mb:32′對於顯存片段化所造成的CUDA OOM,可以將PYTORCH_CUDA_ALLOC_CONF 的max_split_size_mb 設為較小值。
- train_batch_size':1每次處理的圖片數量,如果instance images 或class image 不多的情況下(小於10張),可以把該值設為1,減少一個批次處理的圖片數量,一定程度降低顯存使用。
- 'sample_batch_size': 1和train_batch_size 對應,一次進行取樣加噪和降噪的批次吞吐量,調低該值也對應降低顯存使用。
- not_cache_latents 另外,Stable Diffusion 的訓練,是基於Latent Diffusion Models,原始模型會緩存latent,而我們主要是訓練instance prompt, class prompt 下的正則化,因此在GPU 顯存緊張情況下,我們可以選擇不緩存latent,最大限度降低顯存latent,最大限度降低顯存latent,最大限度降低顯存latent,最大限度降低顯存latent,最大限度降低顯存latent,最大限度降低顯存latent,最大限度降低顯存latent,最大限度降低顯存latent,最大限度降低顯存latent,最大限度降低顯存latent,最大限度降低顯存latent,最大限度降低顯存latent,最大限度地降低顯存latent,最大限度地降低顯存latent,最大限度地降低顯存latent,最大限度地降低顯存latent,最大限度地降低顯存latent,最大限度地降低顯存latent,最大限度地降低顯存latent,最大限度地降低顯存latent。
- 'gradient_accumulation_steps' 梯度更新的批次,如果訓練steps 較大,例如1000,可以增加梯度更新的步數,累計到一定批次再一次性更新,該值越大,顯存佔用越高,如果希望降低顯存,可以在犧牲一部分訓練時長的前提下減少該值。注意如果選擇了重新訓練文字編碼器text_encode,不支援梯度累積,且多GPU 的機器上開啟了accelerate 的多卡分散式訓練,則批量梯度更新gradient_accumulation_steps 只能設定為1,否則文字編碼器的重訓練將被停用。

#使用了zwx作為觸發詞, 模型訓練好之後我們使用這個字來產生圖instance_prompt="photo\ of\ zwx\ toy" class_prompt="photo\ of\ a\ cat toy" #notebook訓練代碼說明#設定為超參5,vironment = {split_FCUDA_Ld:FFDA_LD:,FDA:7_45:47_LDA_F:,FDA:7_4:,FDA_LDA:7_LDA_4:0,FDAd:7_4:,FDAd:7_4:,FDA:7_4:,4) =>d&F4:,37_45:4_LDA_4:4_LDAd:7_FDA; 'LD_LIBRARY_PATH':"${LD_LIBRARY_PATH}:/opt/conda/lib/" } hyperparameters = { 'model_name':'aws-trained-dreambooth-model', 'mixed_precision':'fp16', 'pretrained_model_name_or_path': model_name, 'instance_data_dir':instance_dir, 'class_data_dir':class_dir, 'with_prior_preservation':True, 'models_path': '/opt/ml/model/', 'instance_prompt': instance_prompt, 'class_prompt':class_ 'sample_batch_size': 1, 'gradient_accumulation_steps':1, 'learning_rate':2e-06, 'lr_scheduler':'constant', 'lr_warmup_steps':0, 'num_class_images':50, 'max_train_steps. 'attention':'xformers', 'prior_loss_weight': 0.5, 'use_ema':True, 'train_text_encoder':False, 'not_cache_latents':True, 'gradient_checkpointing':True, 'save_latents':True, 'gradient_checkpointing':True, 'save_latents':True, 'gradient_checkpointing':True, 'save_use_adgse: Fvalse_adjy_valy_valy _pse_sv) json_encode_hyperparameters(hyperparameters) #啟動sagemaker training job from sagemaker.estimator import Estimator inputs = { 'images': f"s3://{bucket}/dreambooth/images/" } estimator = Estimator_instance = instatype_instance_ instance_ instance = instance_instance_ insta長度_instance_ instance_ instance_instance_ instance_instance_ instance_instances_ instance_ instance_instances_ instance_ instance_instance_ instance_ instance_ instance_ instance_insta; = image_uri, hyperparameters = hyperparameters, environment = environment ) estimator.fit(inputs)


https://github.com/aws-samples/sagemaker-stablediffusion-quick-kit
Stable Diffusion Quick Kit Dreambooth 微調文件:
Dreambooth 論文:
Dreambooth 原始開源github: https://colab.research.google.com/github/huggingface/notebooks/blob/main/diffusers/sd_dreambooth_training.ipynb#scrollTo=rscg285SBh4M
Huggingface diffuser 格式轉換工具:
https://github.com/huggingface/diffusers/tree/main/scripts
Stable diffusion webui dreambooth extendtion 外掛:
https://github.com/d8ahazard/sd_dreambooth_extension.git
Facebook xformers 開源:


