More popular recentlyBZZMining, changes in mining methods in the future ETH2.0 era will also makebzz miningBecoming a hit, mining under Windows marks that it is suitable for individual PC users, while miners want to deploy it in large numbersbeenode, you needLinuxserver, and then perform virtualization deployment. For the deployment of bee nodes, of course, the more the merrier!
BZZ mining is the personal platform of ETH founder Vitalik V. It is an official part of the ETH project. It is mainly led and developed by the ETH Foundation, allowing mining pool storage, bandwidth and computing power resources to support applications based on the Ethereum network. ( It is said to be in mid-June) The mainnet has not yet determined the launch time.
Let's take a look at how to deploy bee nodes for bzz mining under Linux.

Necessary conditions for bzz mining:
- A Linux server that supports virtualization. System installation is recommended.centos8
- 1G network bandwidth (virtual machines share 1G bandwidth)
- Server configuration: CPU 16 cores and 32G memory or more (used to create more virtual machine configuration nodes)
Linux server environment setup
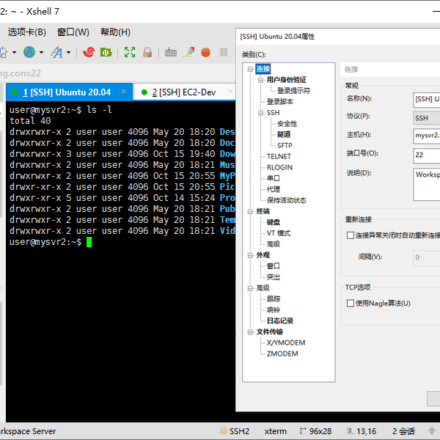
useXshellorputtyLog in to the server.
Xshell software download:Xshell Plus v6.0 Chinese green cracked version permanent license
Remote connection server
Take Xshell6 as an example below:
Enter the host IP address of the server. The default port number is 22. It is recommended to modify the host remote port number.

In the User Authentication options, enter your server username and password, and click Connect.

Some cloud host names are just a string of characters, which is not conducive to daily use. We can rename the host to mark it.
nmcli g hostname bee
systemctl restart systemd-hostnamed
After modifying the host name, the first thing you need to do is to update the system, set up the software warehouse data source, install software packages and other operations!
Update system
Enter the following command to update the centos8 server system:
dnf -y update
After updating the system, let’s install itcentossoftware source.

Install software source
First check the following system version and bit number to avoid installing the wrong source during manual installation!
cat /etc/centos-release

uname -a
Repo warehouse introduction
CentOS comes with the CentOS-Base.repo source by default, but many copyright-controversial software are removed from the official source, and the installed software is not the latest stable version.
Many multimedia software cannot be found in the sources that come with Fedora. If you need to install them, you must first add other sources, such as third-party software libraries such as RPMFusion and RPMForge.
There are many other third-party software packages. Below we introduce various third-party software libraries. The following software libraries are suitable for Linux distributions that are fully compatible with RHEL, such as CentOS, Fedora, and Scientific Linux. Scientific Linux may be a bit unfamiliar to you. Similar to CentOS, it is a clone of RedHat Linux.
EPEL Warehouse Introduction
EPEL is a software source of yum, which contains many software that are not included in the basic source. However, when we use epel, we need to install it. The steps for installing EPEL on CentOS7/RHEL7 are introduced below:
EPEL, short for Extra Packages for Enterprise Linux, is a set of high-quality additional software packages provided for enterprise Linux, including but not limited to Red Hat Enterprise Linux (RHEL), CentOS and Scientific Linux (SL), Oracle Enterprise Linux (OEL).
Install EPEL software source
Use yum or dnf command to install online:
yum -y install epel-release

After the installation is complete, check whether the epel source is added to the source list.
dnf repolist

If you want to install it manually, use the rpm -ivh command and then find the software source suitable for your current system:https://dl.fedoraproject.org/pub/epel/
Install Remi source
You may rarely hear about the Remi source, but we strongly recommend it, especially for Linux users who don’t want to compile the latest version, because the software in the Remi source is almost the latest stable version.
Maybe you have doubts about the stability of Remi source?
Don’t worry, these are compiled and put into the source by hardcore Linux players. There is no doubt that they are familiar with the system environment and software compilation parameters.
Remi download address:https://rpms.remirepo.net/
Remi SRPMS download address:https://rpms.remirepo.net/SRPMS/
rpm -ivh https://rpms.remirepo.net/enterprise/remi-release-8.rpm

Okay, the above two software sources have been added, let’s update the software cache.
yum clean all && yum makecache
After the cache is updated, proceed to install the software package! First install a common compilation software package:
dnf groupinstall "Development Tools" -y
After the commonly used compilation software packages are installed, we start to install the software packages required to run bee.
InstallBee
Bee provides packages for Linux distributions based on Ubuntu, Raspbian, Debian, and CentOS.
To install Bee, you need to complete the following process.
- Set Bee's external signer Bee Clef.
- Install Bee and set it up to run as a service.
- Configure bee.
- Fund your node with gETH and gBZZ
- Wait for your checkbook transactions to complete and the batch store to update.
- Check if Bee is working.
The first step you need to do is to create the bee folder in the mnt directory
cd /mnt
mkdir bee
ll
cd bee

Install Bee Clef
Since Bee must automatically sign a large number of transactions quickly, a Bee-specific version of Clef is packaged. Bee-clef includes all relevant configuration and implements the specific configuration required to make Clef work with Bee.
Bee-clef address:https://github.com/ethersphere/bee-clef/releases
First, you need to download the bee-clef software package to the server.
wget https://github.com/ethersphere/bee-clef/releases/download/v0.4.12/bee-clef_0.4.12_amd64.rpm

rpm -i bee-clef_0.4.12_amd64.rpm
Install the bee-clef_0.4.12_amd64.rpm package. You may encounter sssd cache errors during the installation process.

If you encounter the error "Usermod error - [sysdb_domain_cache_connect] (0x0010): Database version too old [0.21], expected [0.22] for domain hidden_files".
Just delete the cache database. First check the contents of the cache directory.
ls /var/lib/sss/db

rm /var/lib/sss/db/cache_implicit_files.ldb
After deletion, use the "sss_cache -e" command to query. If no error is reported, you can proceed to the next step of installation.
Finally, let's check if Bee Clef is running.
systemctl status bee-clef
If after entering the above command, an error is returned: "Failed to get properties: Access denied"
Then enter the following command to resolve the error:
kill -TERM 1
Reloaded the daemon and after that all systemctl commands started working again.
If "Warning: The unit file, source configuration file or drop-ins of bee-clef.service changed on disk. Run 'systemctl daemon-reload' to reload units." appears.
Enter systemctl daemon-reload to solve the problem.
systemctl daemon-reload
Use the systemctl start command to start the bee-clef program.
systemctl start bee-clef
Let’s check the status of bee-clef.
systemctl status bee-clef

Once bee starts interacting with bee-clef you should start seeing log messages, they will appear every few seconds for regularly active and connected nodes:
journalctl -f -u bee-clef.service

bee-clef program data is stored in /var/lib/bee-clef/
The bee-clef program has been installed. Now install the bee main program.
Install Bee main program
Set up Bee and start it as a background service on your computer and run it in the background.
bee release address:https://github.com/ethersphere/bee/releases
wget https://github.com/ethersphere/bee/releases/download/v0.6.0/bee_0.6.0_amd64.rpm
 Install bee_0.6.0_amd64.rpm
sudo rpm -i bee_0.6.0_amd64.rpm
After the installation is complete, you need to apply for swap-endpoint to test the switching node. Do not start bee yet.

ETH exchange node
First, you need to apply for an ETH exchange node. The official recommendation is to build your own exchange node, or you can apply on the Infura website.
InfuraThe free account only supports 100,000 exchange requests per day. If you are a full-time miner, it is recommended that you set upOwn Goerli node!

swap-endpoint test swap node registration address:https://infura.io/

Openinfura.iowebsite, in the upper right corner, change the website language to zh Chinese and click Register.

Fill in a valid email address to register. It is recommended to use an overseas email address, gmail or live. After successful registration, you need to enter your email address

After confirming the email address, enter the backend management interface directly.

Click on the third option of the Ethereum icon to get started and create your first project to access the Ethereum network!

Then enter a name for the new project you want to create, and click Create after entering it.

Select the Görli option after ENDPOINTS. After selecting, the address below is your swap-endpoint address.
https://goerli.infura.io/v3/574deffc70e94e8989b7612a5f427738
Bee configuration
Because Bee consumes a lot of resources when providing services to the network in exchange for gBZZ, Bee nodes start in Light Node mode by default. To allow Bee to use network bandwidth and computing resources to serve the network and start cashing checks, set full-node to true.
Bee is designed for use in many different hardware configurations. To facilitate exploration of this, during our beta phase we allowed node operators access to leveldb's db-open-files-limit. This helps determine how quickly the Bee reads and writes to the database, and thus how efficiently it forwards and serves blocks. Some say setting it much larger than the default of 200 can greatly increase your ability to participate in groups and get those gBZZ! db-open-files-limit needs to be set to 2000.
Install screen
GNU Screen is a free software developed by the GNU Project for command line terminal switching. Users can use this software to connect to multiple local or remote command line sessions at the same time and switch between them freely.
GNU Screen can be thought of as the command line interface version of a window manager. It provides a unified interface and corresponding functions for managing multiple sessions.
- session resume
As long as the Screen itself is not terminated, sessions running within it can be resumed. This is especially useful for users logging in remotely - even if the network connection is interrupted, the user will not lose control of the command line session they have opened. Just log in to the host again and execute screen -r to resume the session. Also when leaving temporarily, you can also execute the detach command to suspend the Screen (switch to the background) while ensuring that the programs inside are running normally. This is very similar to VNC under the graphical interface. - Multi-window
In the Screen environment, all sessions run independently and have their own numbers, input, output and window buffers. Users can switch between different windows through shortcut keys, and can freely redirect the input and output of each window. Screen implements basic text operations, such as copy and paste, etc.; it also provides scroll bar-like functions to view the history of window status. Windows can also be partitioned and named, and background window activity can be monitored. - session sharing
Screen allows one or more users to log in to a session multiple times from different terminals and share all the features of the session (such as seeing the exact same output). It also provides a mechanism for window access permissions and can password-protect windows. - GNU's Screen official site: http://www.gnu.org/software/screen/
screen installation command:
dnf install -y screen
Install the json parsing tool to make the output display more friendly when querying commands later.
dnf install -y jq nc
If there are no ifconfig and netstat -an commands, please install net-tools
dnf install -y net-tools
Check server port usage
netstat -lnpt
Run Bee
To run the bee node, you need to set a password for the first time. When typing, the characters will not be displayed on the screen. Please remember the password.
First create a new bee window
screen -S bee
Check your wallet address and enter the command:
bee-get-addr

After getting your wallet address, go to the official faucet to save water.
For specific water connection methods, please check: bzz mining official faucet, get ETH and gBZZ for free
Enter the following command to start bee
bee start --config /etc/bee/bee.yaml
curl -s http://localhost:1635/peers | jq '.peers | length'After normal startup, if you do not encounter startup problems, you can exit screen. Press ctrl+a and then press d to exit screen virtual CLI. At this time, the Bee client enters the background and you can close Xshell or perform other debugging. If you want to return To the previous Bee node window, you can use the command to return to the screen.
screen -r bee
Disable IPv6
If your server has IPV6 enabled, an error will be reported when starting the bee node.
"Error: init chain: dial eth client: dial tcp [::1]:8546: connect: connection refused"
Check if the server has IPV6 enabled
ip a | grep inet6

If there is a return from inet6, you need to disable IPV6
vi /etc/default/grub
Add ipv6.disable=1 in GRUB_CMDLINE_LINUX
Apply the new configuration: use grub2-mkconfig to generate a new grub boot file.
grub2-mkconfig -o /boot/grub2/grub.cfg

ip a | grep inet6
Check after entering the command. No inet6 is returned, and ipv6 has been successfully disabled.
Bee related commands
Start Bee: systemctl start bee
Stop Bee: systemctl stop bee
Restart Bee: systemctl restart bee
Set to start Bee at boot: systemctl enable bee
Set to disable Bee at boot: systemctl disable bee
Bee status: systemctl status bee
DeleteBee
If some irreversible errors occur during the installation process, please delete bee first and then reinstall it.
rpm -qa | grep -i bee

rpm -e bee-0.6.0-1.x86_64
rpm -e bee-clef-0.4.12-1.x86_64
or
yum remove bee
yum remove bee-clef
Data storage location
bee-clef
Configuration files are stored in /etc/bee-clef/
Key materials and other data are stored in /var/lib/bee-clef/
bee
Configuration files are stored in /etc/bee/
State, blocks and other data are stored in /var/lib/bee/
Turn off system firewall
Turn off the firewall service that comes with the system, and then set it to disable the firewall service at startup.
systemctl stop firewalld

systemctl disable firewalld


After getting your wallet address, head to the official faucet section.
There is no wallet address in the picture here, only the Ethereum node address. I followed your tutorial and there is indeed no wallet address. The wallet address should start with 0x.
Quickly install Swarm Bee on Centos7, including multi-node startup scripts
https://github.com/trustex/Document/blob/master/swarm/bee.md